
21 Newspaper Craft Projects: Functional Upcycled Paper Ideas

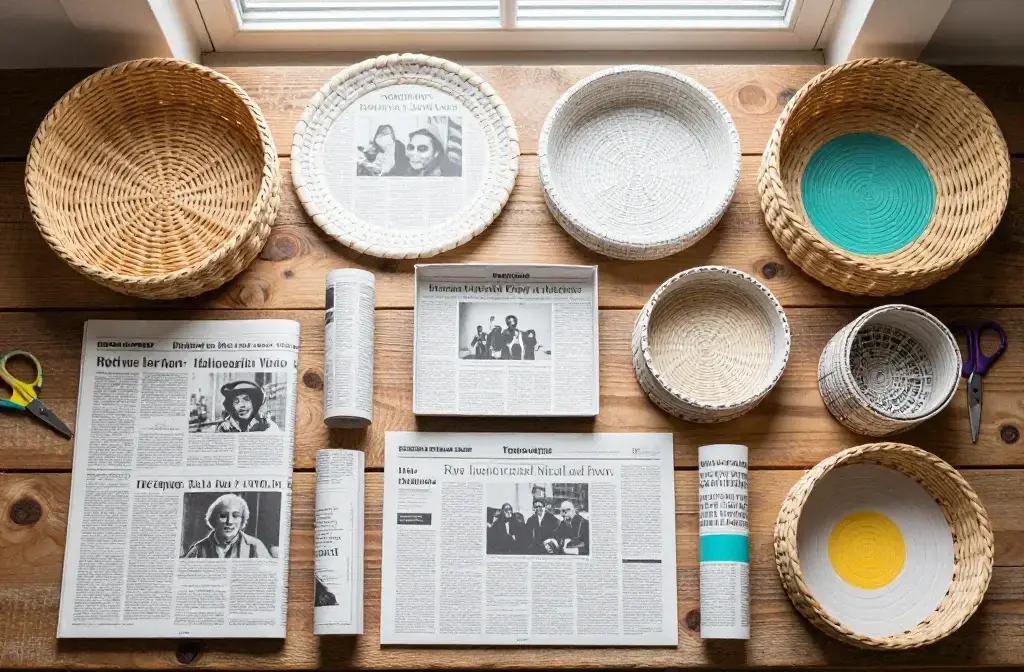
That stack of old newspapers sitting by the recycling bin is worth more than you’d think.
With a little folding, rolling, or weaving, plain newsprint turns into baskets, seedling pots, lampshades, jewelry, and even a working wall clock, no special tools or crafting experience required.
What makes newspaper such a good material to work with is how differently it behaves depending on the technique.
Rolled into tight tubes, it’s sturdy enough to build furniture-style frames. Woven flat, it holds its shape like a basket. Coiled and shaped, it becomes roses convincing enough to sit in a vase.
The printed text itself, whether it’s a headline, a comic strip, or a page of classifieds, becomes part of the design instead of something to hide.
This roundup covers 21 newspaper craft projects and up-cycled paper ideas, from quick, no-glue kitchen fixes to detailed sculptural pieces worth a whole weekend.
Some are practical, some are pure decoration, and a few genuinely surprised us with how far a rolled newspaper strip can go.
Grab a stack of old papers and pick a project to start with.
1. Rolled Newspaper Seedling Pots You Plant Straight Into the Ground
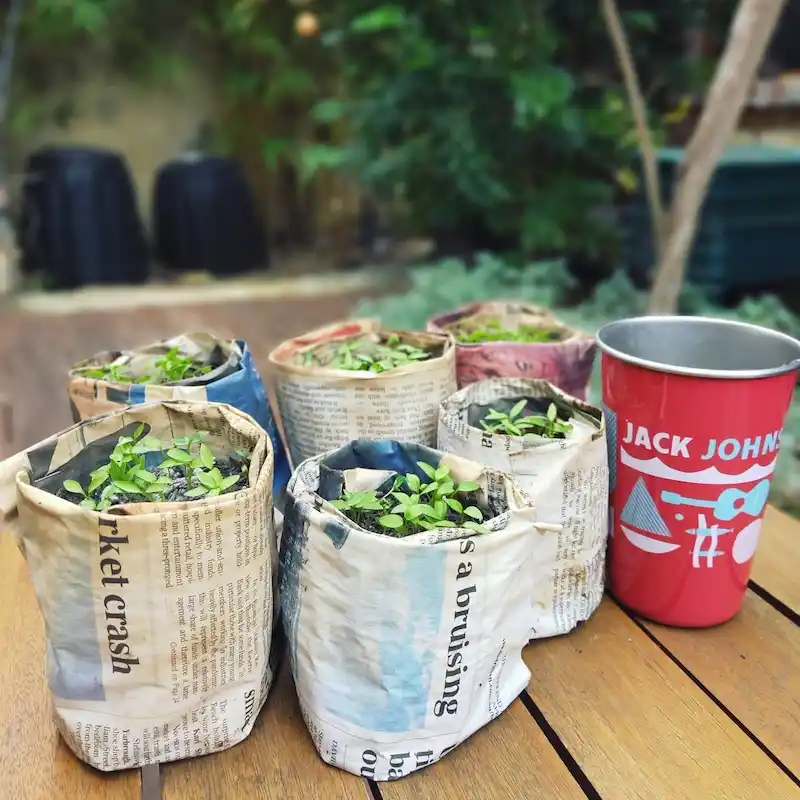
A metal cup makes an easy mold here, wrap newspaper around it a few layers thick, fold the bottom in, and slide it off to get a pot the exact right size for starting seeds.
Six little pots line up on this table, each one already sprouting seedlings, and none of them will need to be removed before planting.
Do this:
- Wrap several layers of newspaper around a cup or jar for strength before folding the bottom closed
- Fill with seed starting mix right after shaping, while the paper still holds its form
- Plant the entire pot directly into soil once seedlings are ready, the newspaper breaks down on its own
Skip this:
- Don’t use glossy magazine pages or anything with heavy colored ink, stick to plain newsprint for anything going into soil
- Don’t let the pots sit dry and empty for too long after shaping, unfilled paper pots lose their shape fast
2. Layered Newspaper Flowers With Vintage Button Centers
sonjazimsen1
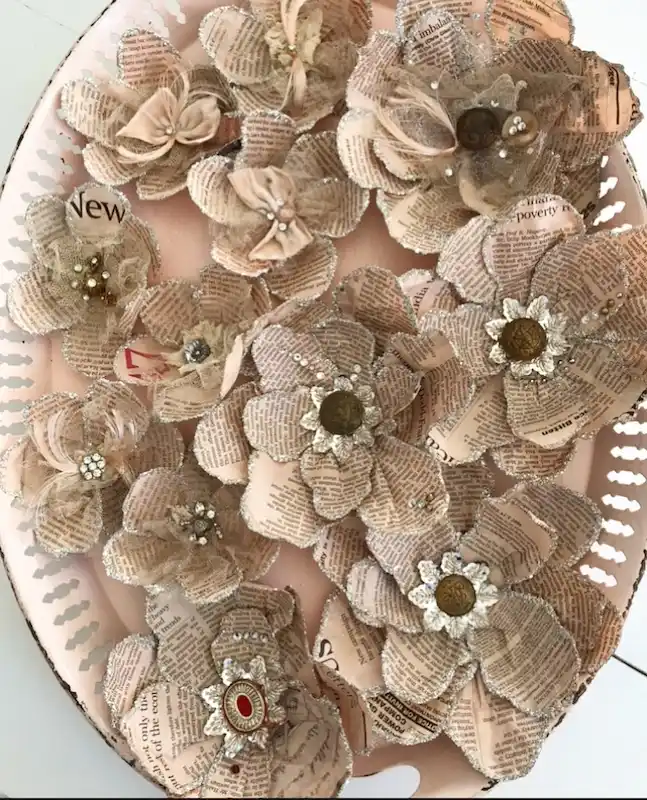
This one skips function entirely and goes straight for decoration, a whole tray full of paper flowers, each built from several layered petal shapes with soft, worn newsprint edges dusted in silver glitter.
What actually makes this collection interesting is the centers, no two match.
Vintage buttons, small beads, ribbon bows, and rhinestone clusters get pressed into the middle of each flower, turning ordinary newsprint into something that reads more like antique jewelry.
What you need:
- Newspaper cut into layered petal shapes, three or four per flower for depth
- Glue or a hot glue gun to stack and shape the petals
- Silver glitter or fine metallic edging for the petal tips
- Assorted small buttons, beads, or rhinestones for the centers
Curl each petal edge slightly before gluing layers together, using your fingers or a pencil to give the paper a soft, dimensional bend instead of lying flat.
A tray or shallow bowl like the one shown here doubles as both storage and display once the flowers are finished.
3. Sturdy Gift Bags Built From Folded Newspaper Pages
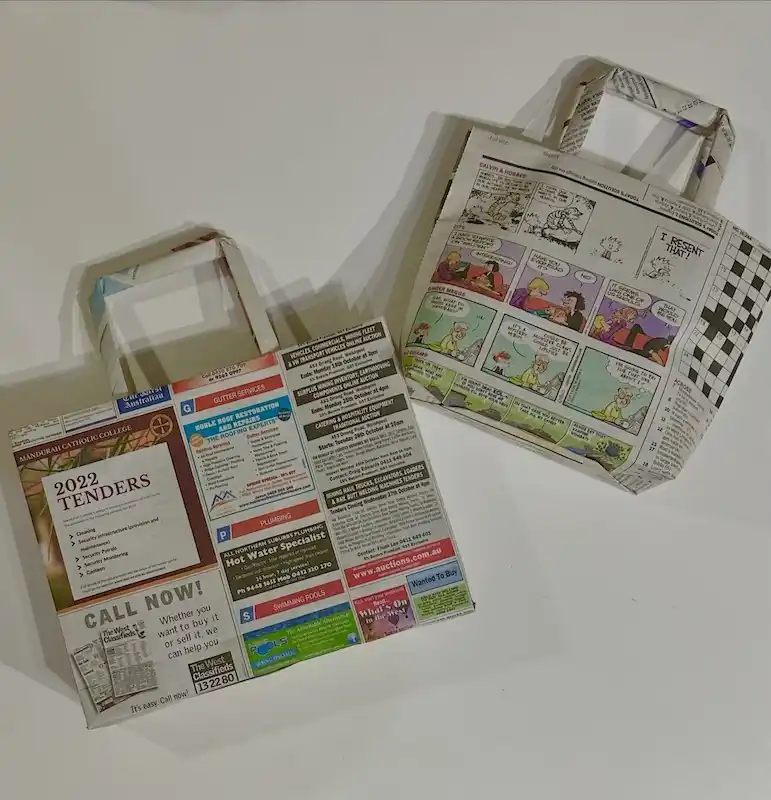
These two bags use whichever page happened to be on top, one wrapped in classified ads, the other in a comics and puzzles page, and both hold their shape well enough to carry an actual gift.
Boxy folded corners and a reinforced paper handle threaded through a punched hole give each bag real structure instead of the floppy look you’d expect from plain paper.
How to get this look:
- Fold a rectangle of newspaper into a flat-bottomed bag shape, similar to folding a paper lunch sack
- Reinforce the base and side seams with tape or a thin layer of glue so the bag holds weight
- Cut a separate strip of newspaper, roll or fold it into a sturdy handle, and tape or glue it in place at the top
- Punch small holes where the handle attaches for extra hold, especially if the bag will carry something with weight
The page you choose becomes part of the design here, comics and colorful ads read as playful, while a classifieds page gives a more understated, collage-like look.
4. A Wall Sculpture Built From Dozens of Pleated Paper Rosettes
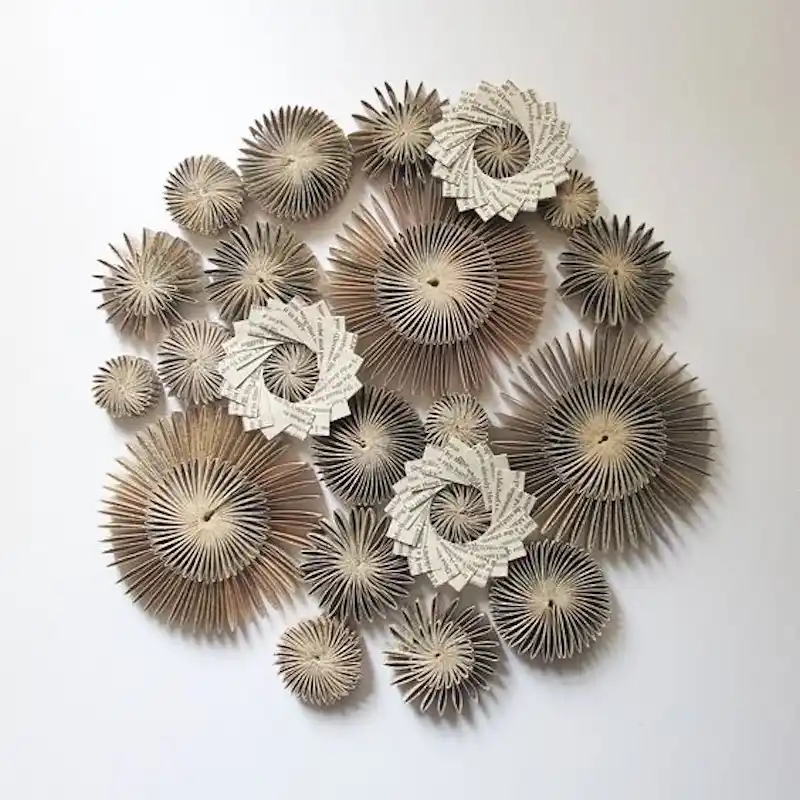
Every circle in this cluster is folded the same basic way, an accordion pleat curled into a spiral, but the sizes and colors vary enough that the whole piece reads as a coral reef instead of a repeated pattern.
Aged, brown-toned newsprint mixes with brighter white pages that still show visible text through the folds, and clustering dozens of them together at different scales is what turns a simple fold into a real wall piece.
What works here:
- Sizing the rosettes in at least three or four different scales prevents the cluster from looking uniform or grid-like
- Mixing yellowed, older paper with cleaner white pages adds visual depth without needing any paint or dye
- Leaving some rosettes flatter and others more tightly spiraled gives the whole piece texture and shadow variation
- Gluing pieces directly to a wall or backing board in an organic, clustered layout, rather than a straight grid, is what sells the coral or sea urchin look
Save this project for scrap pages and torn sections you’d otherwise toss, since each rosette only needs a single sheet, and a piece this size can use fifty or more.
Each rosette starts as a simple accordion fold before being curled into a spiral and glued at the center.
Narrower pleats create a spikier, sea urchin look, while wider ones flatten out more like a coral disc.
Lay the whole arrangement out loose first, so you can adjust spacing before anything gets permanently attached.
5. A Handmade Envelope Folded From a Book or Dictionary Page
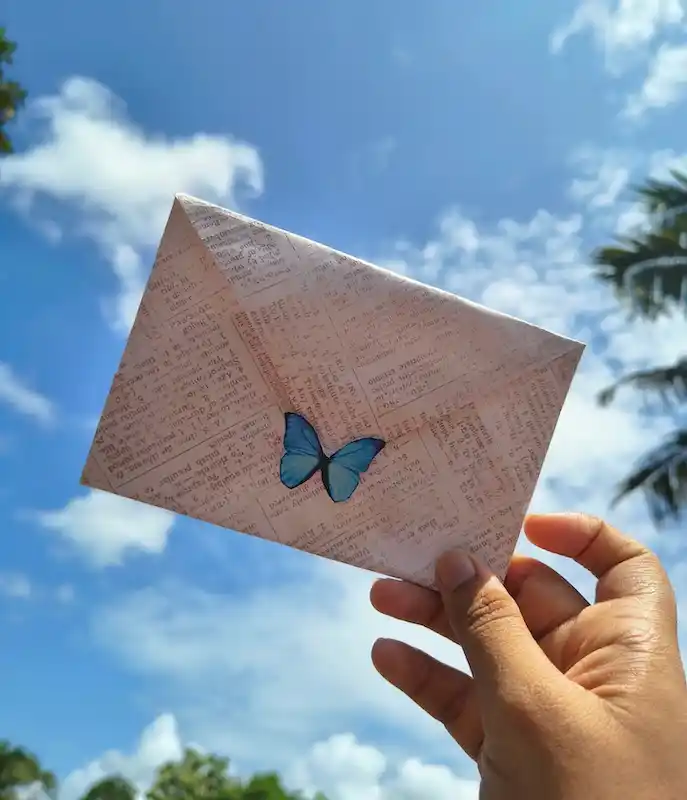
This envelope comes from a printed reference page, dense columns of small text and definitions, folded into a clean triangle-topped shape and finished with a single blue butterfly sticker as the only decoration.
The warm, aged tone of the paper does most of the visual work here, no extra color needed beyond that one small accent.
- The dense, small-print text reads better at this scale than a typical newspaper column would, so save reference pages or dictionary spreads specifically for this project
- A single well-placed sticker or stamp keeps the envelope from looking too busy against all that text
- Standard letter-folding techniques apply directly, this uses the same basic triangle-flap fold as any homemade envelope pattern
Good to know: an envelope like this holds up fine for mailing small, lightweight items, but test the fold on a spare sheet first if you plan to actually send it, since page weight varies a lot between a newspaper and a book.
Book and dictionary pages fold crisper than newsprint since the paper is slightly heavier, which makes this project a good use for an old paperback you’re already recycling.
6. A Woven Newspaper Basket for Hiding Chargers and Cables
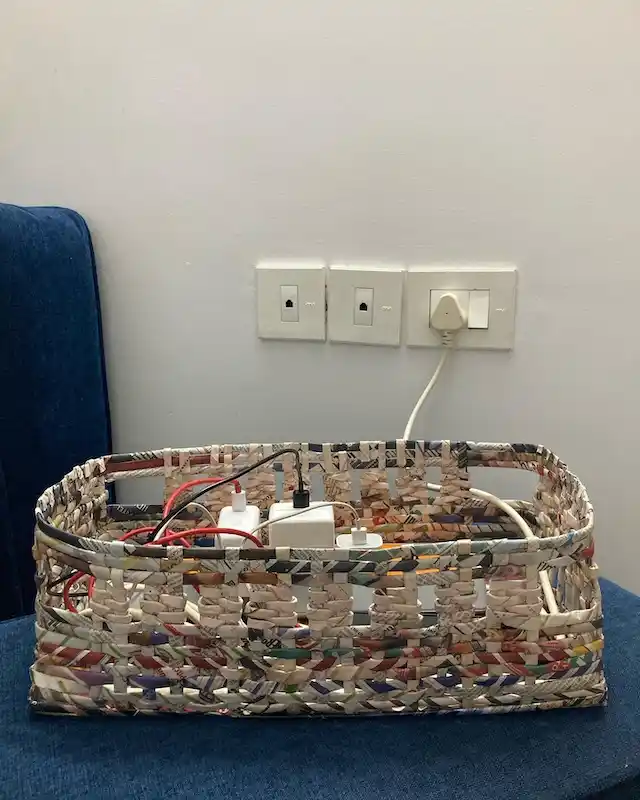
Instead of tucking chargers behind furniture where they tangle and collect dust, this open-weave basket sits right out on a side table, holding a small pile of plugs and adapters where they’re easy to grab but no longer visible as clutter.
The weave pattern is loose enough that cords can run in and out through the gaps, so the basket doesn’t trap cables, it just organizes them.
What works here:
- An open, gappy weave lets cords pass through the sides freely instead of forcing everything to exit from one spot
- Mixed colored strips from different newspaper sections give the basket visual texture without needing any paint
- A low, wide shape works better than a tall basket for this specific use, since chargers and small adapters need width more than depth
- Placing it directly below the outlet it’s servicing means one basket handles the mess for an entire power strip setup
This is one of the more practical entries on this list, since it solves an actual daily annoyance, tangled charger cords, rather than being purely decorative thing, folding, or gluing beyond shaping paper to fit whatever storage you already have.
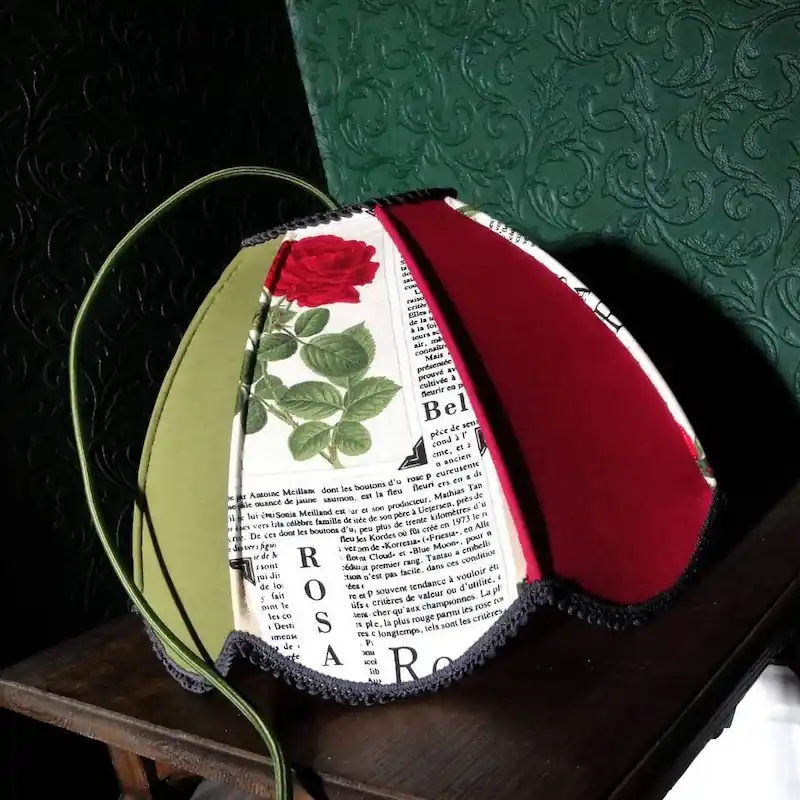
7. A Segmented Lampshade Mixing Newsprint Panels With Solid Fabric
katie.made
Print and plain color alternate around this dome-shaped shade, olive green, a printed panel with French newspaper text and a botanical rose illustration, then deep red, repeating in wedge-shaped sections that meet at a curved seam finished in black trim.
It’s a genuinely different use for newspaper than anything else on this list, folded flat and stiffened enough to function as a rigid lampshade panel rather than something soft or pliable.
Do this:
- Back the newspaper panel with fabric or interfacing before shaping, so it holds a curved form and doesn’t sag near heat
- Alternate printed panels with solid fabric ones rather than using newsprint all the way around, so the text stays a feature, not the whole shade
- Finish every seam with trim or piping, the black edging here is what keeps raw paper edges from fraying or looking unfinished
Skip this:
- Don’t use raw, unbacked newspaper directly over a bulb, heat and fragile paper make a poor combination
- Don’t skip a heat-safe liner or use anything but a low-wattage or LED bulb inside a shade built this way
| Newsprint Panels | Solid Fabric Panels |
|---|---|
| Carry the visual interest and text detail | Give the eye a resting point between printed sections |
| Need backing for rigidity and heat safety | Add sturdiness on their own without extra reinforcement |
| Best kept to one or two panels per shade | Can make up the majority of the shade’s structure |
8. Dyed Newspaper Coasters With Rainbow Ring Patterns
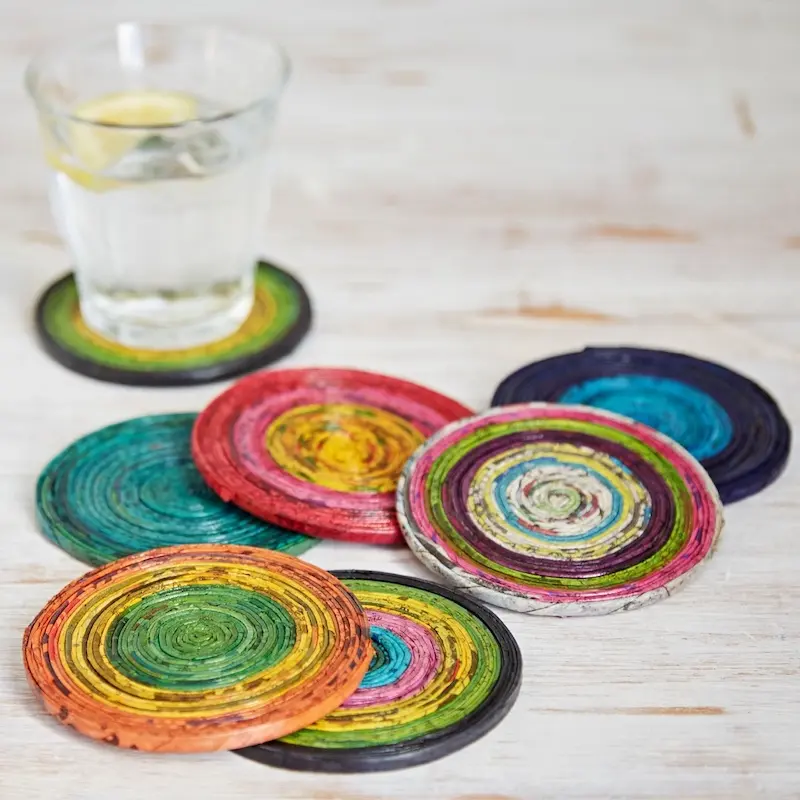
paperhighuk
This set takes the coiled coaster idea from earlier in a bolder direction.
Rather than relying on whatever colors happen to print naturally on the page, each strip of newsprint gets dyed or painted before rolling, so the rings spiral through deliberate color combinations, teal into black, orange into green, a whole rainbow packed into pink and purple on one piece alone.
Do this:
- Dye or paint newspaper strips in batches before rolling, letting them dry fully so color doesn’t transfer or smear during the coiling process
- Plan a color order for each strip so the rings build in a sequence, rather than random splotches once rolled
- Seal the finished coaster with a clear coat, since a piece meant to sit under a wet glass needs real moisture resistance
Skip this:
Don’t use water-based paint without a topcoat, since it can reactivate and bleed the moment a cold drink sweats onto the surfacedom mix.
Don’t skip the sealant here specifically, unlike decorative coils, a coaster gets direct contact with condensation and spills regularly
9. A Woven Newspaper Basket With a Stitched Rim
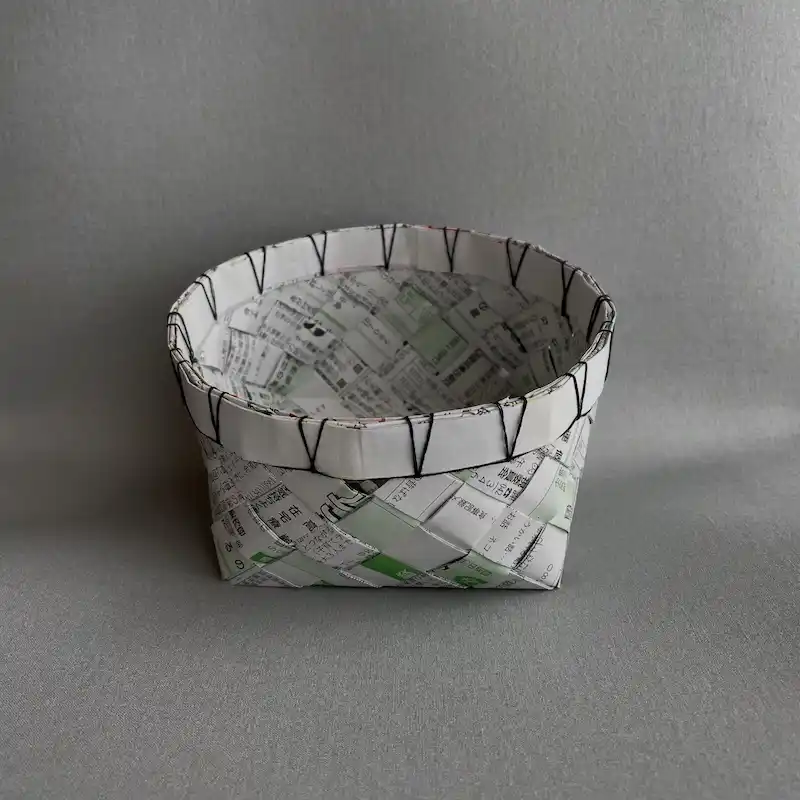
1011sachiko
Strips of newspaper get plaited together into a sturdy little basket here, tight enough to hold its shape without a mold underneath.
The real standout detail is the top edge, black thread laced through the rim in an X pattern, the way you’d bind a book, which finishes the raw paper edge and keeps the whole thing from unraveling with use.
What you need:
- Newspaper cut into even strips, wide enough to weave without tearing
- A basic under-over weave pattern for the sides and base
- Strong thread or embroidery floss for stitching the rim
- A large needle to pull thread through the woven paper edge
Weaving the base flat first, then folding the strips upward to weave the sides, is what gives this basket its shape without any glue holding it together.
The printed text staying visible through the weave is part of the look here, not something to hide, so save newsprint pages with interesting type or graphics for the outer layer.
10. A Full Door Wreath Covered in Coiled Paper Roses
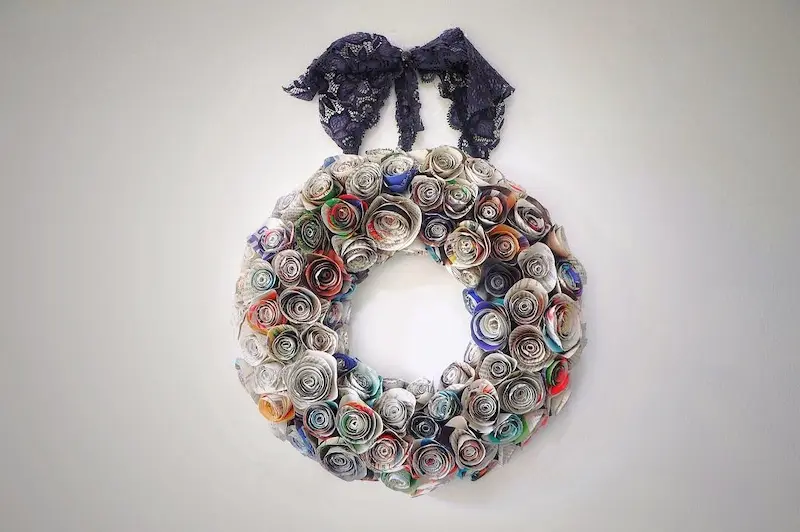
artera_world
Dozens of coiled roses, each in a different color pulled from mixed newspaper and magazine scraps, get packed edge to edge around a circular base here, dense enough that no gaps show through to the ring underneath.
A wide navy lace ribbon knotted at the top turns it into something ready to hang on a front door, not just sit on a shelf.
What you need:
- A circular wreath form, foam or cardboard, to build the roses onto
- Mixed colorful paper scraps, magazine pages work especially well for variety here
- Hot glue for attaching each rose directly to the form
- Wide ribbon for the hanging loop and bow
Building a wreath this full takes real volume, expect to need somewhere between fifty and a hundred individual roses depending on the base size, so this is a project worth spreading across a few sittings rather than finishing in one go.
Working color by color rather than randomly placing roses as you make them tends to give a more balanced spread once the whole ring is covered.
Make roses in batches over several days rather than trying to finish a wreath this full in one sitting.
11. A Tiny Papier-Mâché Figure Sitting on a Stack of Book Sculptures

artiruma
This is the most detailed project on the list by far, a small figure with a sculpted head, wire-frame glasses, and a printed newspaper dress, seated on a stack of miniature books, each one bound in a different colored cover.
Even her shoes are wrapped in tiny strips of text, and the open book she’s holding is folded and shaped to look genuinely mid-page.
A figure like this takes real time, and a few techniques stand out:
- The head and limbs are built up in papier-mâché over a wire armature, giving the figure enough structure to sit and pose
- Newspaper text gets used as a print pattern for clothing and shoes, chosen deliberately for scale so the words read at this tiny size
- The stacked books beneath her are their own separate project, each one folded and bound in miniature with a different colored spine
- Small painted details, the glasses frames, hair color, add the final touch that turns a paper sculpture into a character
This is not a weekend project. If you’re newer to papier-mâché, start with a simpler shape before attempting a full figure with a pose and separate accessories like this one.
12. A Branch Full of Origami Cranes Folded From Book or Newspaper Pages
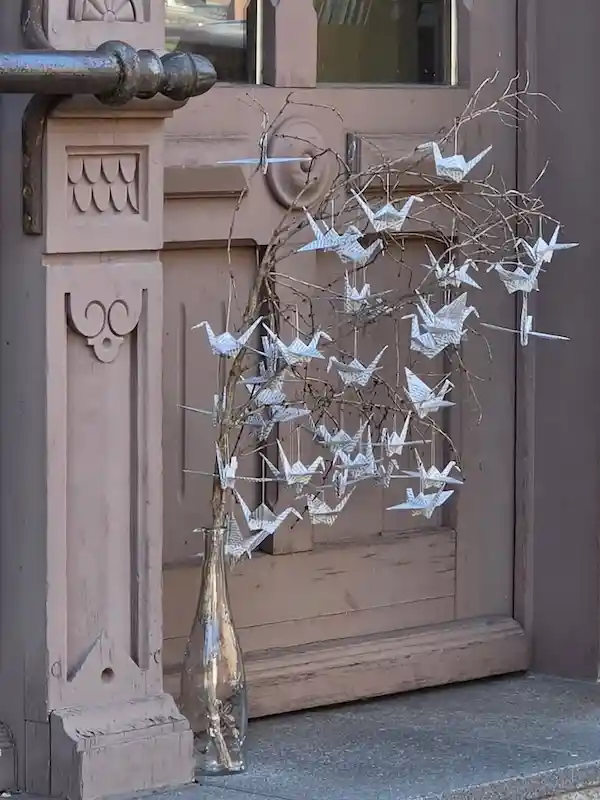
bookogami
Dozens of small paper cranes hang from a bare, forked branch here, each one folded from printed text pages and strung at a different height, so the whole arrangement fills out like leaves on a tree.
A simple glass bottle holds the branch upright, turning what’s essentially a handful of folded paper into a full entryway display.
How to get this look:
- Fold standard origami cranes using squares cut from newspaper or book pages, printed text adds visual texture that plain paper doesn’t have
- Thread a length of clear thread or fine string through the top of each crane
- Gather a few bare branches with some natural forking, then place them in a bottle or vase heavy enough to keep them upright
- Tie cranes on at varying heights and depths through the branches, rather than lining them up evenly, so the finished piece has real dimension
Skip this: don’t crowd every crane onto the front-facing branches only, tucking some further back into the structure is what makes the arrangement look full from every angle, not just head on.
13. A Miniature Motorcycle Sculpted From Rolled Newspaper and Paint
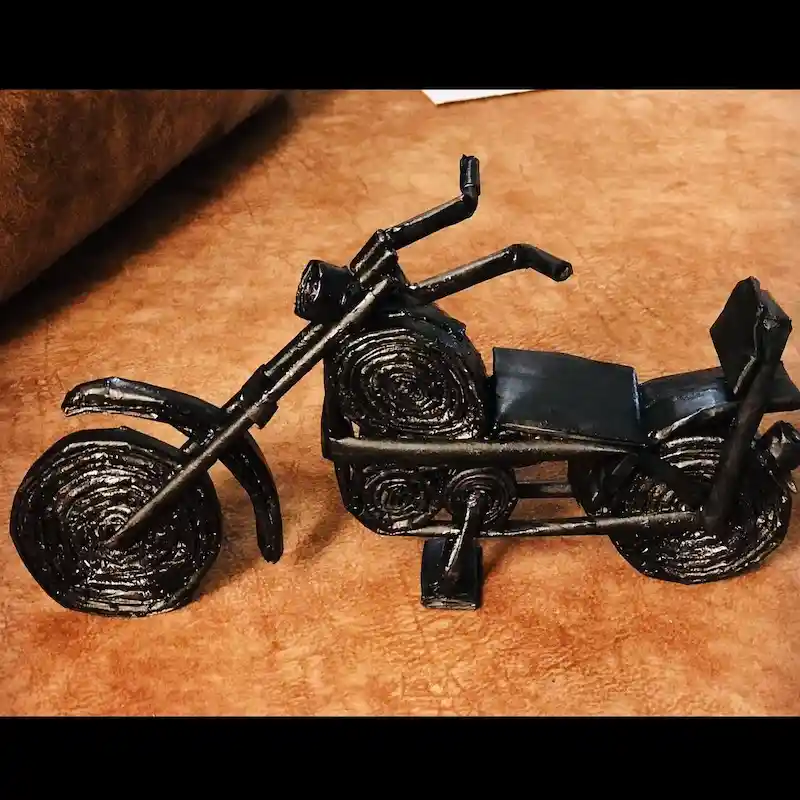
Look past the black finish and the coiled construction gives it away, this motorcycle’s wheels and body panels are built from tightly rolled newspaper tubes, shaped and fitted together into a full vehicle frame before getting a solid coat of paint.
The rolled coils double as tires and engine details, so the paper’s own shape becomes part of the model rather than something to hide.
A build like this comes together in stages:
- Frame first: Rolled paper tubes get shaped and glued into the basic motorcycle silhouette, wheels, handlebars, seat, and body all built as separate coiled or shaped pieces
- Assembly: Pieces join together with strong glue at each connection point, wheels attached last since they need to sit level for the model to balance upright
- Finishing: A solid black paint coat unifies every piece and hides the newsprint entirely, turning soft paper into something that reads as metal from a few feet away
This project rewards patience over speed, since a wobbly wheel or a poorly glued joint becomes obvious the moment you try to stand the finished piece up.
Raw coiled newsprint tubes, visibly paper, held together with glue at every joint.
A solid black finish that reads as cast metal, with the coiled texture still visible as tire tread and detail.
14. A Miniature Swing Set Built Entirely From Rolled Paper Tubes
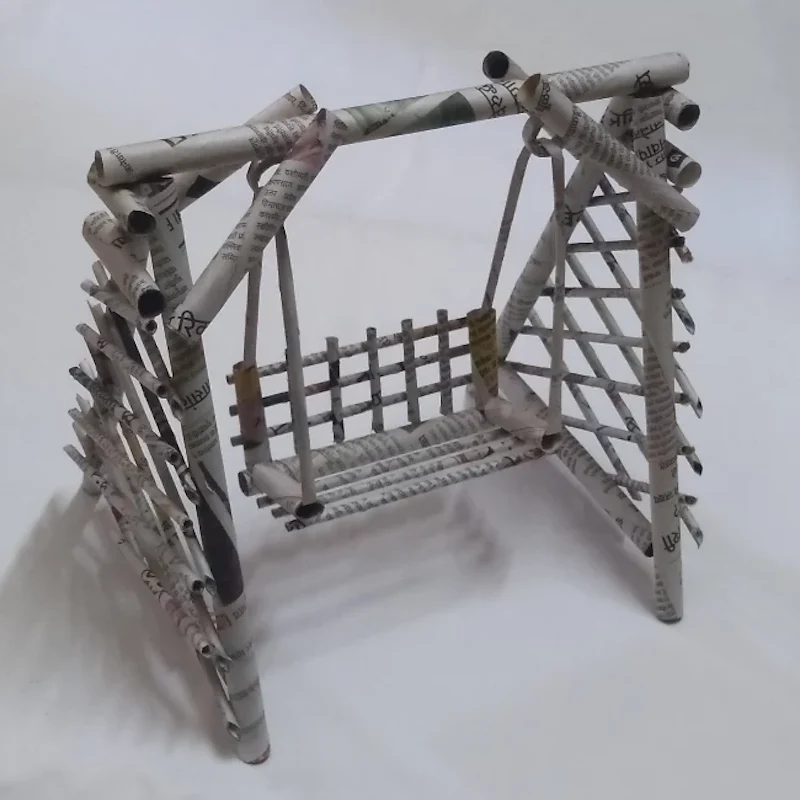
Skip glue and structure entirely comes from woven paper tubes here, an A-frame stand supports a swinging seat woven like a tiny cane chair, with a diagonal lattice pattern filling in the two side panels.
Every single piece, the frame, the crossbars, the seat, the woven diagonals, is rolled from a strip of newspaper into a rigid tube first, then assembled into the final shape.
Building a structure like this comes down to two skills working together:
- Rolling consistent tubes: Every tube needs to be roughly the same diameter and stiffness, since the whole structure’s strength depends on the tubes acting like miniature wooden dowels rather than floppy paper
- Weaving the seat and side panels: The crosshatch pattern in the seat and lattice walls comes from weaving thinner rolled strips over and under each other, the same basic principle as a woven basket base
Let each rolled tube dry completely before assembling.
A tube that’s still slightly soft will bow under weight once the structure stands on its own legs.
A frame this detailed likely uses well over fifty individually rolled tubes once you count the lattice panels and seat weave.
Where tubes cross and connect at corners is the weakest point structurally, so those joints benefit from extra wrapping or reinforcement.
Even well built, rolled paper cannot support meaningful weight, so this stays decorative rather than functional at full scale.
15. A Woven Newspaper Vase, Shown Both Raw and Painted Gold
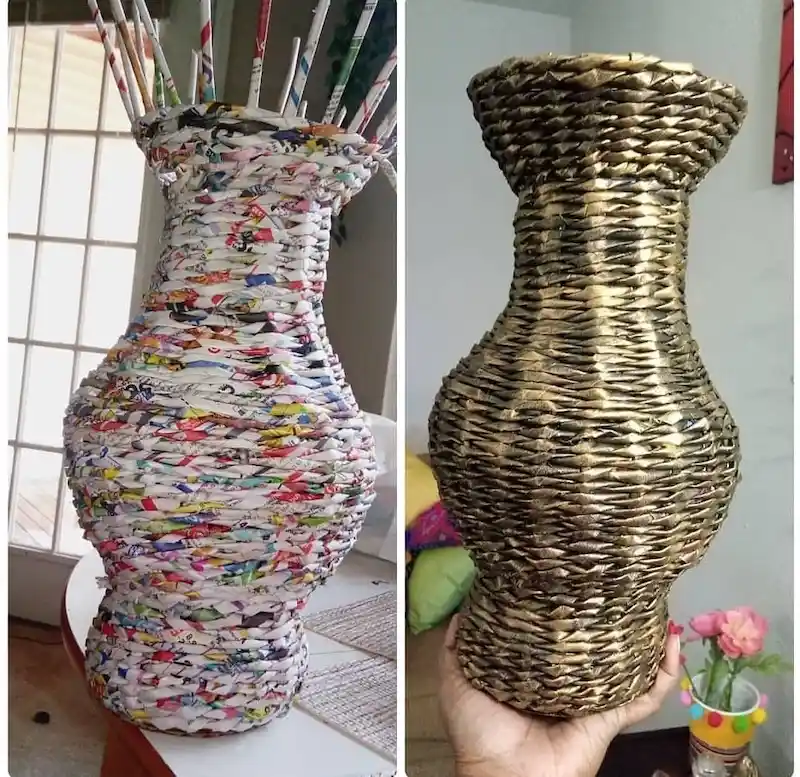
Side by side, these two photos actually show the same technique at two different finish points.
On the left, colorful rolled paper coils weave up into a full curved vase shape, the multicolor print sections still fully visible.
On the right, the same woven method gets coated entirely in gold paint, turning what looks like a paper craft into something that could pass for a real decorative vase from across a room.
Do this:
- Weave the vase’s curved shape using rolled paper coils over a bottle or form for structure, working the coils in and out to build the narrow neck and wider body
- Choose mixed, colorful newspaper sections if you want the woven texture to stay visible as the final look
- Coat the entire finished piece in metallic spray paint if you want the gold, sculptural finish shown here instead
Skip this:
- Don’t rush the paint coverage if going for the metallic look, gaps in coverage break the illusion of solid material fast
- Don’t remove the internal form too early, the vase needs to hold its shape fully before it can stand on its own
One woven paper shape can go two completely different directions, colorful and rustic, or painted and polished, just by choosing a finish.
16. A Small Crate-Style Shelf Built From Rolled Newspaper Rods
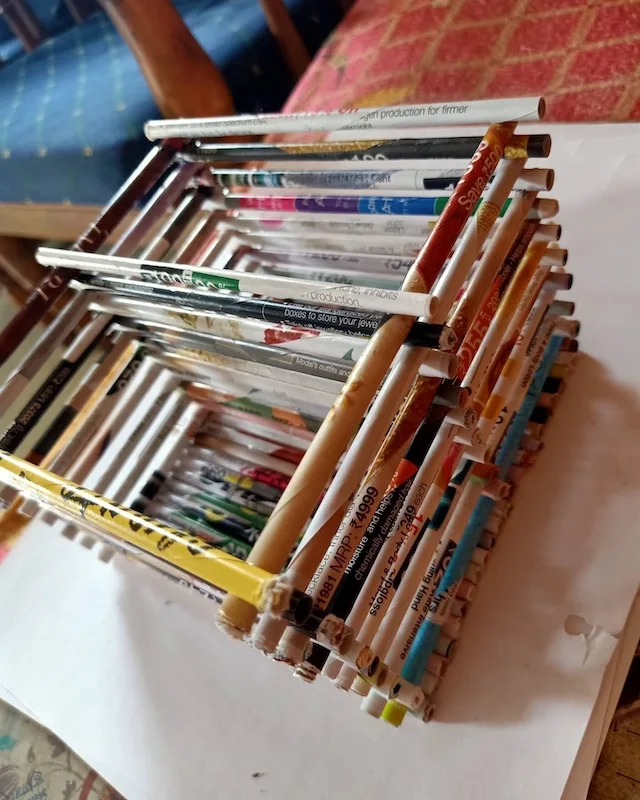
Rolled magazine and newspaper strips, printed ads, prices, and headlines still fully visible, get stacked and glued together here in a crisscross grid, the same basic construction logic as a wooden crate but built entirely from rolled paper rods instead of dowels.
Bright colored inserts break up the rows, so the printed text becomes a design element rather than something to disguise.
What works here:
- Each rod gets rolled from magazine or catalog pages rather than plain newsprint, since the heavier stock and colored print hold shape better under a grid structure like this
- Rods are stacked in a crisscross pattern, alternating direction layer by layer, similar to log cabin construction, so the structure gains rigidity from the overlap itself
- Leaving the printed text and prices fully visible rather than painting over them keeps the piece feeling collaged and intentional rather than hidden
- A shape this open works well as a small shelf or magazine rack, since the gaps between rods let you see what’s stored inside
Glue every intersection point where rods cross, not just the outer frame.
The strength of a stacked grid like this comes from every single crossing point being secure, not just the corners.
17. A Rolled Newspaper Lamp With Wired LED Lights Inside
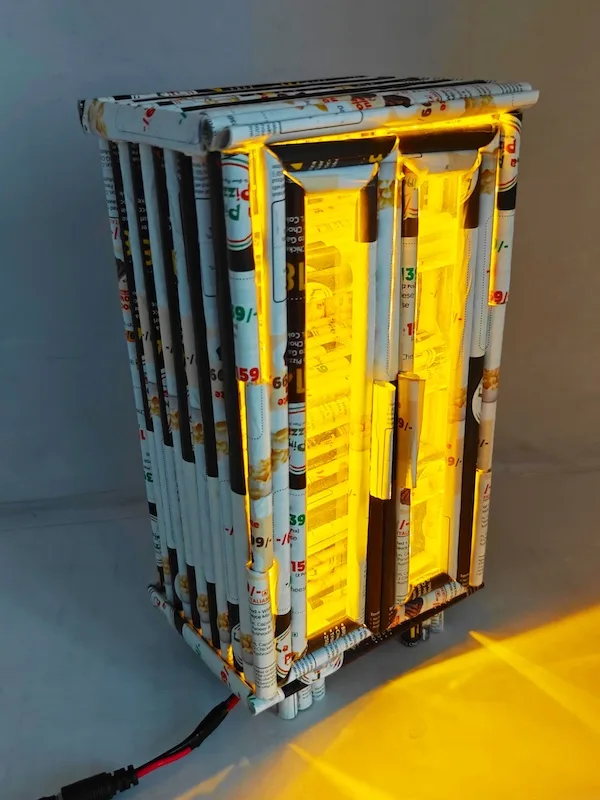
Rolled newspaper tubes stand upright here in a rectangular cage shape, and a warm LED strip wired inside glows straight through the gaps between rods, printed pizza ad text and prices catching the light from behind.
A visible plug cord running out the base confirms this isn’t just decorative, it’s a working lamp built entirely around rolled paper as its outer shell.
What you need:
- Rolled newspaper tubes cut to consistent height for the vertical bars
- A rigid internal frame or base to hold the tubes upright and evenly spaced
- A warm-toned LED strip light, plugged version rather than battery, for steady illumination
- Wiring routed out through the base or back, kept away from where rods make contact
Good to know: the gaps between tubes are what make this design work, since the light needs somewhere to escape. Spacing tubes too tightly together blocks the glow entirely and defeats the purpose of building a lamp this way.
18. A Statement Ring Made From a Rolled Newspaper Disc
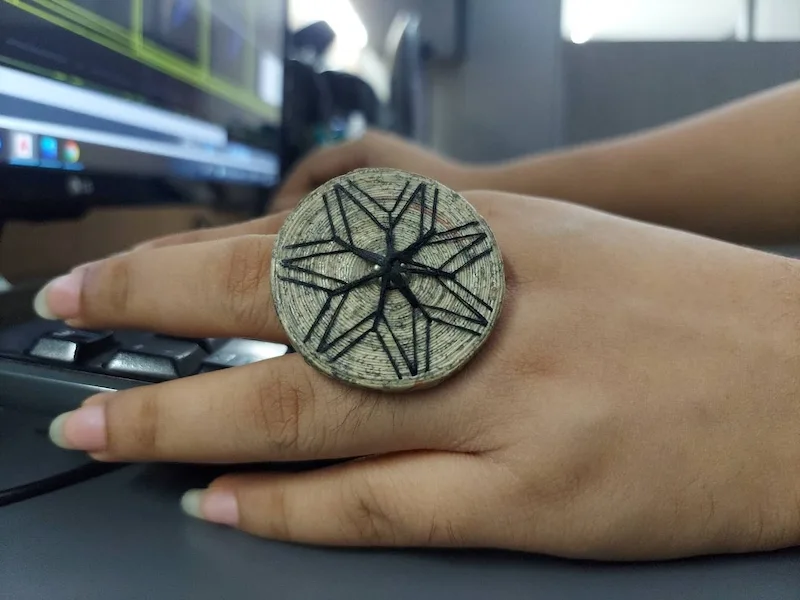
Rolled tightly enough that the paper’s edge stripes look almost like tree rings, this ring’s flat top disc gets a hand-drawn geometric star pattern inked directly onto the surface, sealed under a glossy finish that gives it real shine.
It’s a genuinely wearable piece of jewelry, no bigger than any statement ring you’d buy in a store, made entirely from the same rolled paper technique used for baskets and vases earlier on this list, just scaled way down.
How to get this look:
- Roll newspaper tightly into a coiled disc, building it up in a spiral until it reaches the width you want for the ring top
- Sand or trim the flat top and bottom of the disc smooth once fully dry
- Draw or paint a geometric line pattern directly onto the paper surface using a fine permanent marker or paint pen
- Attach the disc to a metal or wire ring band, then finish the whole top with a clear glossy sealant to protect the design and give it shine
Small-scale coiled projects like this one are a good way to use up narrow leftover strips too thin or short for bigger builds like baskets or vases.
19. A Woven Photo Frame Trimmed With Rolled Paper Roses
k4craft
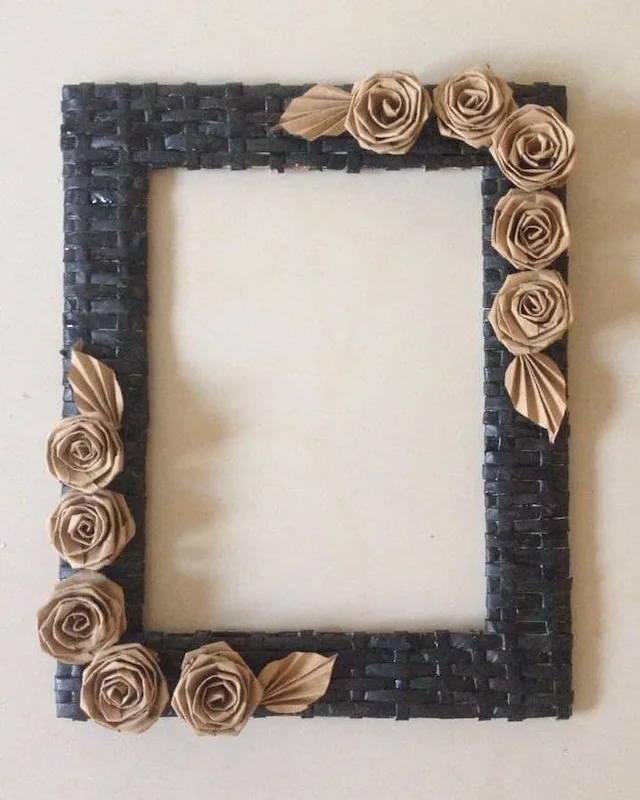
Newspaper strips get woven flat here into a black-painted frame border, basket weave technique applied to a rectangular shape instead of a bowl.
What sets this one apart is the corner and edge decoration, small coiled paper roses in a warm tan tone, clustered in twos and threes along two corners rather than spread evenly around the whole border.
What works here:
- The frame’s woven base gets painted a solid dark color first, which makes the natural tan paper roses stand out sharply against it
- Roses are grouped unevenly, more concentrated at the bottom left and top right corners, giving the piece an asymmetric, natural feel instead of a stiff, evenly spaced border
- Small pointed leaf shapes, folded from the same paper as the roses, get tucked between blooms to break up the round shapes
- Leaving the woven texture visible on the black-painted sections adds depth that a flat painted frame wouldn’t have
This project pairs two techniques already covered separately elsewhere on this list, flat weaving and coiled roses, combined into a single functional piece rather than kept as two different projects.
20. A Bouquet of Rolled Paper Roses on Wire Stems in a Mason Jar
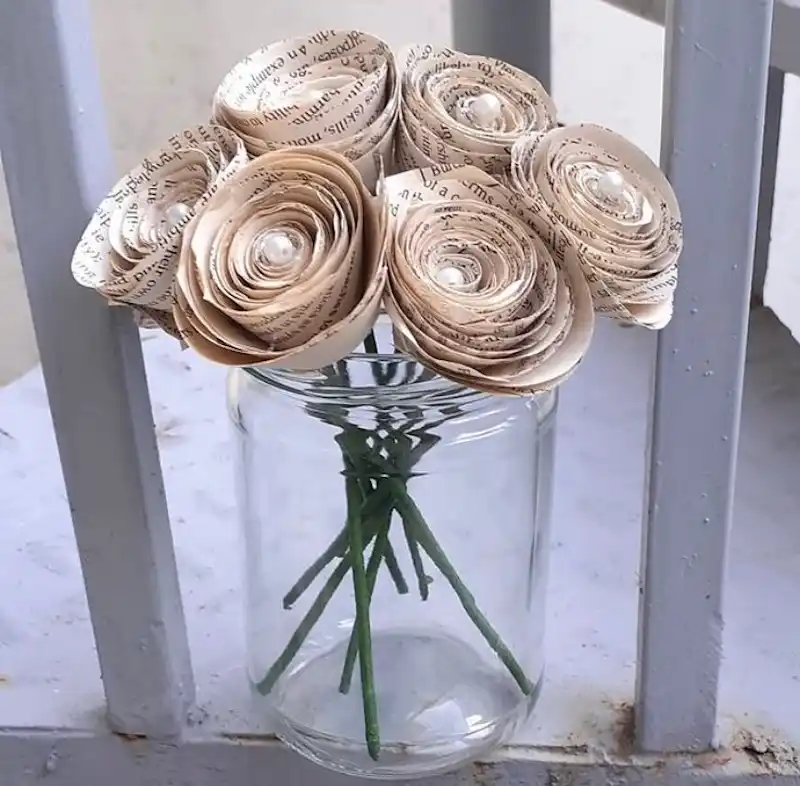
Six roses stand in a plain glass jar here, each one built from a printed page rolled into a spiral bloom, with a single pearl bead pressed into the center of every flower.
Green floral wire stems run down into the jar, giving the whole arrangement the shape and structure of a real cut bouquet rather than something obviously flat or paper-thin.
How to get this look:
- Cut a long spiral strip from a printed page, then roll it from the outside in to form a coiled rose shape
- Glue the base of each rose to hold the coil together, gluing a small pearl bead into the center once the rose is formed
- Attach a length of floral wire to the base of each rose, wrapping with floral tape to hide the connection point
- Bend and trim the wire stems to varying heights before arranging the finished roses together in a jar or vase
A plain glass jar works better here than a decorative vase, since it lets the green stems show through and keeps the focus entirely on the roses themselves.
21. A Square Wall Clock Built From Rolled Newspaper Strips
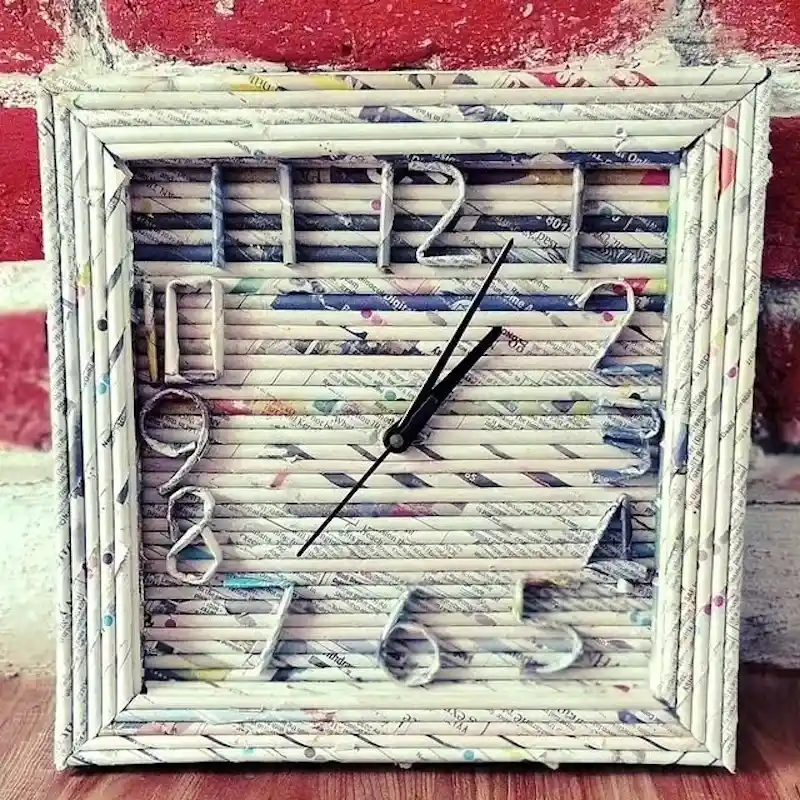
Every element of this clock, the frame, the horizontal ridged face, and even the numbers themselves, comes from rolled or shaped newspaper.
Thin coiled tubes get bent and shaped into each numeral, then glued onto the striped paper face, while a working clock mechanism sits mounted behind it all, hands ticking across a surface that’s entirely handmade paper.
Do this:
- Build the square frame from thicker rolled tubes for rigidity, since it needs to support the clock mechanism’s weight
- Shape individual numerals by bending thin rolled paper strips into curved and straight number forms, gluing each one flat onto the clock face
- Use a standard clock mechanism kit, drilling a center hole through the paper face for the hands to mount through
Skip this: don’t skip sealing the finished clock face with a matte varnish, since a piece meant to hang and be touched occasionally needs more durability than raw newsprint alone provides.
A basic clock mechanism kit with hands is inexpensive and widely available, and it works with almost any flat surface you drill a center hole through, paper included.
Essential Supplies and Tools
The beautiful thing about newspaper crafts is that you probably already have most of what you need lying around. Here’s the basic toolkit:
- Newspapers (obviously) – grab extras from recycling centers if you need more
- White glue or mod podge – for sealing and adhering
- Flour and water – makes a great alternative paste
- Scissors or a craft knife – sharp ones make life easier
- Paint and brushes – acrylics work best
- Sealant or varnish – protects finished projects
- Wooden skewers or knitting needles – for rolling tight tubes
Advanced crafters might want to invest in a bone folder for crisp creases, various sizes of round molds, and maybe some decorative stamps or stencils.
But honestly? You can create amazing stuff with just the basics.
Tips for Working with Newspaper
Choose Your Paper Wisely
Not all newspaper is created equal. Thinner paper works better for delicate projects like lampshades, while thicker sections are better for sturdy items like baskets.
The glossy advertising inserts? Those are trickier to work with because glue doesn’t adhere as well, but they can add cool color pops to your projects.
Save your favorite sections—maybe you want only crossword puzzles, or perhaps you’re into the aesthetic of old sports scores. The content of the paper can add personality to your finished piece.
Master the Tight Roll
If you’re making anything with newspaper tubes, tightness matters. Loose, floppy tubes won’t give you the structural integrity you need. Roll them as tightly as possible around your skewer, and secure the end with just a tiny dab of glue. The tighter the roll, the stronger your final project.
Some people like to dampen the newspaper slightly before rolling to make it more pliable, but this is optional. Experiment to see what works for you.
Seal Everything
Unless you want your hard work to disintegrate the first time it gets damp, seal your projects properly. Mod podge, diluted white glue, or clear acrylic sealant all work great. Apply multiple thin coats rather than one thick coat to avoid warping.
For items that might get wet (like coasters or plant pots), use a waterproof sealant designed for outdoor use. Your future self will thank you.
Frequently Asked Questions:
Will newspaper crafts look cheap or tacky?
Not with good sealing and paint. A polished finish, not the material, is what makes a project look intentional.
How long do newspaper crafts last?
Years, if sealed properly and kept away from moisture.
Is the ink from newspapers safe to handle?
Yes, most modern newspaper ink is soy-based and non-toxic, though it’s still worth washing your hands after.
Can I use magazines instead of newspapers?
Yes, magazine pages add color but need stronger glue since the pages are glossier.
Do I need artistic skills to make these projects?
No, most projects rely on patience and repetition rather than any artistic talent.
What’s the best way to store newspaper for crafting?
Keep it dry, sorted by section or color if you’re picky, in a box or bin away from pests.
Conclusion
Newspaper crafts offer this perfect combination of sustainability, creativity, and practicality that’s hard to beat.
You’re taking something destined for the recycling bin and transforming it into functional items that actually improve your space.
Plus, there’s something genuinely satisfying about making useful things with your own hands—especially when those things cost you basically nothing.
Start with a simple project like coasters or a small basket to get the hang of working with newspaper.
Once you’ve got the basics down, you’ll probably find yourself eyeing that recycling bin differently, seeing potential instead of waste.
Who knows? You might even become that person who asks friends to save their newspapers for you. And honestly? That’s a pretty cool person to be.