
22 Holiday Resin Craft Ideas to Make and Gift This Season

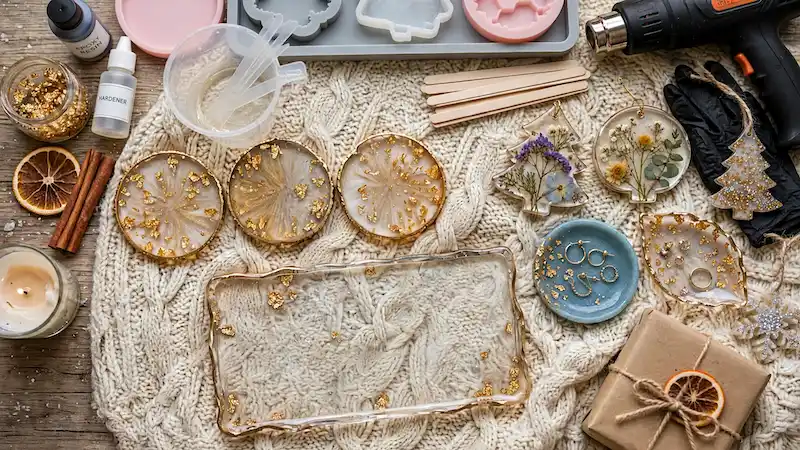
A gift card. Something forgettable by New Year’s. Resin crafts solve that problem in a way most homemade gifts can’t.
They look polished and expensive, but they come together with basic supplies and a little patience, which makes them one of the best holiday resin craft ideas to make and gift this season.
What makes resin so good for holiday giving is how much you can do with one batch.
Mix a single pour, split it across a few molds, and you walk away with ornaments, coasters, or keychains that all feel personal even though you made them in an afternoon.
Every piece cures a little differently, so no two ever look exactly the same.
Below are 22 festive resin projects worth trying this year, from quick weeknight makes to pieces that take a bit more time and care.
Pick a few that catch your eye and start there.
1. Light-Up Resin Winter House Lantern
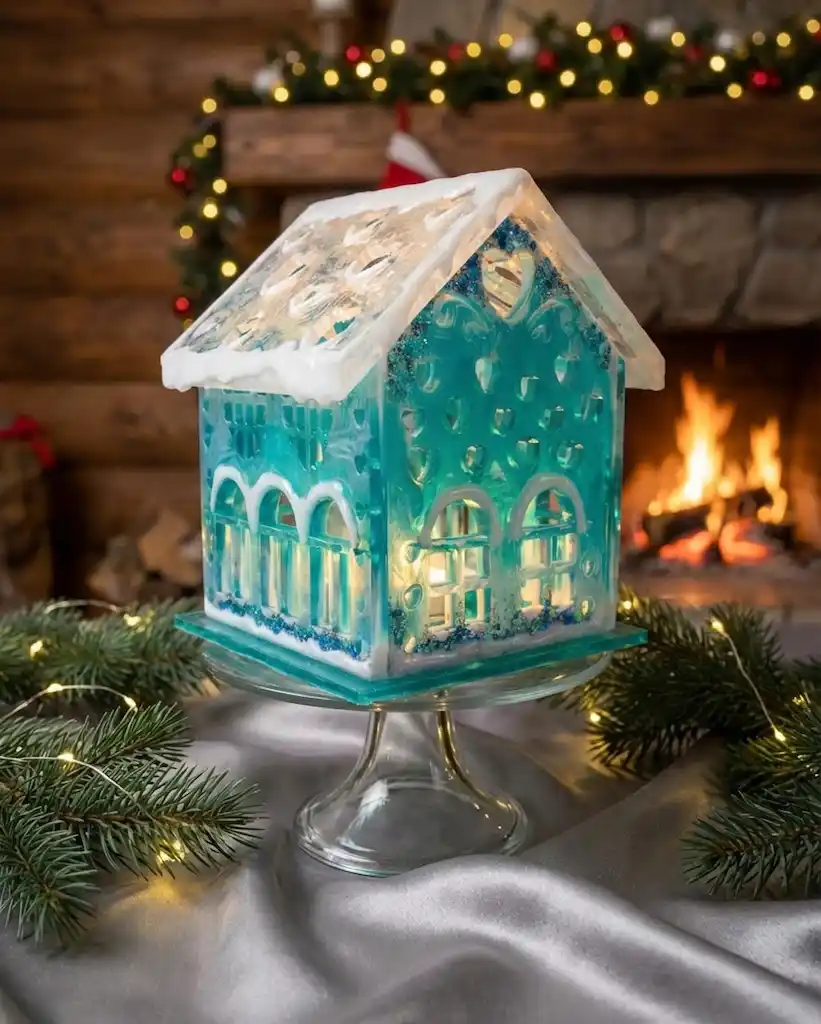
This one is a genuine centerpiece project, a full architectural house form cast in translucent teal and white resin, with arched windows and heart-shaped cutouts carved through the walls so light glows out from inside.
A small candle or LED sits inside, and the whole thing lights up the arches like stained glass windows on a real cottage.
What you need:
- A large house-shaped resin mold with a peaked roof
- Teal and white resin dye for the walls and snow-capped roofline
- A flat sheet of glass or acrylic to serve as the base plate
- A battery LED tealight or flameless candle to place inside once cured
Pour the roof separately in white with a rough, textured top coat so it reads as snow.
The walls get poured in teal with the window and heart shapes masked off before the resin sets, so light can pass straight through once everything is assembled.
Glue the roof to the walls last, after both pieces are fully cured, so the seams stay clean.
Because it needs an internal light source to really shine, this project works best as a display piece rather than something tucked away in a drawer, it’s built to be seen lit up on a mantel or table.
| Roof Piece | Wall Pieces |
|---|---|
| Poured white with a textured top for snow | Poured teal, thin enough for light to pass through |
| Cures flat before attaching | Window shapes masked off before pouring |
| Glued on last once fully hardened | Assembled into four walls, then joined at the seams |
2. Icy Blue Snowflake Ornament With a Frosted Dendrite Pattern
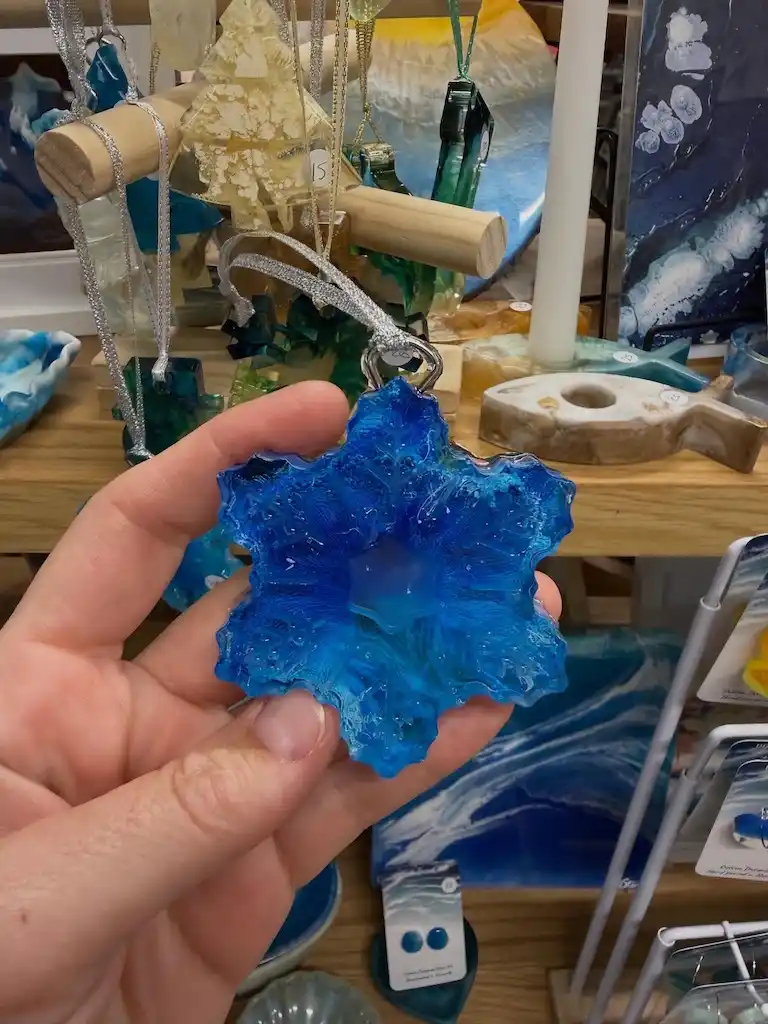
This one skips the usual pale, glittery snowflake and goes deep instead.
The maker poured navy and sky blue resin into a snowflake mold, then let fine white lines branch out from the center like frost spreading across a window.
A few details worth copying:
- The center pours lighter, almost frosted blue, then deepens toward the outer points
- Thin branching lines run through each arm for that hand carved ice look
- The edges stay uneven and organic instead of a clean cutout, which is part of what makes it feel handmade
- A silver ribbon loop gets set into the top before the resin cures, so the piece hangs flat once it’s dry
It’s a sturdy tree ornament, but the deep color also makes it work as a window hanger where light can pass through the blue.
3. Lace-Pattern Snowflake Coasters With Gold and Silver Leaf
birkboutique
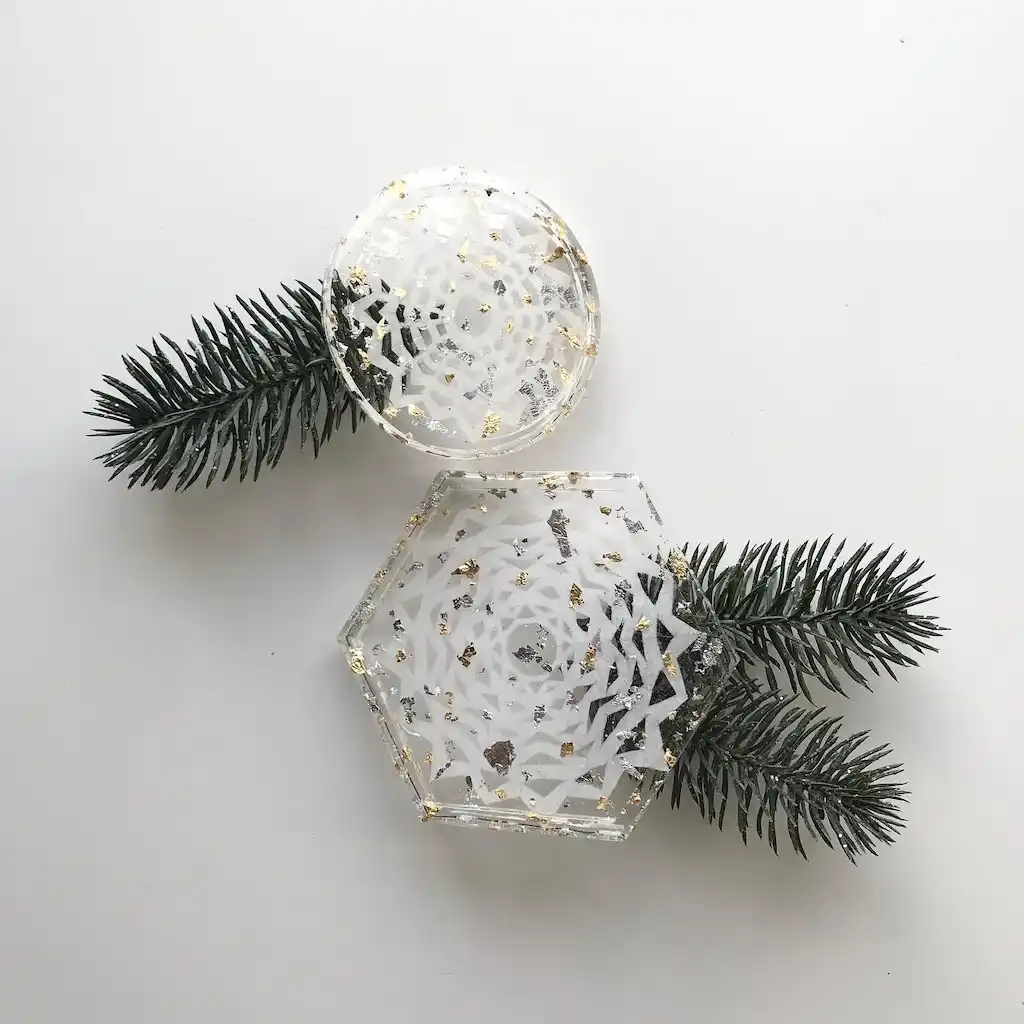
Coasters are one of those gifts nobody turns down, and this pair shows why a simple design idea can carry the whole piece.
A fine, lace-like snowflake sits suspended inside clear resin, built from thin overlapping shapes rather than a single stamped outline.
Scattered gold and silver leaf catches the light around it like flecked frost.
The maker made two mold shapes from the same design:
- Round, which lets the snowflake pattern read as one continuous circle
- Hexagon, which echoes actual ice crystal geometry and gives the piece sharper, more modern edges
Both work as a set. Pour four of one shape, or mix two of each for a little visual variety on the table.
| Round Shape | Hexagon Shape |
|---|---|
| Snowflake pattern flows in one unbroken circle | Straight edges frame the pattern like a cut gem |
| Softer, classic look on the table | Reads more modern and geometric |
| Easier to pour evenly for beginners | Corners need a slower, careful pour |
4. Illustrated Charm Pendants Set in Gold Bezels
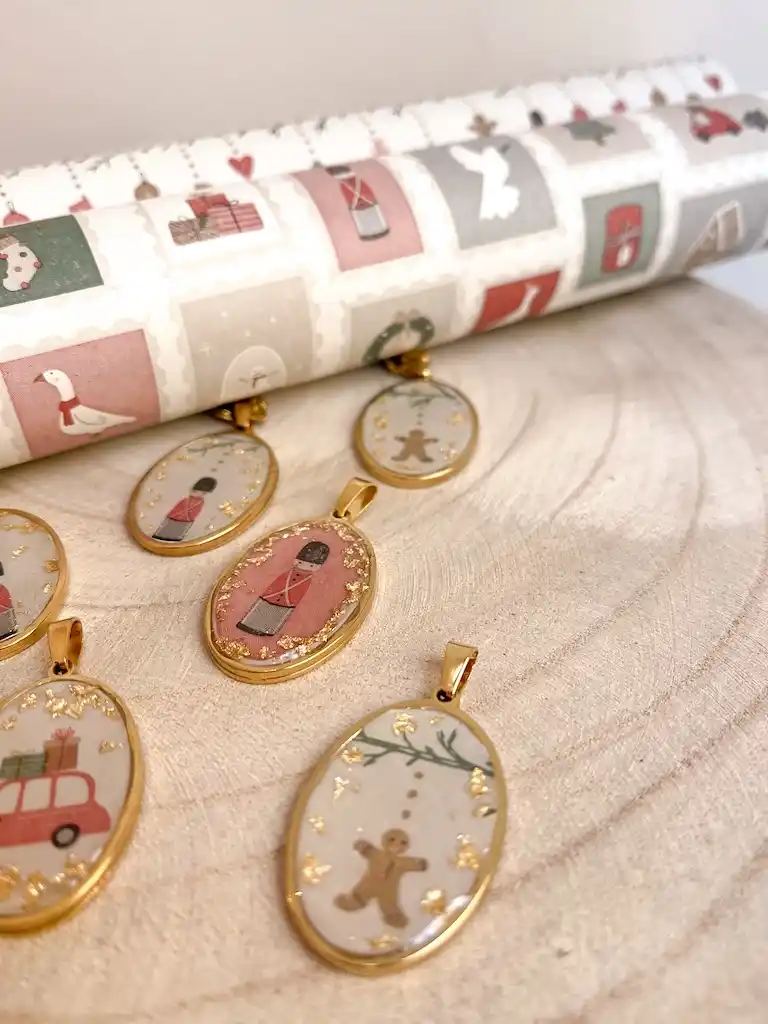
This one swaps flowers and glitter for something different: small printed illustrations, a toy soldier, a gingerbread man, a car loaded with gifts, sealed under a dome of clear resin inside oval gold bezel settings.
It’s a nice change of pace from the pressed-botanical look that’s shown up a few times already on this list, since the imagery does the work instead of the material.
What you need:
- Oval gold bezel pendant blanks, the kind with a raised metal lip
- Small printed paper cutouts or illustrated cardstock, sized to fit the bezel
- Clear resin for the dome pour
- Fine gold leaf flakes for the edges
Cut the paper images slightly smaller than the bezel opening so a thin margin of gold metal shows all the way around.
Glue the image flat to the bezel base first, then pour the resin slowly so it domes up without spilling over the metal lip.
Sprinkle the gold leaf into the wet resin near the edges before it sets, so it settles naturally into the border instead of sitting in a hard ring.
Each pendant reads as its own little scene, which makes this a strong option for a set where every piece needs to look different but still belong together.
5. Pressed Flower Initial Keychains With Real Botanicals and Gold Leaf
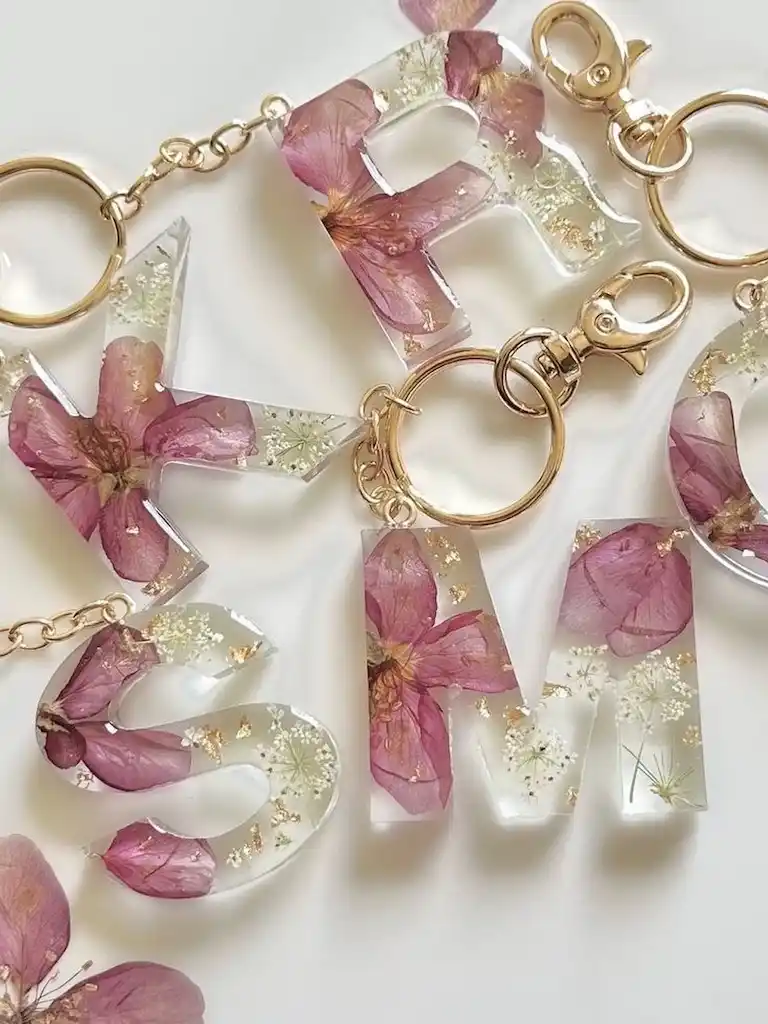
Skip the plain letter mold and press actual flowers into it instead. Each initial here holds real dried petals and tiny white filler blooms, with flecks of gold leaf scattered through the clear resin.
Gold keyring hardware finishes the look, so the whole piece feels put together rather than thrown on a ring at the last minute.
How to get this look:
- Lay dried or pressed flowers face down in the mold first, arranging petals so they sit close to the letter’s edges
- Pour a thin base layer of clear resin and let it tack up slightly so the flowers stay put
- Top off with a second pour, adding a pinch of gold leaf flakes as it settles
- Once cured, drill or use a pre-cast hole for the keyring, then attach a gold lobster clasp and split ring
Real flowers do fade slightly over months in direct sun, so mention that when you gift one.
Lay pressed petals face down in the letter mold, close to the edges.
Let it tack up slightly so the flowers hold their spot.
Add a second pour and scatter gold flakes in as it settles.
Add a gold lobster clasp and split ring once fully cured.
6. Marbled Teal Ornament Set With Glitter Edges and White Ribbon
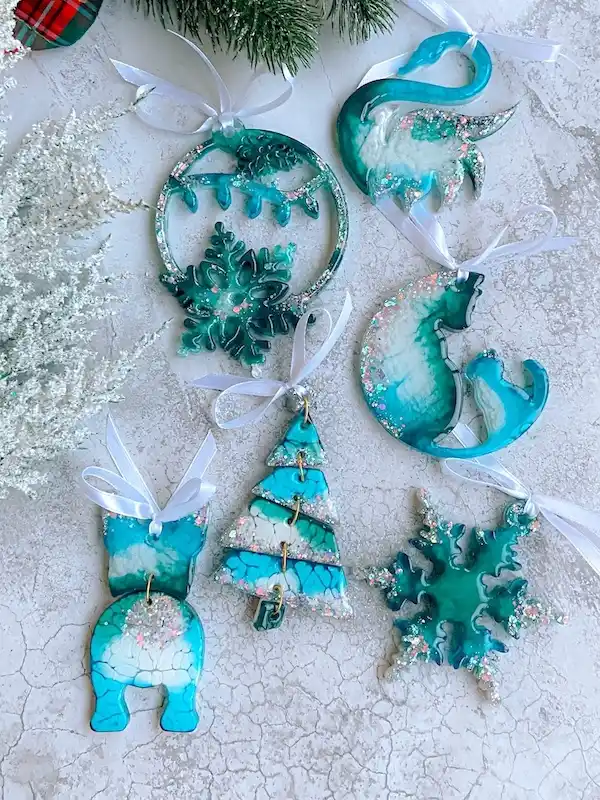
Six shapes, one consistent technique: a marbled teal-and-white base finished with a heavy dusting of iridescent glitter along the edges.
A snowflake shows up in this set too, similar in concept to the dendrite ornament from earlier in this list, but the technique here is completely different, alcohol-ink style marbling instead of a solid poured color, so it earns its own spot.
Do this:
- Layer teal and white in a swirled, marbled pattern before it sets, so no two pieces look identical
- Add glitter heavily along the outer edges only, leaving the center clearer so the marbling stays visible
- Punch or mold a hole at the top for a ribbon loop, then finish with a simple white bow
Skip this:
- Don’t mix the glitter evenly through the whole piece, it muddies the marbled effect underneath
- Don’t use a colored ribbon here, since the white keeps the ornament looking clean against the teal
The set includes shapes beyond the usual snowflake and tree: a moon with a cat silhouette, a swan-like animal, and a bear peeking around a corner, which gives a buyer more variety if they want a full matching tree collection rather than repeats of one shape.
Got it — here’s entry 14’s visual swapped to a completely different template (breakdown stack) with custom, content-specific labels instead of any repeated fixed headers:“`htmlTeal and white get swirled together with a toothpick or skewer while still wet, so the pattern stays organic instead of blended flat.
It’s pressed in around the outer edge only while the resin is tacky, leaving the marbled center clear so the swirl stays the focal point.
A moon, a swan, a bear, a tree, a wreath, and a snowflake all share the same palette and glitter treatment, so the shapes vary but the set still reads as matching.
7. Ombre Bookmark With Silver Flake and a Custom Quote
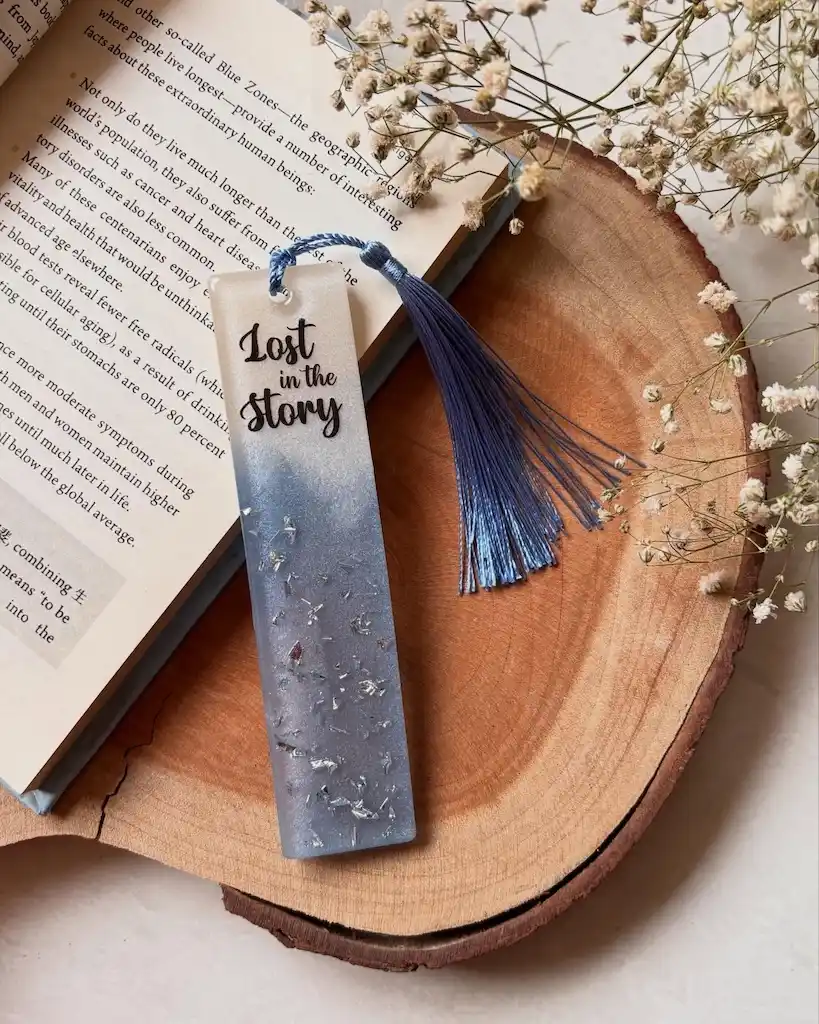
This one trades the peppermint look for a moody blue fade, which works just as well and maybe better for a reader who wants something they’d actually keep clipped in a favorite book.
The top starts pale and frosted, deepens into slate blue toward the bottom, and gets finished with scattered silver leaf that sits like flecks of light caught mid-page.
What makes it feel finished:
- A short phrase stamped or printed into the resin near the top, something like a favorite line or a simple “lost in the story”
- A gradient poured in stages rather than one flat color, so the fade looks natural instead of banded
- Silver leaf added toward the bottom half only, so it reads as an accent and not clutter
- A twisted cord tassel in a matching blue, knotted through a small hole at the top
Skip the tassel if you want something slimmer, but it’s what turns a flat bookmark into a gift someone photographs before they use it.
7. Snow-Covered Cottage Paperweight in a Resin Cube
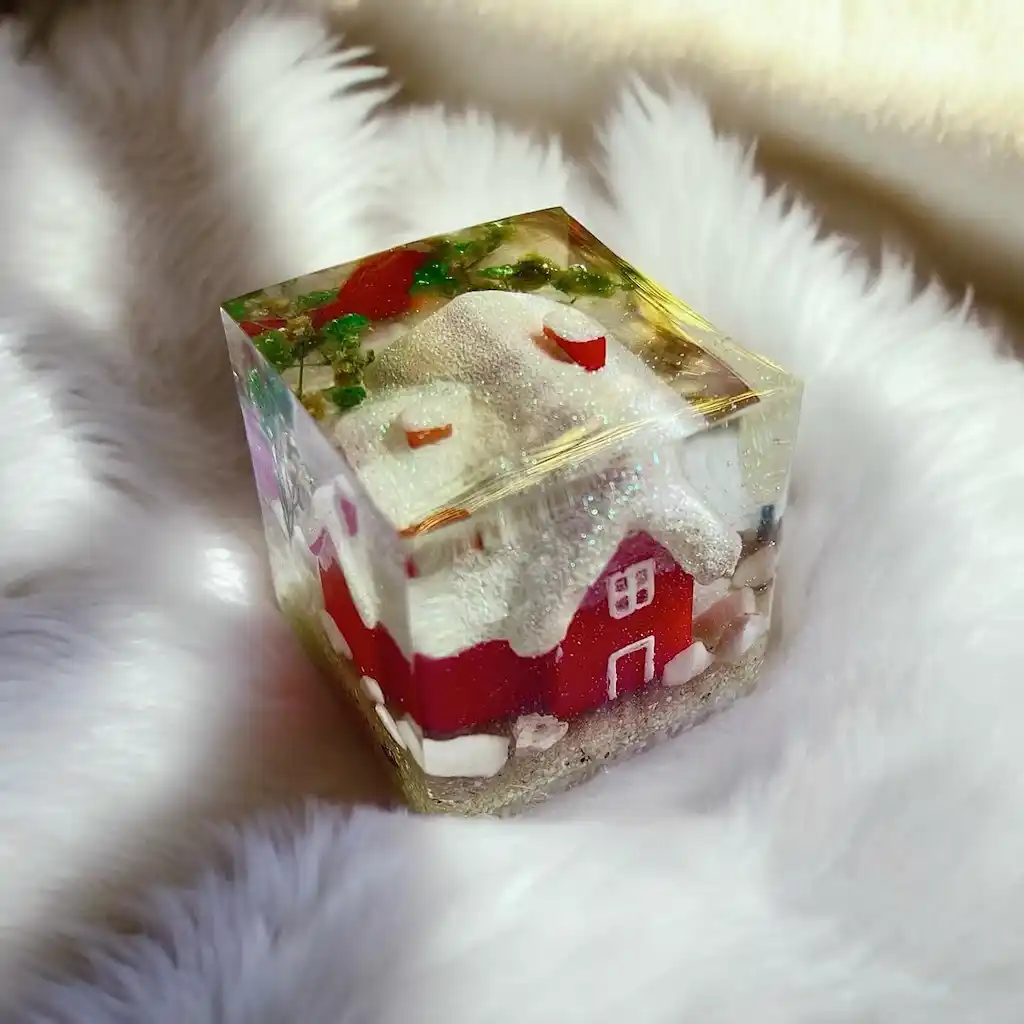
This is the project that goes on a desk or bookshelf and doesn’t leave.
A tiny red cottage sits at the base of a clear cube, its roof buried under a thick layer of glittering white “snow,” with sprigs of green tucked in near the top corner like a bit of forest peeking through.
A dusting of sand and small stones anchors the bottom, so the whole scene reads like a little world stopped mid-snowfall.
What makes it work here:
- The house sits low in the cube, leaving plenty of clear resin above for depth and light to travel through
- Snow gets built up in layers rather than one flat coat, so it has real texture and catches light from every angle
- A single sprig of greenery breaks up the white and red, keeping the scene from feeling flat
- Sand and tiny pebbles at the base ground the piece and hide the seam where the mold met the pour
Cube molds are more forgiving than domes for a first attempt since the flat sides make layering easier to control.
The sand and base layer go in first and cure before the house piece is placed, so it does not shift or sink once the deeper resin is poured.
Fine glitter mixed straight into thin resin tends to sink. Stiffening the resin slightly first, or using a snow-textured additive, keeps it suspended on the roofline.
A cube’s flat sides make it easier to see layer lines while pouring. A dome hides layering better once cured, but is harder to judge mid-pour.
8. Standing Resin Angel Figures With Confetti-Style Glitter
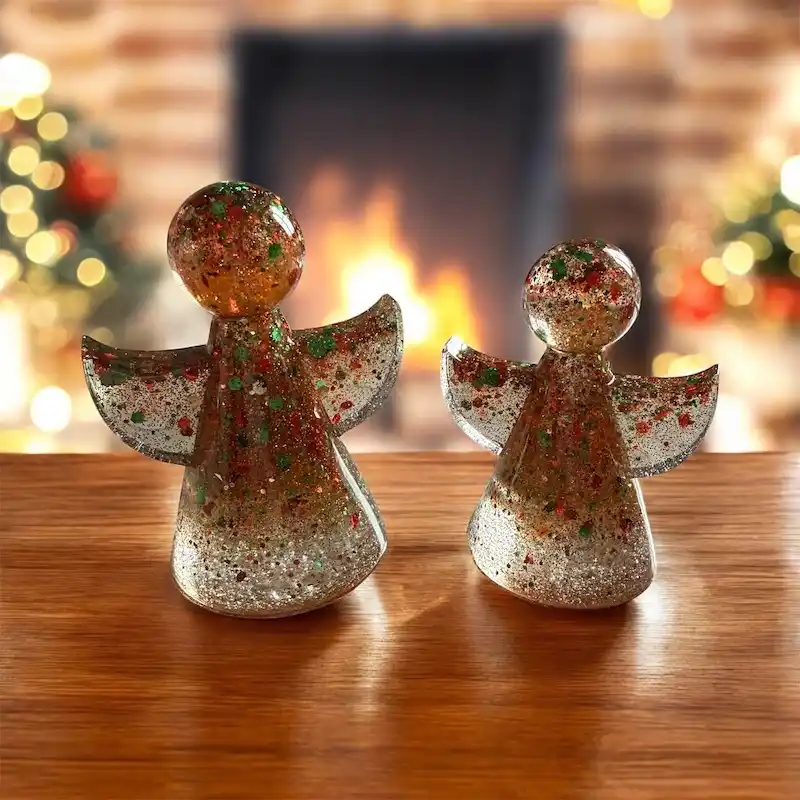
These trade wall decor for something that actually stands on its own, a freestanding 3D figure rather than a flat pendant or ornament.
Two angels, a taller and a shorter version, are cast in a solid figural mold with a round head and swept-back wings, filled edge to edge with red and green glitter suspended through clear resin like confetti caught mid-fall.
At a glance:
- Shape: freestanding 3D angel figure, round head with a cone-shaped body and wings
- Fill: red and green glitter flakes distributed through clear resin
- Base: flat cut bottom so the figure stands without extra support
- Best for: mantel display, gift for someone who collects seasonal figurines
Getting a 3D mold to fill evenly is trickier than a flat pour.
Fill in stages and tilt the mold slightly as it sets so the glitter distributes through the wings and skirt instead of sinking straight to the base.
9. Mini Sneaker Keychains in a Rainbow of Colors
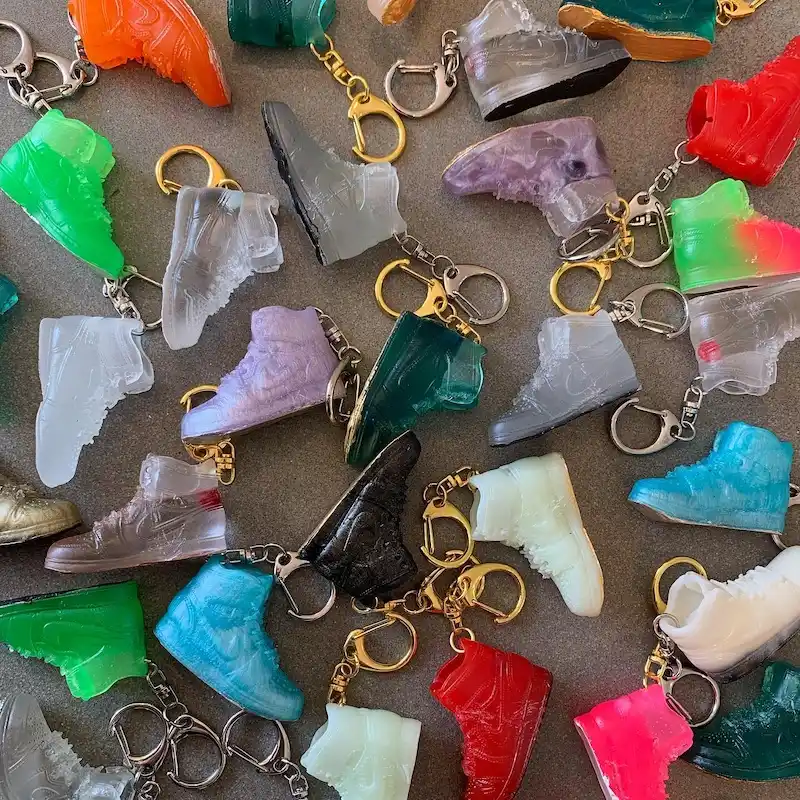
This one skips holiday shapes entirely and leans into something a teenager or sneakerhead on your list would actually want.
Each keychain is a tiny high-top sneaker, cast solid in resin, with the shoe’s stitching and sole detail still visible in the mold.
The real draw is the color range: neon orange, teal, lavender, glow-in-the-dark white, solid black, all lined up together like a display wall.
A few things that make this batch work:
- One detailed sneaker mold gets reused across every color, so the whole set stays consistent in shape
- Solid, saturated colors read best since the shoe’s texture is what carries the design, not swirls or glitter
- A couple of pieces use a glow-in-the-dark or frosted resin for a different finish in the same lineup
- Gold or silver lobster clasp hardware gets attached the same way across the set, keeping it uniform even with a dozen different colors
Because one mold makes so many, this is an easy project to batch for a group gift, like a whole friend group or a sports team.
10. Pressed Mimosa Ornaments in Four Different Shapes
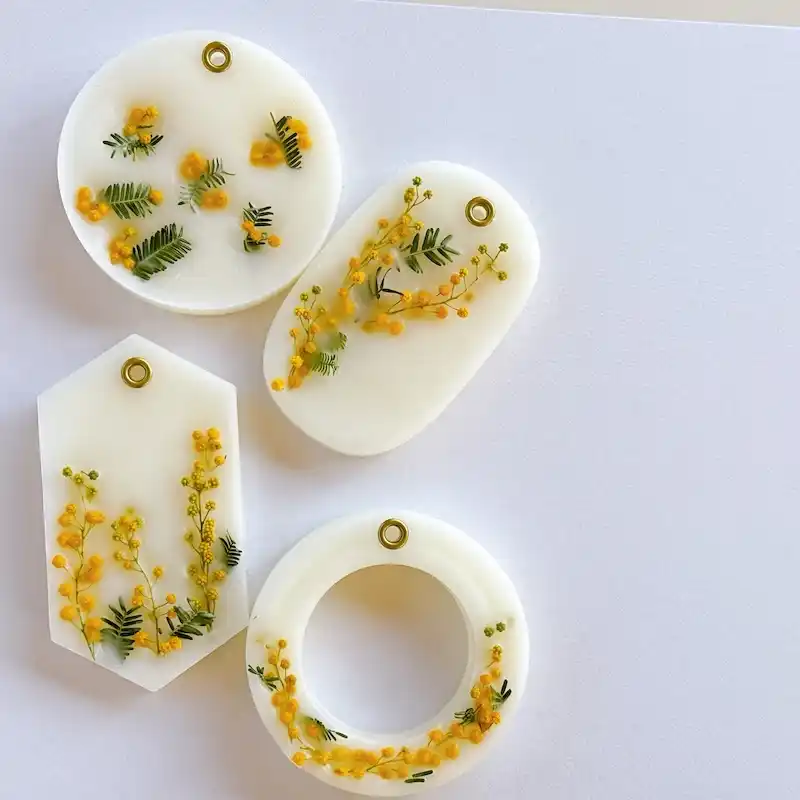
A set like this works because it uses one flower and stretches it across four completely different forms.
Sprigs of yellow mimosa and small fern-like leaves sit suspended in opaque white resin, with a brass eyelet cast into each piece so they’re ready to hang straight out of the mold.
The shape variety keeps it from looking repetitive:
- A circle with loose, scattered blooms for a full, wildflower feel
- A long oval where the flowers trail diagonally, almost like a single cut stem
- A hexagon tag with blooms climbing straight up one side
- A open ring where the flowers wrap the inner edge like a little wreath
White resin is what makes this set work so well. It keeps the yellow blooms and green leaves as the only color in the piece, so nothing competes with the pressed flowers themselves.
11. Wave-Inspired Serving Tray and Coaster Set in Ombre Blue
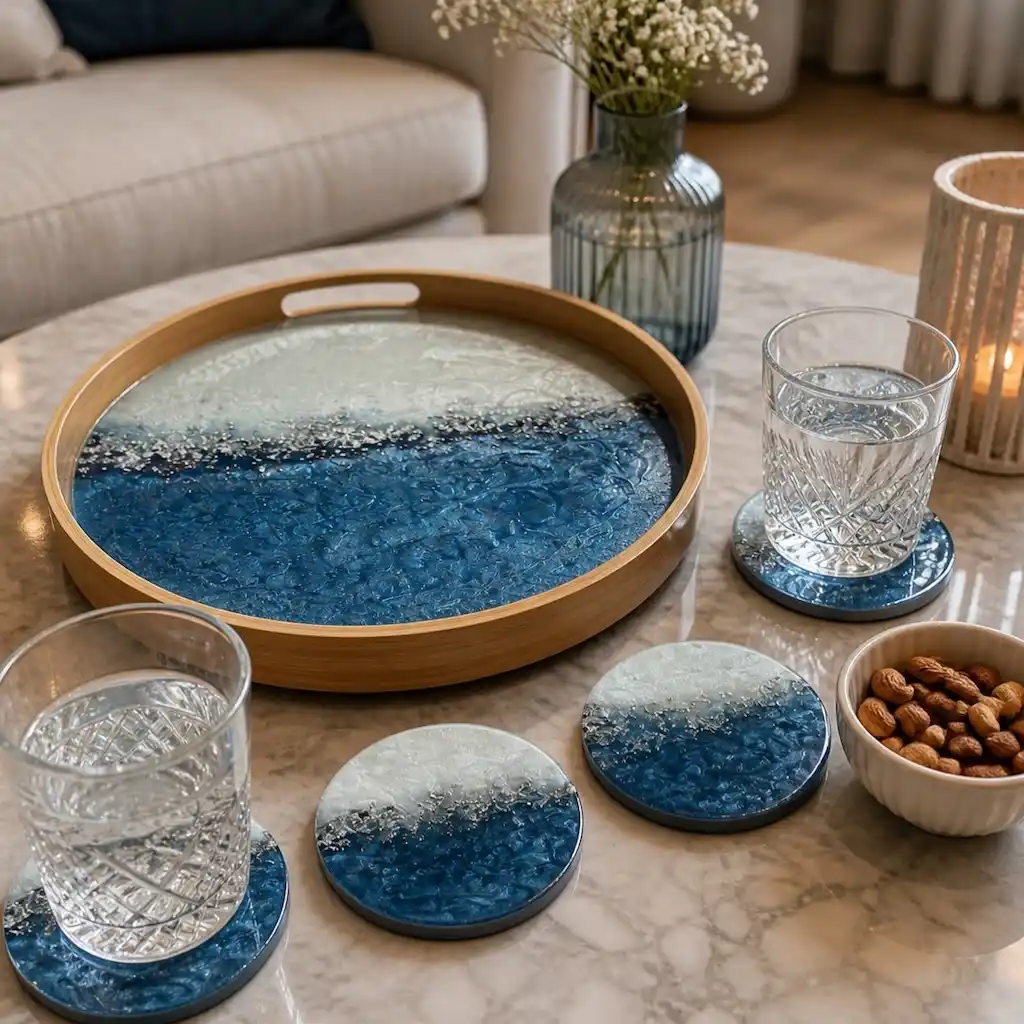
A matching set does more for a gift table than one piece ever could.
This tray and its four coasters share the same ombre effect, fading from pale frosted white down into deep ocean blue, with a textured surface that catches light like real water.
A round wooden tray frame holds the whole thing together, keeping it sturdy enough for actual serving duty.
At a glance:
- Design: white-to-blue ombre with a textured, wave-like finish
- Set size: one tray plus four matching coasters
- Base: wood tray frame, resin coasters
- Best for: hosting, but sturdy enough for daily use
Matching the gradient across five separate pieces is the hard part.
Pour each item from the same batch and work fast, since the color needs to shift at roughly the same point on every piece for the set to read as intentional rather than random.
12. Wine Stopper Set With Five Different Resin Toppers
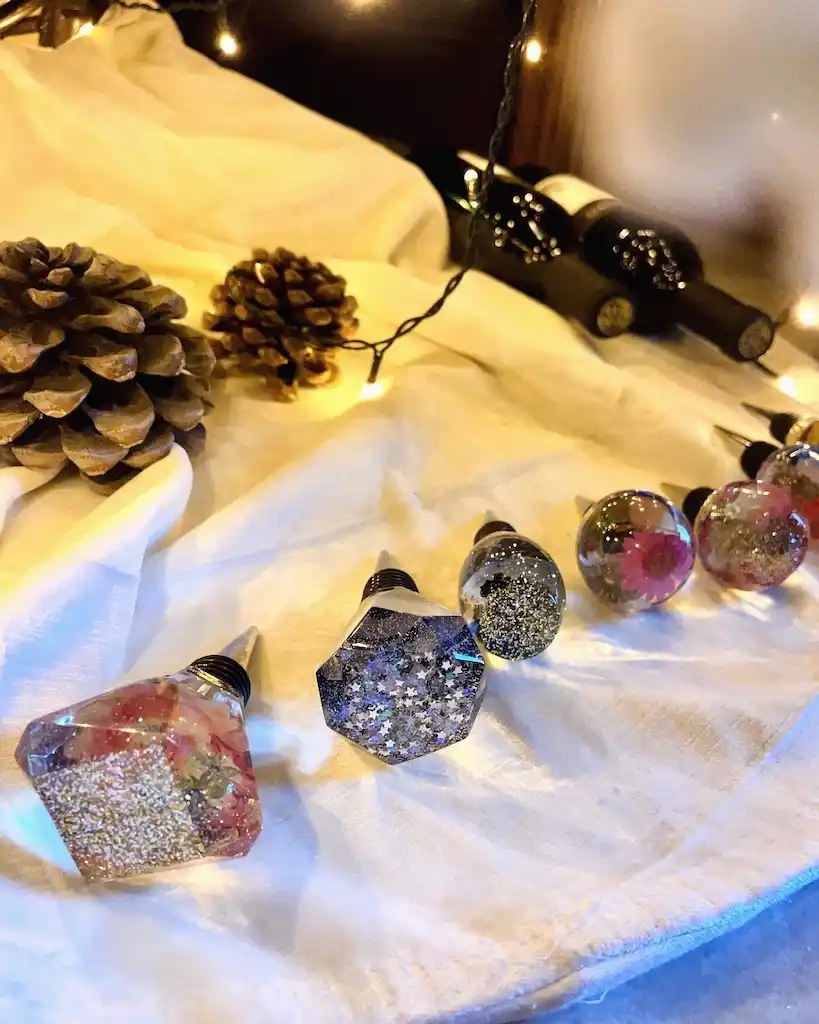
Five stoppers, five completely different looks, all sharing the same dark bottle-cork base.
That’s the trick to this gift: you’re not making one design and repeating it, you’re making a small collection so the giver can pick a favorite, or the recipient gets an entire matching set.
The range here covers a lot of ground:
- A faceted diamond shape with pressed red flowers over a bed of gold glitter
- A geometric topper packed with silver stars floating in a deep navy field
- A smooth round dome finished in a soft gold shimmer, almost like champagne
- Two clear spheres, one holding a single pink daisy, the other filled with dried petals and fine glitter
Mixing faceted shapes with rounded domes keeps the set visually interesting even though every piece uses the same core technique.
13. Custom Family Name Dominoes in Marbled Teal
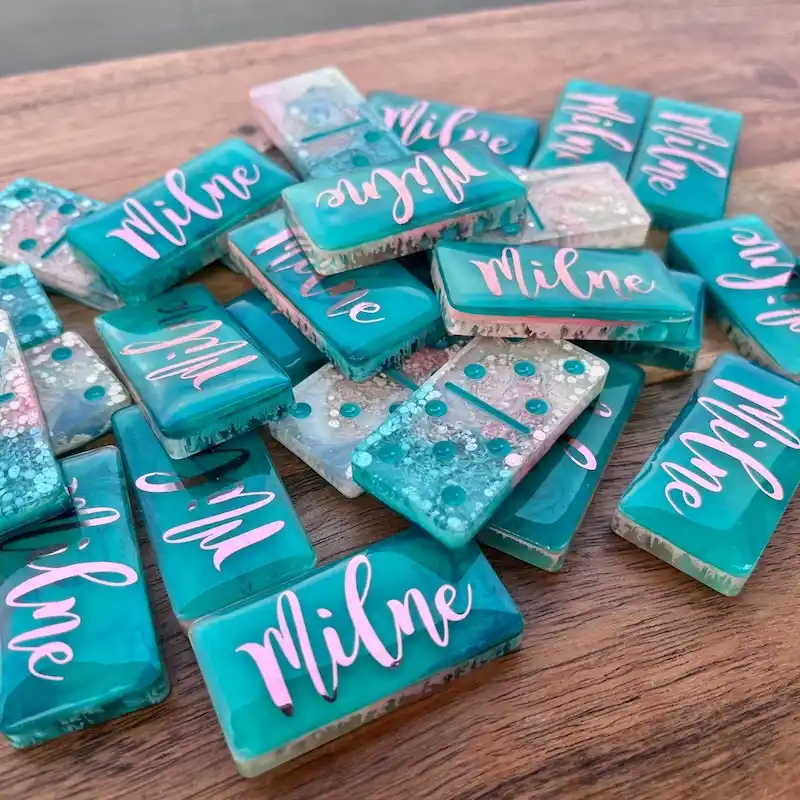
This whole set is built from one repurposed idea: real domino blanks, resurfaced with marbled teal resin and a family surname hand-lettered in pink across most of the pieces.
A few dominoes in the pile keep their original pip dots visible under a lighter, marbled finish, a nice detail that nods to what the tile actually is under all that resin.
Do this:
- Sand or prime the domino blanks first so the resin actually bonds to the surface instead of beading up
- Letter the name in a contrasting paint pen after the base coat cures, then seal with a thin final layer to protect the writing
- Leave a handful of pieces with the dots showing through instead of lettering every single one, so the set still reads as an actual playable game
Skip this:
- Don’t letter every domino identically, since a full set played this way looks more like a wall display than a set you’d actually pick up and play
- Don’t skip the sealing layer over the paint pen lettering, the wording will scratch off with regular handling otherwise
A full 28-piece set with the family name across most tiles makes a strong personalized gift for someone who actually plays dominoes, not just a shelf decoration.
14. Light-Up Resin Photo Frame With Dried Florals and Fairy Lights
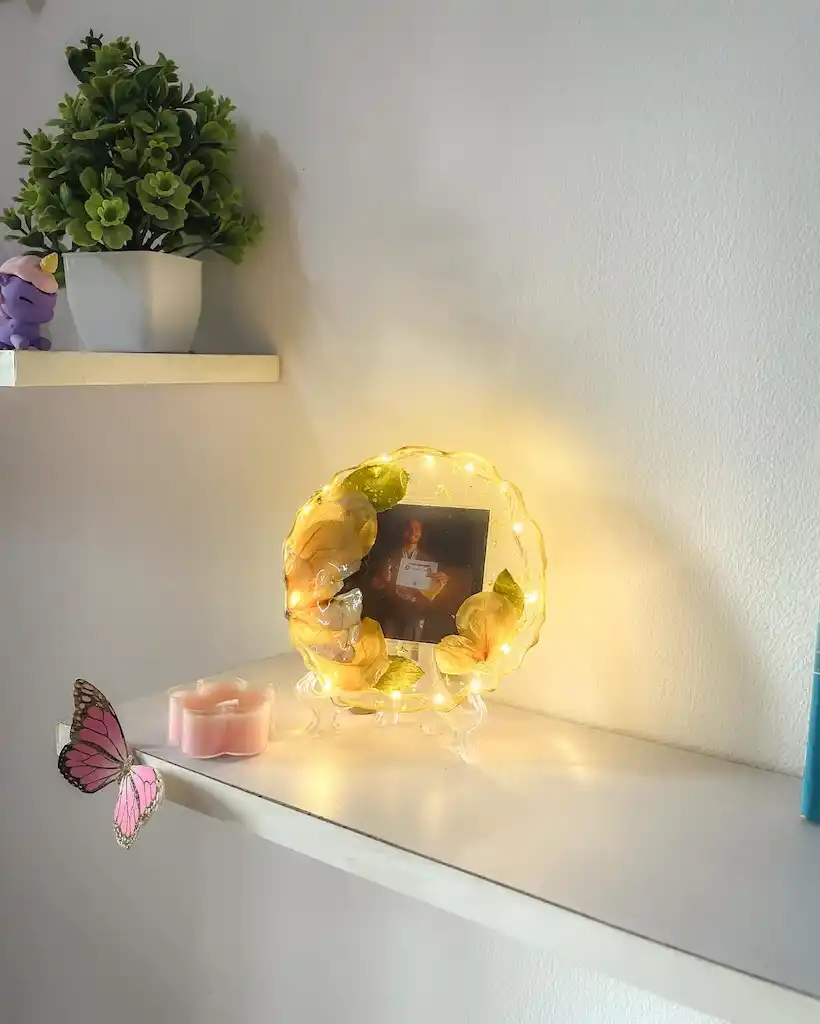
This isn’t your typical resin-edged frame. Warm string lights are cast right into the resin itself, so the whole piece glows once it’s plugged in or switched on, with the photo lit from the ring around it instead of a lamp somewhere across the room.
Dried florals in soft yellow and green sit along one side, thick and layered enough to look almost sculptural rather than flat.
A few things worth noticing:
- The frame shape is organic and wavy, not a straight-edged square, which suits the loose floral cluster better than a hard geometric border would
- Fairy lights get set into the resin during the pour, with the wire routed out through the base to a small battery pack
- A clear acrylic stand holds the frame upright, so it doubles as a little display piece even without a photo inside
- Gold leaf flecks are scattered lightly through the clear sections, catching the light between the flowers
This one takes more planning than most projects on this list since the lights have to be positioned before the resin goes in, but it makes a genuinely different kind of gift than a standard framed photo.
A frame that lights up turns a photo gift into a little nightlight too.
15. Matching Cornflower Jewelry Set With Two Necklace Options
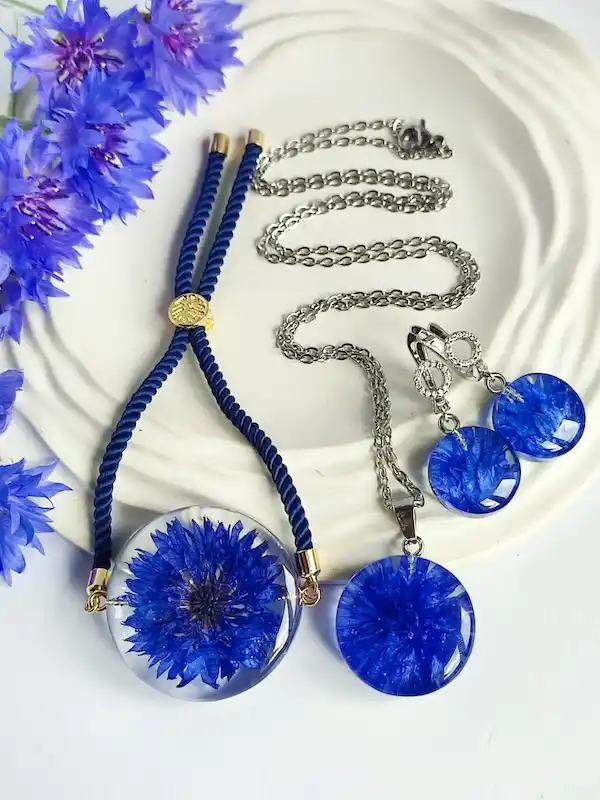
A single dried cornflower, cast in a clear resin circle, repeated across a pendant, a pair of drop earrings, and two different necklace bases.
The deep blue petals stay fully visible under the resin, radiating out from a dark center in a way that photographs like stained glass.
The full set breaks down as:
- Pendant on navy cord + gold hardware
- Same pendant on a silver chain, for a different everyday look
- Matching stud-drop earrings, smaller circles with the same flower
- One flower species used throughout, so nothing in the set feels mismatched
Offering two necklace bases from one pendant is a smart move for gifting. The recipient gets to choose which suits their existing jewelry, without you having to guess.
16. Polaroid-Style Resin Photo Magnets for Pets
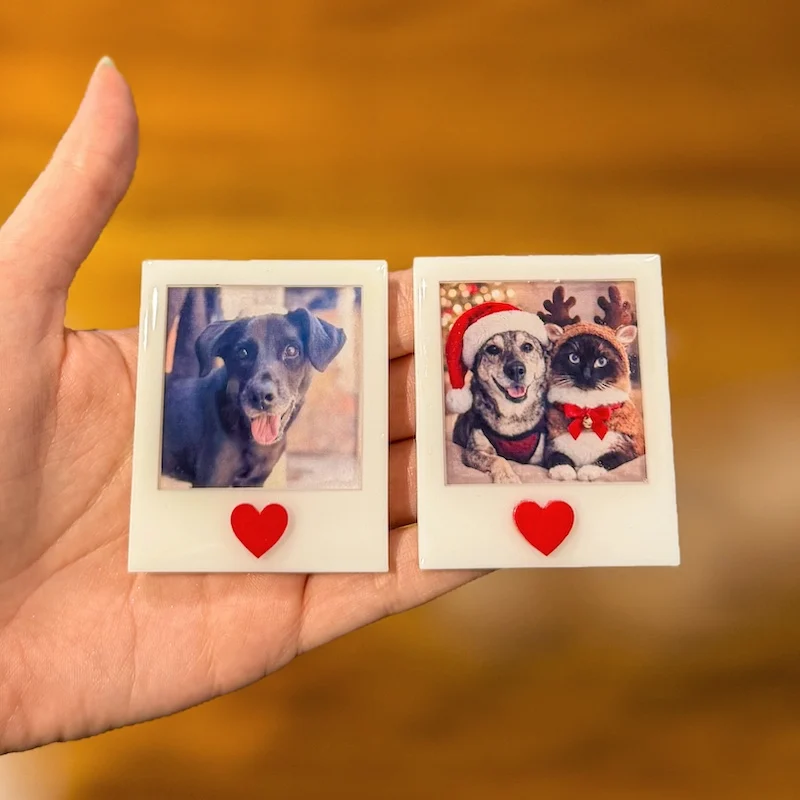
These recreate the instant-camera photo look in solid resin, complete with the thick white border and a tiny red heart cast into the bottom corner.
A printed pet photo sits sealed under a glossy resin dome, so it survives fridge magnets and sticky fingers far better than a paper print ever would.
What makes the polaroid format work so well here:
- The thick white border leaves room for the heart accent without crowding the photo itself
- A single photo per frame keeps the focus on one pet, or one holiday moment, rather than a busy collage
- Gloss resin over the printed image gives it that shiny, protected finish instead of a flat photo paper look
- A magnet glued to the back turns it into something that gets used daily, not tucked in a drawer
This is a genuinely personal gift since it needs an actual photo from the recipient, so it works best when you plan ahead and ask for a picture rather than trying to surprise someone last minute.
Print photos on matte photo paper rather than glossy stock. Glossy paper can trap air bubbles under the resin layer that are hard to smooth out.
17. Chunky Glitter Ornament With a Vinyl Word Overlay
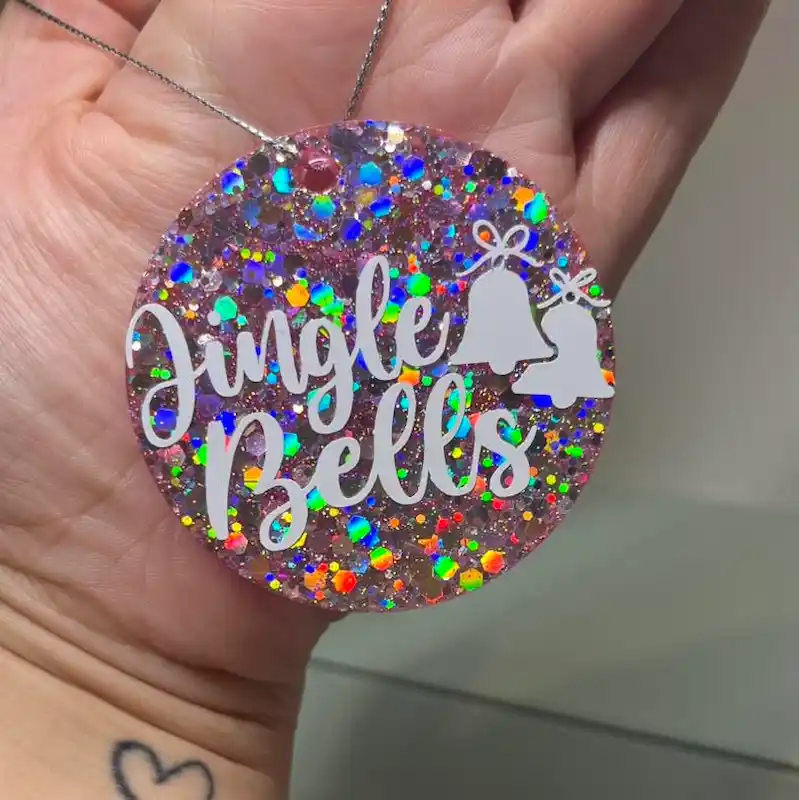
Loaded with holographic glitter in blue, gold, green, and pink, then finished with a white vinyl phrase and bell icons layered on top, this one skips subtlety entirely.
It’s a fast project too, since the wording and imagery come from a cut vinyl sticker rather than anything hand painted or embedded before the pour.
Getting the look right comes down to two layers working together:
- The base pour mixes several colors and sizes of chunky glitter so it catches light differently depending on the angle, rather than sitting flat as one shade
- Once cured, a vinyl decal with the phrase and a small bell design gets applied directly to the surface, so it reads crisp and clean against all that sparkle underneath
This is one of the quickest projects on this list since there’s no need to wait on layered pours or careful placement. Mix the glitter, pour, cure, then apply the sticker.
A silver chain loop finishes it as a hanging ornament, though the same disc works just as well as a keychain or bag charm.
18. Personalized Name Coasters With Pressed Flowers and Gold Script
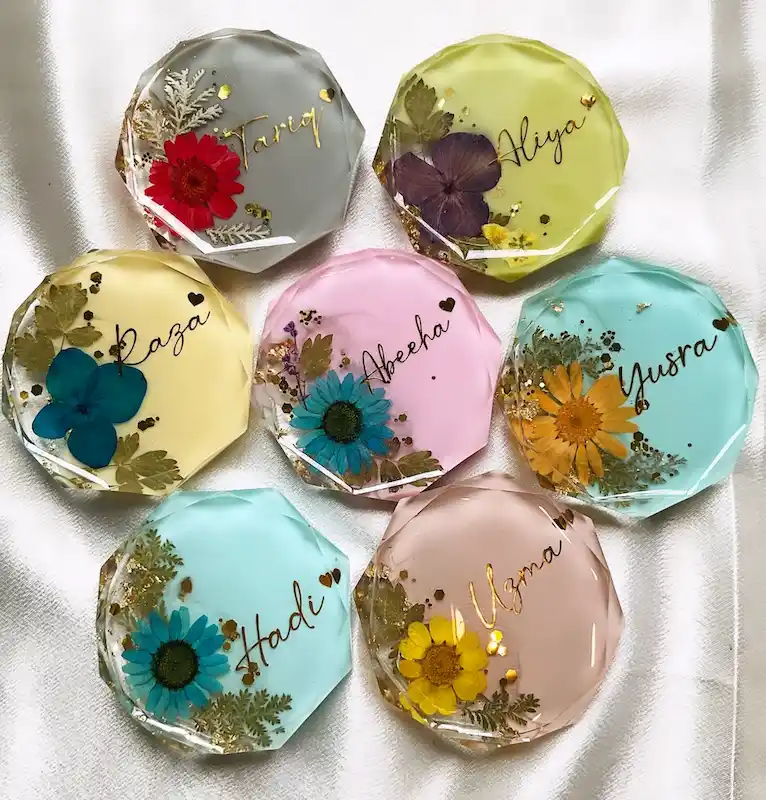
Seven names, seven completely different color bases, one shared design formula.
Each faceted disc holds a single pressed flower in a different shade paired with a name written in gold script across the top.
It’s the kind of gift that works for an entire family or a whole friend group without any two pieces looking alike.
What ties the set together despite all the variety:
- Every disc uses the same faceted, geometric edge, cut like a cut gemstone rather than a smooth circle
- The tinted resin base changes for each piece, gray, yellow, pink, mint, blush, so the flower color gets picked to complement it
- Names are written in gold script directly onto the surface before the final pour seals them in
- Gold leaf flakes and small gold sequins are scattered throughout, tying every disc back to the same palette even though the base tints differ
Because each one is personalized, this project works well as a gift where every recipient gets something made specifically for them, not just a shared design in a different color.
19. Resin-Coated Glitter Pens With Charm Toppers
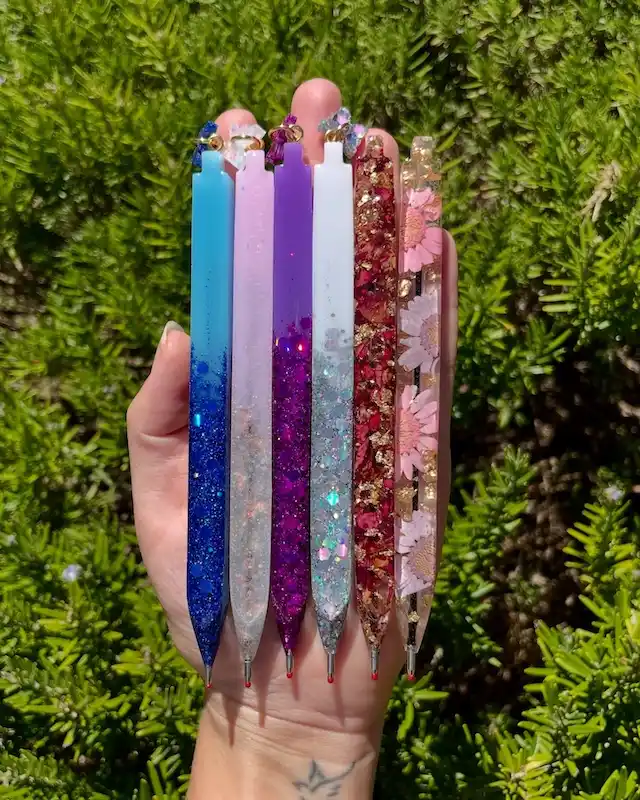
Six pens, six completely different fills, all built on the same click-style pen body.
Some pack in chunky holographic glitter, one holds pressed pink flowers with gold leaf, and each finishes off with a tiny charm dangling from the top, a bow, a flower, a gem shape, so the whole lineup doubles as a set of little collectibles rather than plain office supplies.
This project breaks down cleanly into two decisions:
- Pick your fill for each barrel. Fine glitter alone reads more subtle, chunky glitter mixed with foil flakes goes bold, and pressed botanicals give a totally different, softer finish.
- Match a charm to the fill. The floral pen on the right pairs with a small flower charm, while the glitter-heavy pens lean toward bows or faceted gem shapes.
A pre-made resin pen mold with the clicker mechanism built in makes this far more approachable than it looks, since the actual pen hardware slides into the resin barrel after it cures rather than getting poured around.
20. Gilded Nut Jar Toppers With Matching Resin Serving Tray
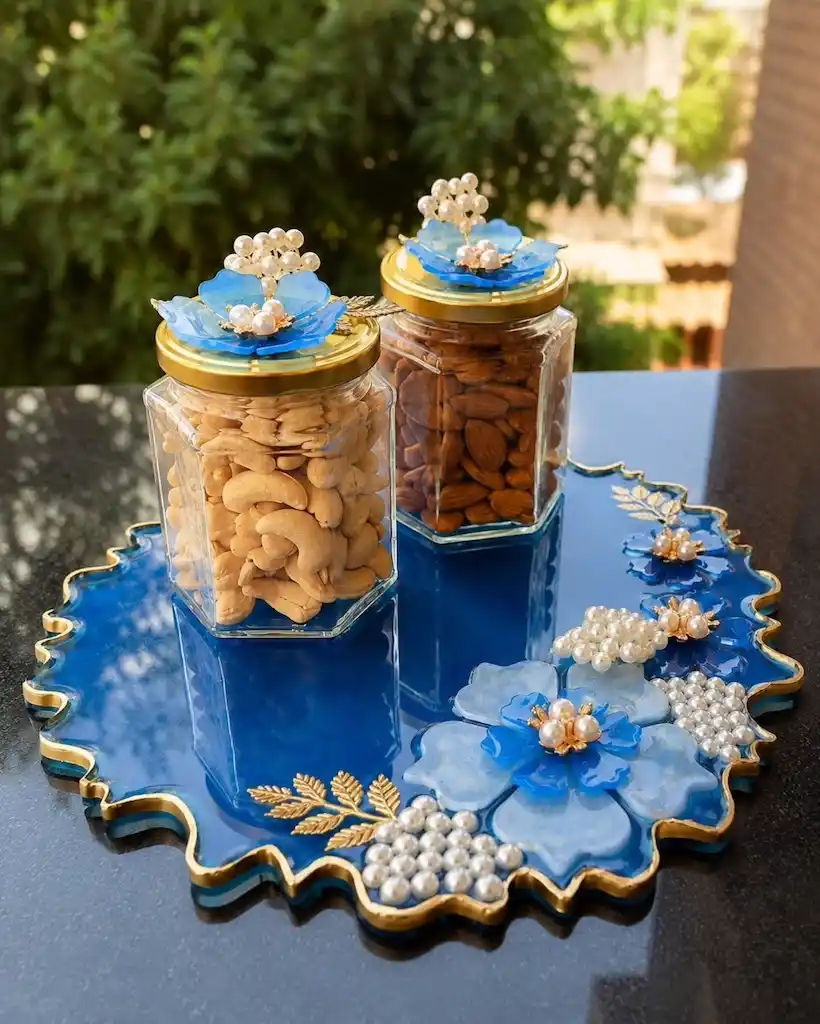
This one turns a plain glass storage jar into a hosting centerpiece.
Store-bought hexagonal jars get topped with a gold ring and a raised 3D resin flower, complete with pearl clusters wired into the center, then set on a scalloped tray finished in deep royal blue with gold leaf edging and its own matching floral and pearl detail.
The tray does double duty as a design anchor:
- The wavy, scalloped outer edge is trimmed in gold leaf, which pulls the eye around the whole piece
- Pearl clusters are pressed into the resin in loose groupings rather than a uniform pattern, so they read as scattered rather than glued on in a grid
- The same blue and gold palette carries from the tray up through the jar lid toppers, so the set reads as one cohesive gift rather than separate pieces
This is a strong project for hosting season specifically, since the jars actually get used and refilled, while the tray stays out as a permanent serving piece long after the holidays.
21. Sphere Candle Holders With Embedded Dried Botanicals
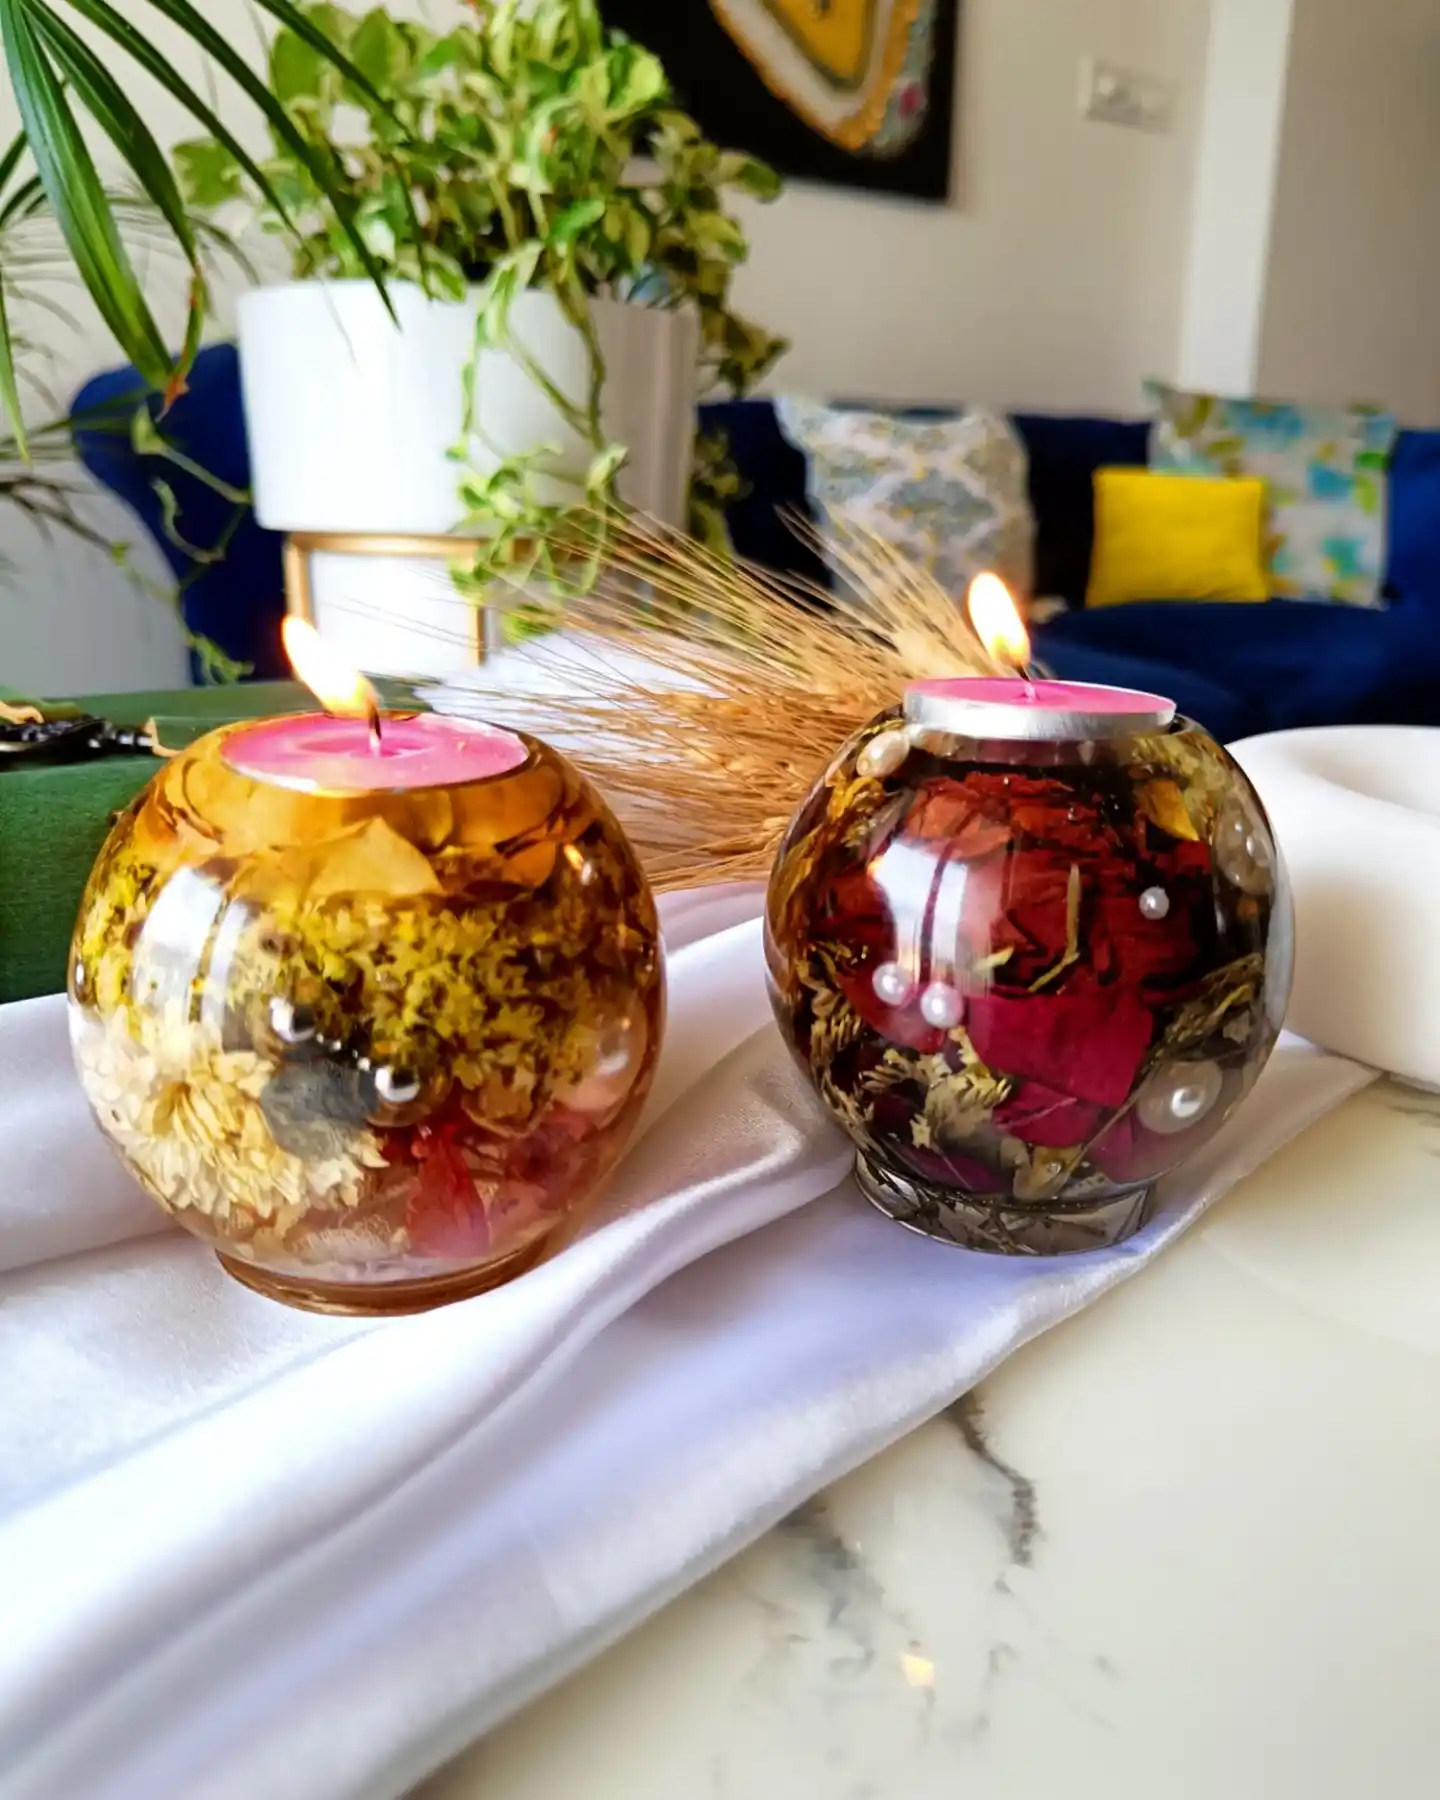
These round resin spheres hold a lit tealight on top while dried flowers, moss, and small glass or pearl beads sit suspended inside, visible from every angle once the candle glows through the resin.
One sphere uses warm amber resin, the other stays clear, so the same technique produces two completely different moods depending on the tint.
What you need:
- A round sphere silicone mold, split in two halves that join at the equator
- Dried botanicals: moss, small flower heads, dried rose petals
- A handful of glass marbles or pearl beads for visual weight at the base
- Amber or clear resin dye, depending on the mood you’re going for
- A flat-top opening or small platform cast into the top to hold a tealight candle
Fill the bottom half of the sphere mold first, layering botanicals and beads so they settle naturally rather than floating in one spot.
Once that half cures, pour the top half with a flat recessed area left open for the tealight, then join both halves with a thin final seam of resin once both are solid.
Since these hold an actual flame, keep the tealight cup slightly recessed and never let the wick burn down close to the resin surface.
One mold, two moods: switch the resin tint and the same design reads completely different.
22. Monogrammed Resin Clutch Filled With Pressed Petals
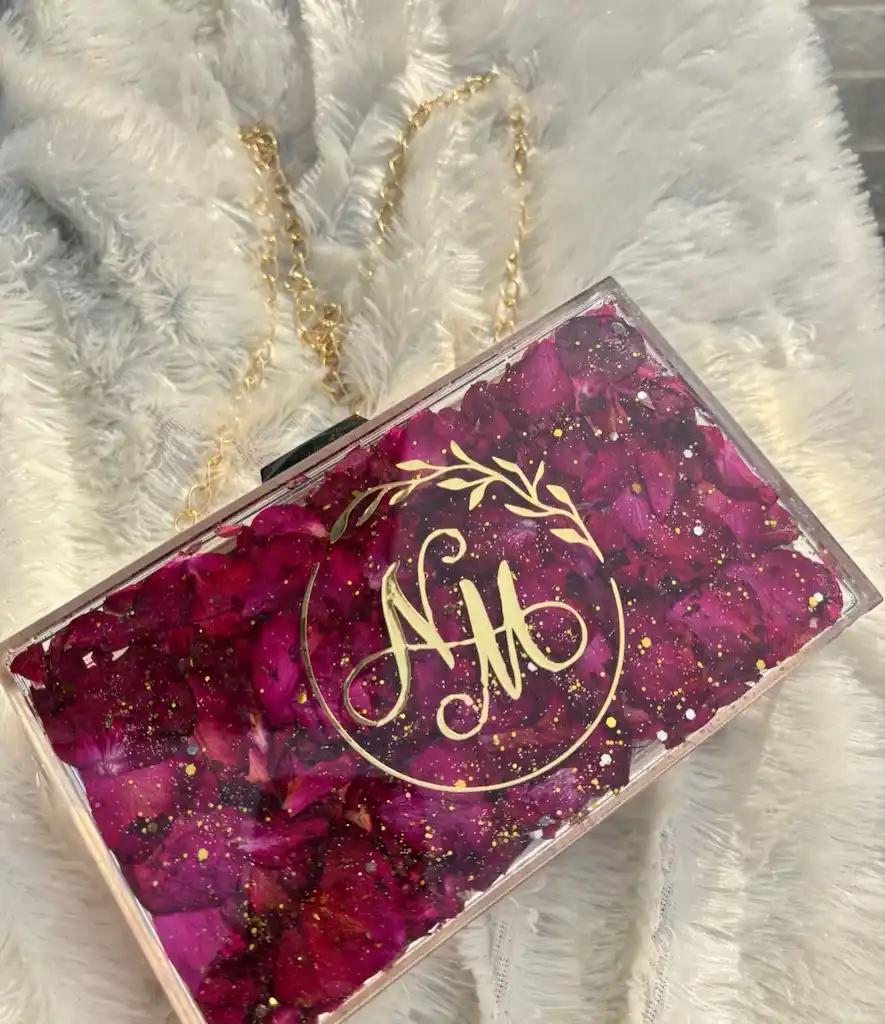
It’s the most ambitious project on the entire list, a full clutch bag, front and back panels cast solid in resin, packed edge to edge with deep magenta pressed petals and gold flecks, with a monogram wreath painted or foiled directly onto the surface.
A gold chain strap and metal clasp hardware turn it from a decorative object into something actually wearable.
A few things that set this apart from everything else on this list:
- The scale is much larger than a pendant or coaster, so it needs a proper mold built for bag panels, not a jewelry-sized mold
- Petals are packed dense enough that almost no clear resin shows through, giving it a saturated, almost velvet look rather than a scattered floral pattern
- The monogram gets applied in gold, either painted freehand, stenciled, or added as a foil transfer, after the petal layer cures but before the final clear top coat
- Metal purse hardware, the clasp and chain, gets set into the resin edges during the pour, so it’s structurally part of the piece rather than glued on after
This is a project for someone with resin experience already, not a first attempt, since a bag panel this size is far less forgiving of bubbles or uneven curing than a small coaster or ornament.
A monogrammed clutch turns a resin skill into a genuinely wearable, one-of-a-kind gift.
Making Your Resin Gifts Extra Special
The craft itself is only half the battle. Presentation takes your resin creations from “nice” to “oh wow, this is amazing!”
Package ornaments in clear boxes so people can see them before unwrapping.
For coasters or other flat items, create simple gift sets with coordinating tissue paper and a handwritten note explaining that these are handmade with care.
Include care instructions with each gift—people don’t automatically know that resin items shouldn’t go in the dishwasher or sit in direct sunlight for extended periods.
A small card with basic care tips shows you’re thinking about the gift’s longevity.
Consider creating matching sets for families.
Personalized ornaments for each family member, or coasters in everyone’s favorite colors, show you put thought into the entire household.