
16 Beginner Crochet Mistakes and How to Fix Them

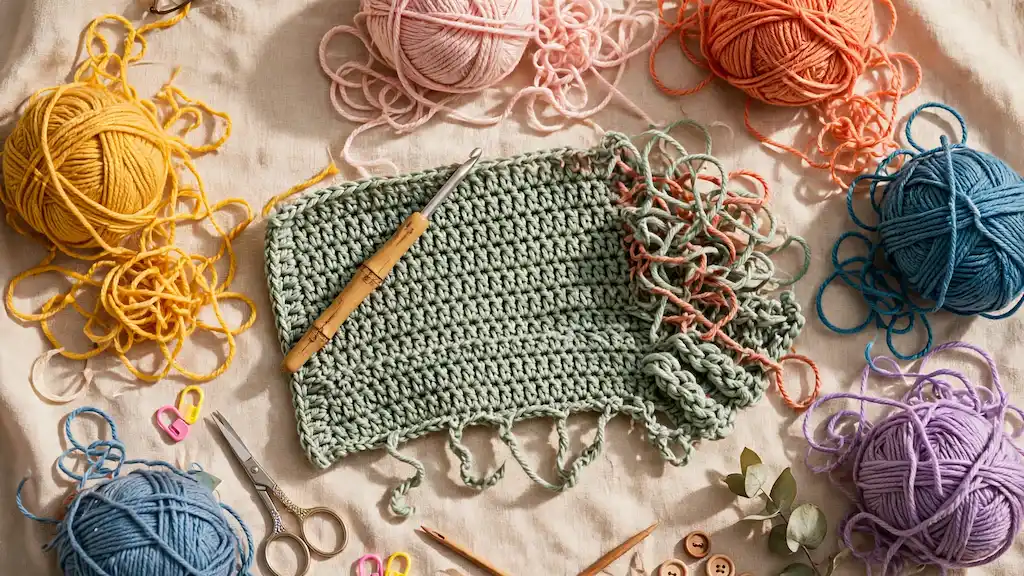
Every crocheter has a stitch pile that looks nothing like the pattern photo.
Wavy edges, split yarn, a project abandoned halfway through a granny square jacket, these aren’t signs you’re bad at this. They’re just part of learning a craft that depends on feel as much as instruction.
The truth is most beginner crochet mistakes trace back to a handful of habits: not checking gauge, gripping the yarn too tight, losing count mid-row, or picking up an old project without leaving yourself any notes.
None of it means starting over. Most of it just means slowing down at the exact spot where things tend to go wrong.
This roundup walks through 16 beginner crochet mistakes and how to fix them, pulled from real projects at every stage, from a first wobbly swatch to an intricate multi-color mandala. Some fixes are as simple as switching a hook size.
Others are about building better habits, like weaving in ends as you go instead of saving them for later.
Work through the ones that sound familiar, and the next project will look a lot closer to the picture in your head.
1. Trying to Crochet Without the Right Basic Toolkit
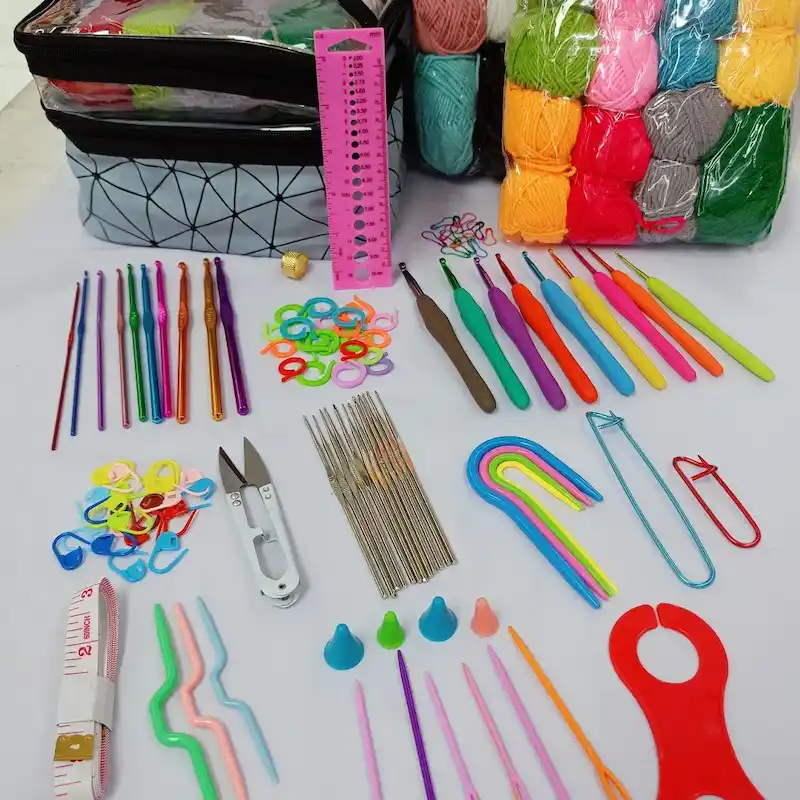
Everything laid out in this roll and around it covers what actually gets used project after project, not just the hook.
A full hook set spanning multiple sizes, locking stitch markers in half a dozen colors, a proper tape measure, sharp embroidery scissors, and a blunt-tip yarn needle for weaving in ends.
Skipping any one of these is a mistake that tends to surface mid-project rather than at the start.
How to build a starter kit that covers you:
- Get a hook set with at least four or five sizes, not just the single size your first pattern calls for
- Add a set of locking stitch markers, the open-and-close kind shown here, not just scrap yarn tied in loops
- Pick up a real tape measure or sewing gauge instead of guessing sizes by eye
- Grab small, sharp scissors kept just for yarn, dull household scissors fray the cut end
- Get at least one blunt-tip yarn needle sized for your yarn weight, for weaving in every one of those loose ends
A roll-up case like the one pictured keeps everything contained too, which matters more than it sounds since a missing hook size mid-project is its own kind of frustrating delay.
2. Using the Wrong Hook Size for Your Yarn
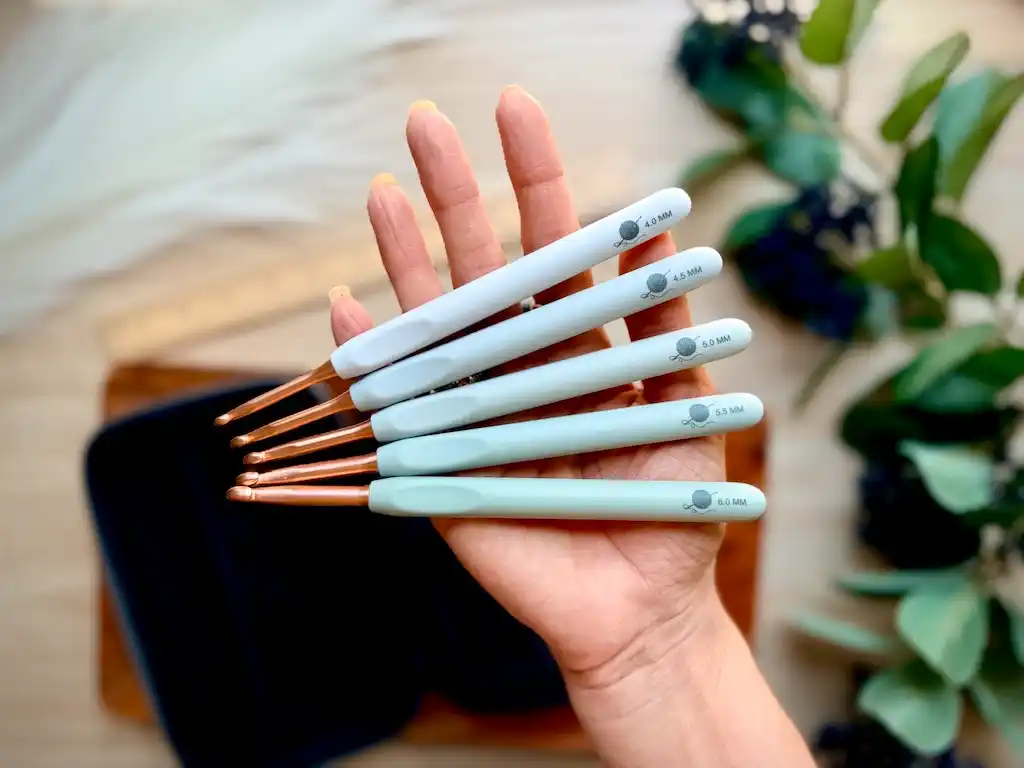
A whole set of hooks like this, sized from 4.0mm up to 6.0mm, exists for a reason.
Grabbing whatever hook is closest instead of checking the label is one of the most common reasons a beginner’s stitches come out too tight or too loose.
The fix comes down to matching, not guessing:
- Check the yarn label for a suggested hook size, most give a range
- Go up a size if your stitches feel stiff and hard to pull the hook through
- Go down a size if your fabric looks loose or has visible gaps between stitches
- Keep a labeled set nearby so you’re not squinting at tiny numbers stamped on metal
Ergonomic handles like the ones in this set also make a real difference during long projects, since a hook that’s comfortable to grip reduces hand fatigue that can throw off your tension over time.
3. Skipping the Gauge Swatch Before Starting a Project
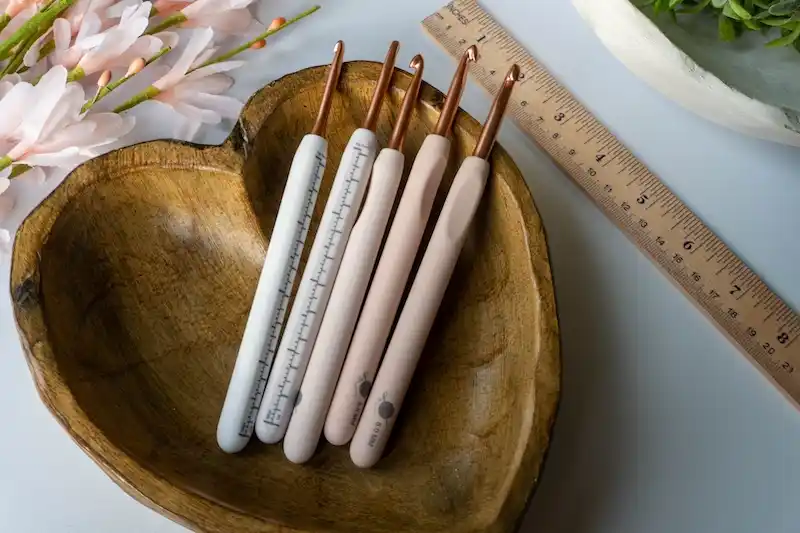
Notice the ruler markings printed right down the handles of a couple of these hooks.
That’s not decoration, it’s a built-in way to measure your work without hunting for a separate tool, and it points to a mistake almost every beginner makes: skipping the test swatch and diving straight into the real project.
Here’s the problem with skipping it. Every crocheter’s tension is different, so the same hook and yarn can produce a slightly different size fabric from one person to the next.
A pattern that calls for a specific gauge is telling you what size swatch the designer got, not a guarantee of what you’ll get.
Crochet a 4×4 inch swatch with your actual hook and yarn before starting.
Measure it flat, without pulling or stretching the fabric.
Don’t assume the recommended hook size guarantees matching gauge.
Don’t skip the swatch on anything that needs to fit a specific size.
4. Uneven, Wavy Edges From Inconsistent Stitch Tension
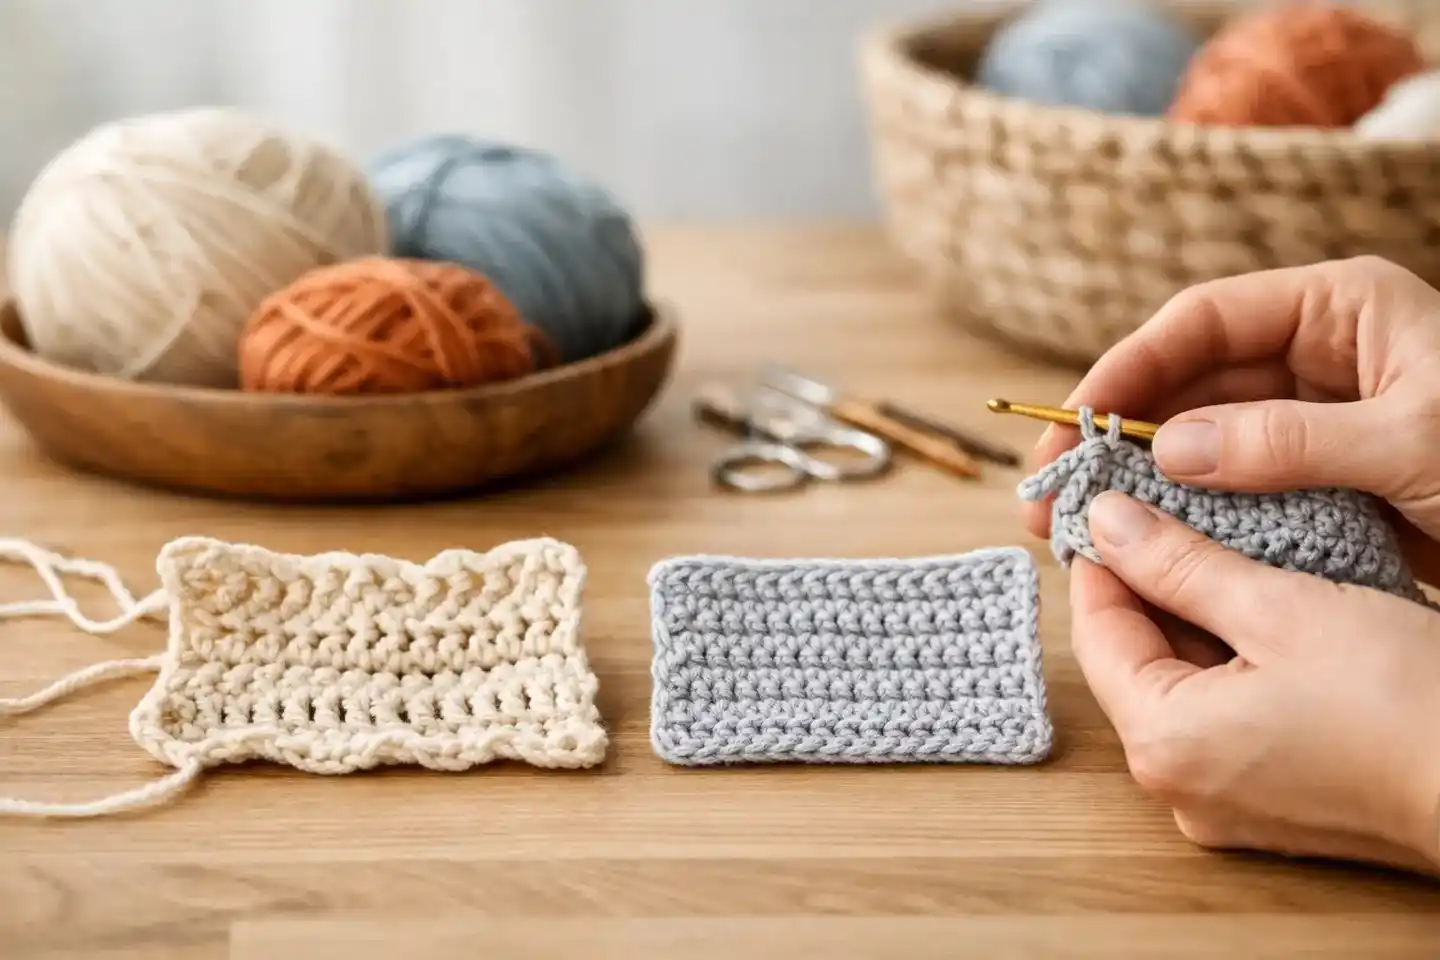
Set the two swatches side by side and the difference jumps out immediately.
The cream piece has rippled, wavy edges with rows that clearly widen and narrow, while the gray piece sits flat with straight, even sides.
Both were made by the same hands, which tells you tension is something you build, not something you’re born with.
What’s likely happening:
- Pulling the yarn too tight on some stitches and leaving others loose creates that rippling effect along the edges
- Miscounting stitches at the end of a row, adding or dropping one here and there, throws off the whole shape over multiple rows
- Switching grip or hand position mid-project changes how much tension you’re applying without realizing it
The fix: Count your stitches at the end of every single row while you’re still learning, out loud if it helps.
Keep your yarn tension hand relaxed rather than white-knuckling the working yarn, since a death grip on the yarn is usually what causes those tight, puckered spots.
Wavy edges, rows that widen and narrow, puckered spots where stitches pull tight.
Flat, straight sides, consistent stitch height, rows that stack cleanly on top of each other.
5. Not Counting Turning Chains as Stitches (When You Should)
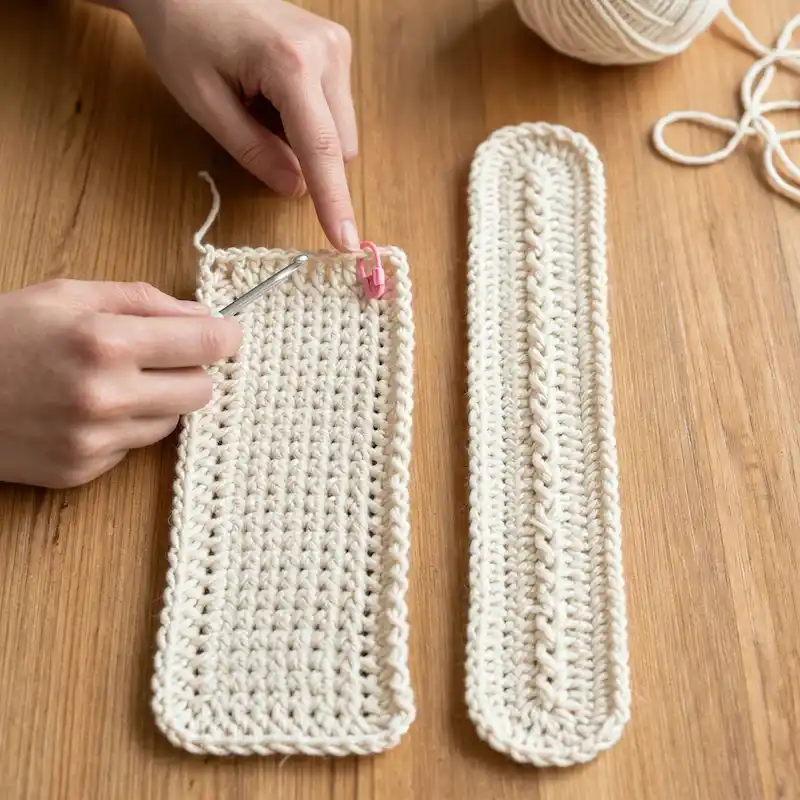
A pink stitch marker sits clipped right at the top edge of this wider swatch, marking the exact spot where a lot of beginners lose track.
That turning chain at the start of a new row, is it a stitch you work into later, or just a step to get your hook up to height? The answer depends on the stitch pattern, and treating every turning chain the same way is what causes width to drift row after row.
For taller stitches like double or treble crochet, the turning chain usually does count as the first stitch of the row, which means the last stitch of the following row needs to work into the top of that chain, not skip past it.
For shorter stitches like single crochet, it typically doesn’t count at all, it’s just there to bring your hook to the right height.
The two swatches on the table show how differently the same yarn behaves once row height and edge treatment are handled correctly versus loosely.
6. Making Fringe Longer Than It Needs to Be, or Skipping the Tool Entirely
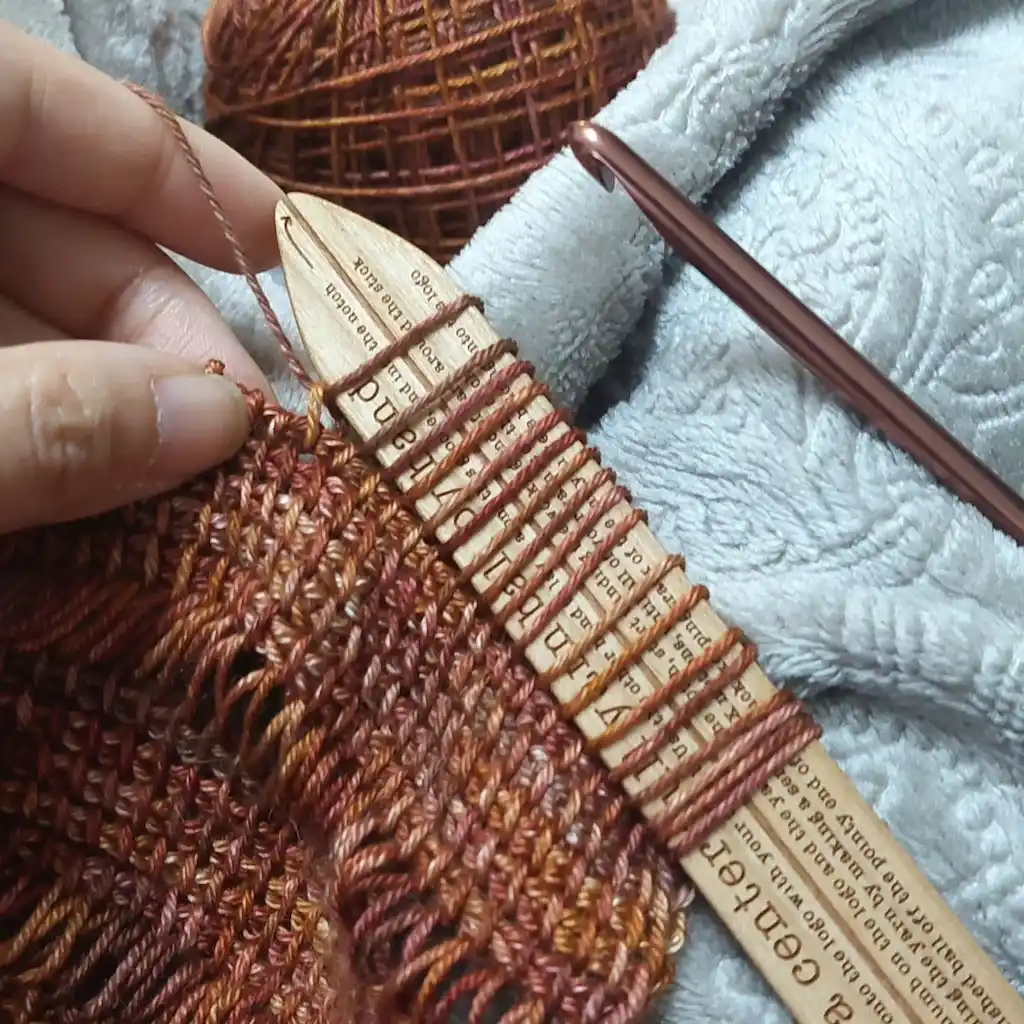
That wooden tool with rows of yarn wound around it isn’t just for looks.
Fringe tools like this exist so every strand comes out the exact same length, which is the actual mistake beginners run into most: cutting fringe by eye and ending up with pieces that are noticeably uneven once they’re attached.
How to get consistent fringe:
- Wrap the yarn around the tool the number of times needed for however many strands each fringe bundle requires
- Cut along one edge of the tool so every loop becomes two equal-length strands
- Fold the cut strands in half and pull them through the edge stitch with your hook
- Tighten the loop, then repeat down the whole edge using the same tool so every fringe matches
No fringe tool on hand? A stiff piece of cardboard cut to your desired length works the same way, wrap, cut one side, done.
7. Losing Stitches Like They’re Going Out of Style
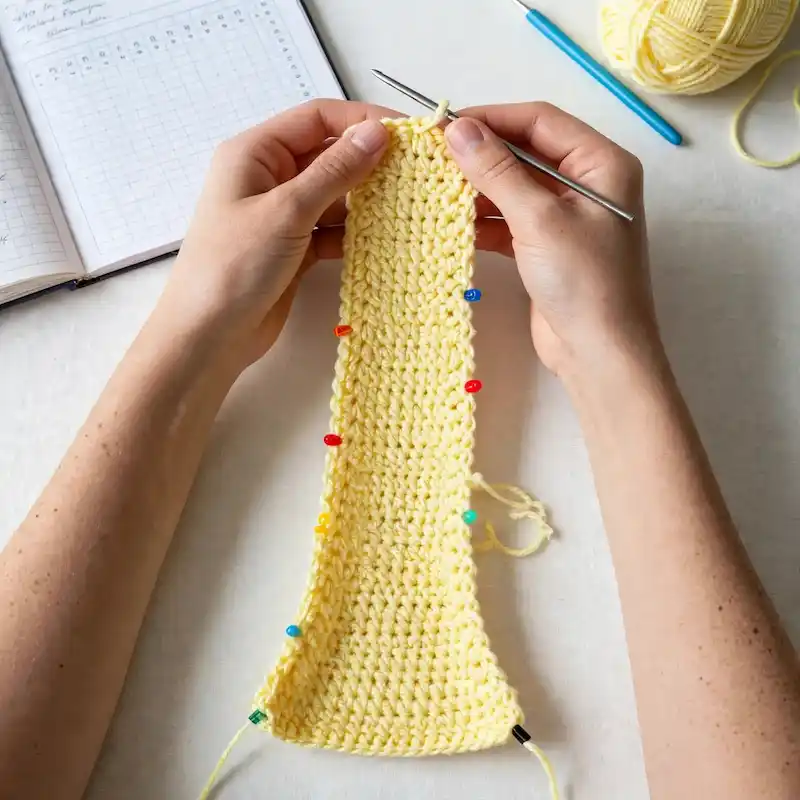
Lay this piece flat and the shape gives the mistake away immediately.
It flares out wider at the top than it is at the bottom, a trapezoid instead of a straight rectangle, which happens when stitches quietly disappear from the end of a row without anyone noticing until the shape has visibly shifted.
A row loses a stitch in a few predictable ways:
- The last stitch of a row gets skipped entirely, often because it’s harder to see or reach at the edge
- Two stitches accidentally get worked together as one, especially in a tight or textured stitch pattern
- A turning chain gets counted as a stitch in one row and not the next, throwing off the total
The color-coded pins running up both edges here are the actual fix in action, a marker placed every few rows makes it obvious the moment the edge starts curving inward instead of staying straight.
8. Losing Track of Stitch Count Inside a Shell or Lace Pattern
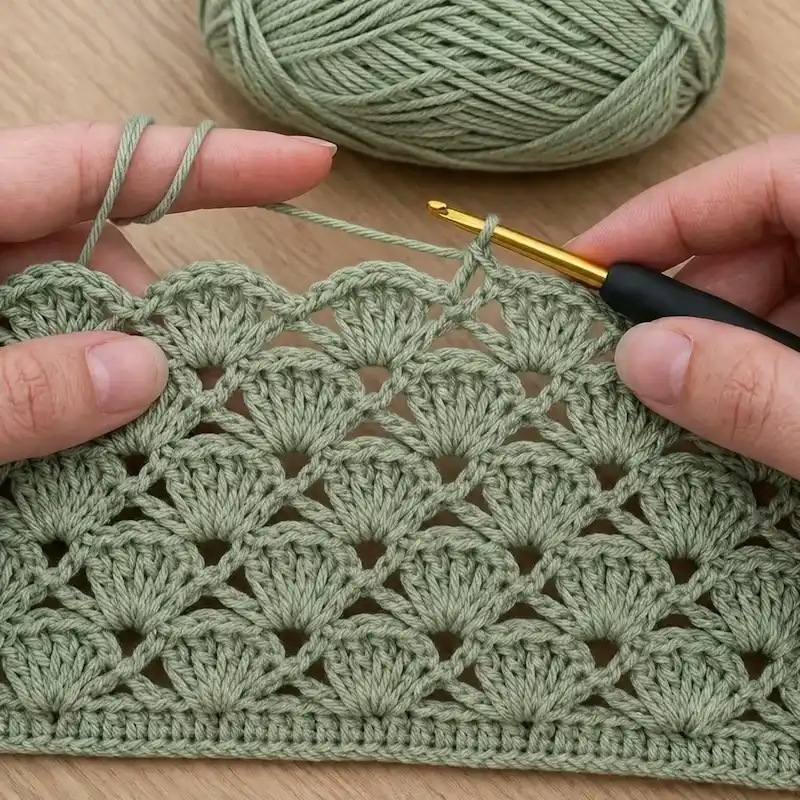
Lace and shell stitches like the one being worked here look stunning once finished, but they’re notorious for tripping up beginners mid-row.
Each shell is actually a cluster of several stitches worked into a single space, so it’s easy to lose count of exactly how many double crochets belong in one shell versus where the next chain space starts.
The scalloped rows in this piece only stay symmetrical because every shell repeat matches the one before it.
One miscounted cluster and the pattern shifts off center for the rest of the project.
Place a stitch marker at the start of each shell repeat, not just at the start of the row. It’s much faster to recount one cluster than to unravel an entire row hunting for the mistake.
9. A Foundation Chain That’s Tighter or Looser Than the Rest of the Work
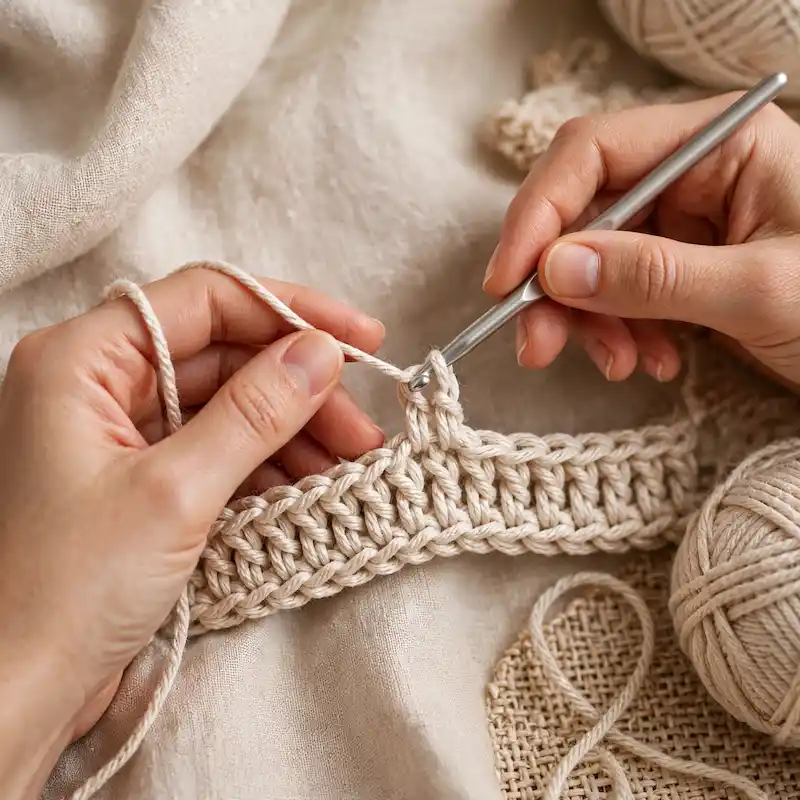
Look closely at where the working yarn wraps around the hook here, right at the start of a new stitch.
The very first row a beginner ever makes, the foundation chain, is worked before any tension habits have settled in, which is exactly why it so often ends up tighter or looser than everything crocheted after it.
A mismatched foundation chain shows up two different ways:
- Too tight, and the bottom edge of the whole piece puckers or curls while the rest lies flat
- Too loose, and the first row looks stretched out and floppy compared to the tighter rows built on top of it
The fix: Chain with a hook one size larger than the one you’ll use for the main project, then switch back down once you start your first row of stitches.
That single size difference is usually enough to loosen up a habitually tight chain without you having to think about it stitch by stitch.
10. Crocheting Into the Wrong Part of the Stitch
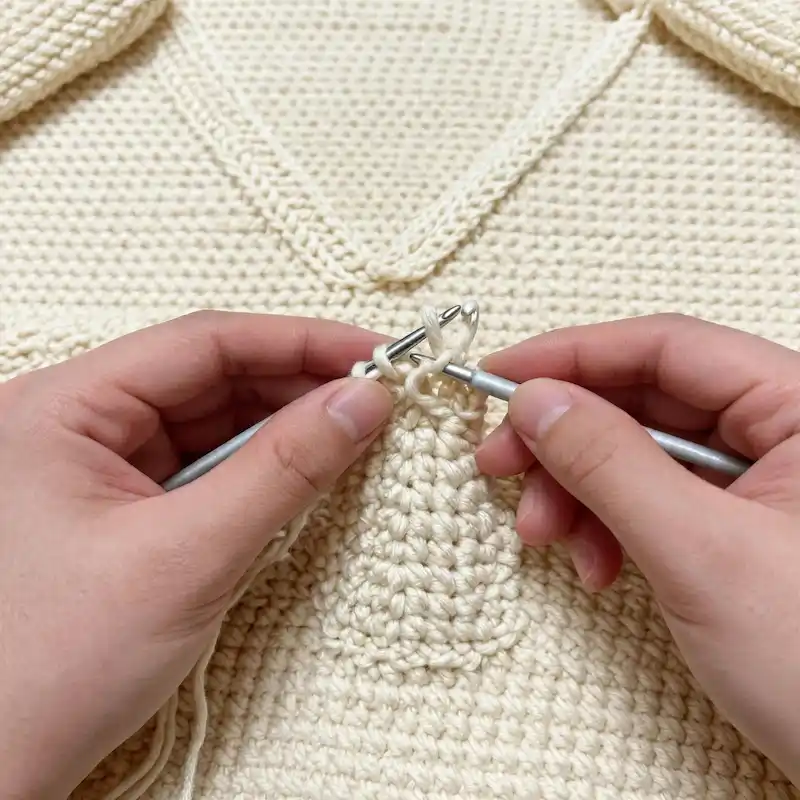
Two hooks are working close together at the top of this piece, right where the loops of the previous row sit waiting.
Every stitch actually has two loop strands running across its top, and beginners often catch just one, or accidentally split the yarn itself, instead of going under both loops the way most patterns assume.
This single habit changes the whole texture of the fabric, and it’s worth understanding the two options rather than picking one at random.
- Under both loops: the standard method most patterns default to, producing a smooth, classic stitch texture
- Under the back loop only: creates a distinct ridged line across each row, often used deliberately for ribbing or texture
The mistake isn’t picking one method, it’s doing it inconsistently within the same row without realizing it, which is what actually causes those uneven, hard-to-explain texture shifts partway across a project.
11. Leaving Ends Unwoven When a Project Has This Many Loose Strands
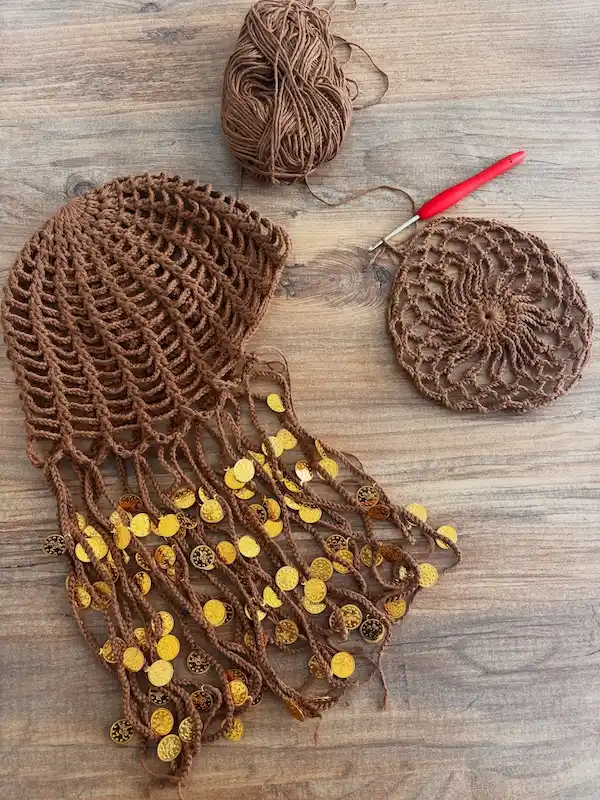
A piece like this coin-fringed panel involves dozens of individual strands, each one started, tied off, or attached to hold a coin in place.
That’s dozens of yarn tails that need securing, and skipping this step is a mistake that gets worse the more embellished a project is. Loose ends don’t just look messy, they’re where coins and beads eventually work themselves free.
What you need:
- A yarn needle with an eye large enough for your yarn weight
- A small pair of scissors for trimming after weaving
- Patience, since a heavily embellished piece like this one can have far more ends to secure than a plain scarf or hat
Weave each tail through several nearby stitches in a zigzag rather than a straight line, so it locks in place instead of pulling loose with wear.
On fringe or dangling sections specifically, secure the end right at the base of the fringe before letting the strand hang free, that’s the point most likely to unravel first.
A straight pass through stitches can slip back out. Angling the needle side to side locks the tail in place.
The base of a hanging strand takes the most stress. That’s where a knot or a few extra passes matter most.
Cutting too early leaves too little tail to weave in properly if it starts to work loose.
12. Splitting Your Yarn With Every Single Stitch
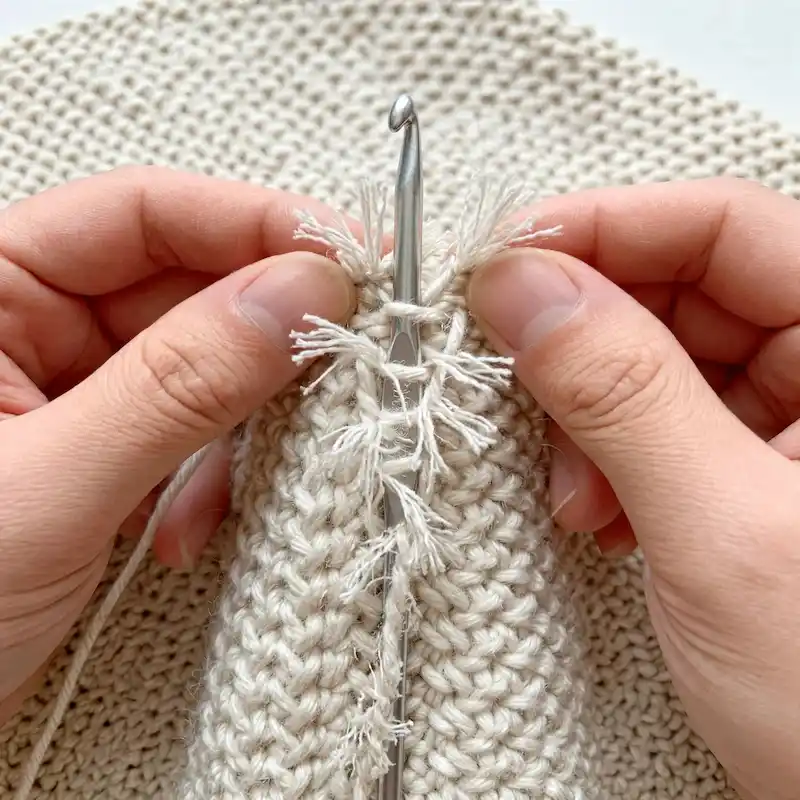
This close-up shows exactly what a split stitch looks like once it’s been pulled apart, frayed strands sticking out in every direction where the hook tore straight through the middle of the yarn instead of sliding cleanly underneath it.
It happens fast and quietly, one stitch at a time, until an entire section of fabric looks fuzzy and worn before it’s even finished.
Splitting usually comes down to how the hook approaches the stitch, not how hard you’re pulling:
- Inserting the hook at too steep an angle catches individual plies instead of sliding between them
- A hook with a rougher or snaggy tip is more likely to grab fibers than a smooth one
- Rushing through a row without watching the hook tip go in is the single biggest cause
The fix: Slow down and actually watch the hook enter each stitch, angling it slightly so the tip glides under the loop rather than stabbing straight through the yarn’s center.
If splitting keeps happening with a specific hook, check the tip for rough spots or try a different material, some hook finishes catch fiber more than others.
13. Wrapping the Working Yarn Wrong Around Your Fingers
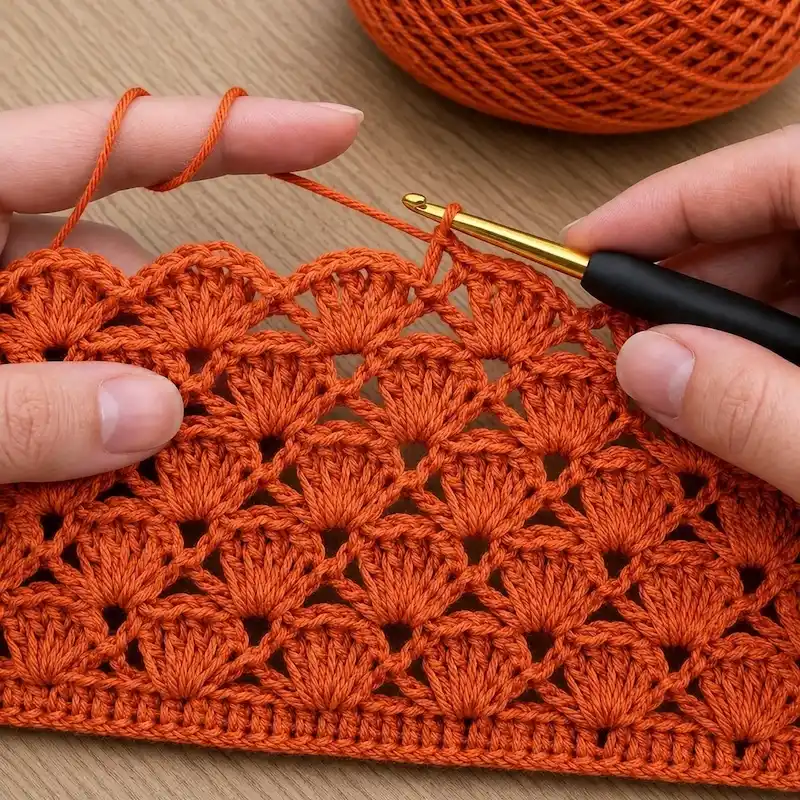
Look at how the yarn loops around the fingers of the hand holding the working yarn in this photo, that wrap is doing more work than most beginners realize.
It’s not just about keeping the yarn from sliding around, it’s what actually controls how much resistance the yarn has as it feeds through, which directly affects every stitch in a delicate pattern like this shell lace.
What you need:
- A consistent finger wrap, most crocheters run the yarn over the index finger, under the middle, and over the pinky or ring finger for tension
- A grip loose enough that you can still feel resistance without your fingers turning white
- Willingness to experiment, since the “correct” wrap varies from person to person and yarn to yarn
Too loose a wrap and the yarn slips, creating the wavy tension issues covered earlier in this list.
Too tight, and your hand cramps up before you’re even a few rows in, especially on an intricate pattern like this one where every shell needs several stitches worked in quick succession.
14. Mixing Yarn Weights That Don’t Actually Match Within One Project
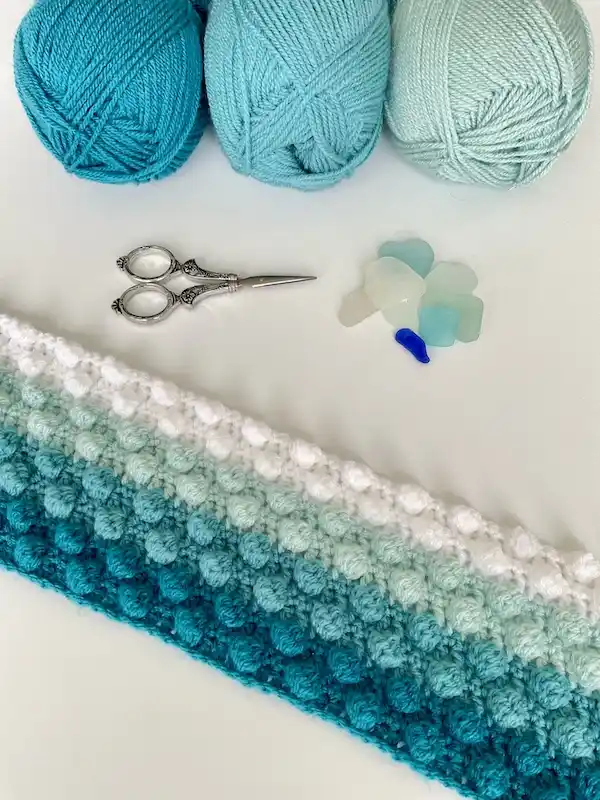
This ombre piece transitions cleanly from white through pale mint into deep teal, and the bobble stitches stay the same plump size across every color change.
That only happens when every skein is genuinely the same weight, not just labeled the same category.
Two yarns can both say “worsted” on the label and still behave differently on the hook.
Do this:
- Check the ply count and yardage per gram on the label, not just the weight category name
- Crochet a small bobble swatch in each yarn before committing to a color-blocked project
- Buy all skeins from the same dye lot when possible, even within one brand, weight can shift slightly batch to batch
Skip this:
- Don’t assume two different brands labeled “worsted” will produce identical stitch size
- Don’t mix a smooth yarn with a fuzzy or textured one in a stitch pattern like bobbles, where definition depends on consistent loft
15. Leaving Loose Ends and Rough Edges Untrimmed on a Finished Motif
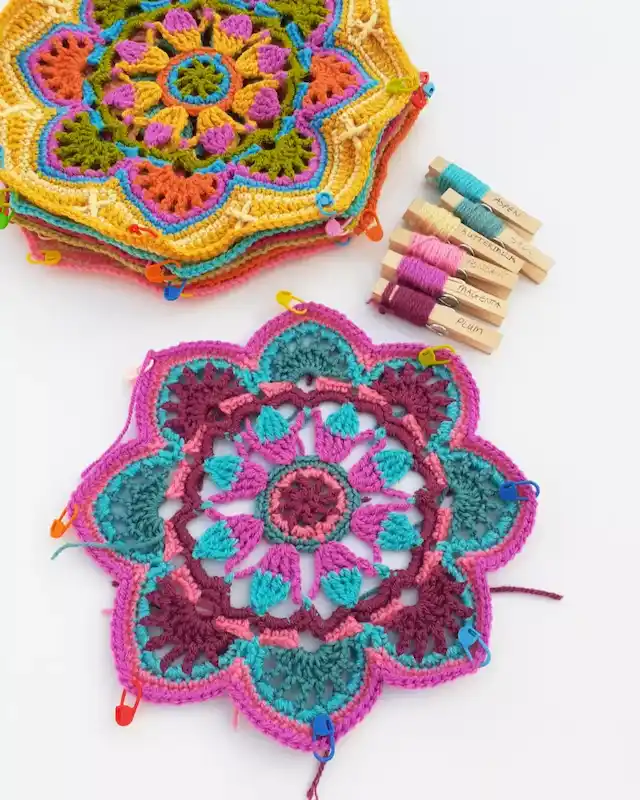
Look closely at both of these motifs and the same problem shows up on each one, stray thread tails poking out from the back, uneven color changes where a new shade was joined, and edges that haven’t been fully secured.
On a project this detailed, with dozens of color changes packed into one small motif, every single one of those joins leaves a tail that needs proper finishing.
The more colors a pattern uses, the more this mistake compounds:
- Each color change creates a new tail to weave in, so a motif like this one can easily have twenty or more ends by the time it’s done
- Skipping ends “for now” and planning to finish them later usually means forgetting several entirely once the piece gets set aside
- Loose, unfinished ends near an edge are the first thing to unravel with handling, especially before the motif is joined to anything else
The fix: Weave in each tail as soon as you finish that color, not after the whole motif is complete.
It takes longer in the moment but means you’re never facing a pile of dozens of loose ends at the very end, which is exactly the kind of task that gets left undone.
16. Giving Up Too Soon on Frogging
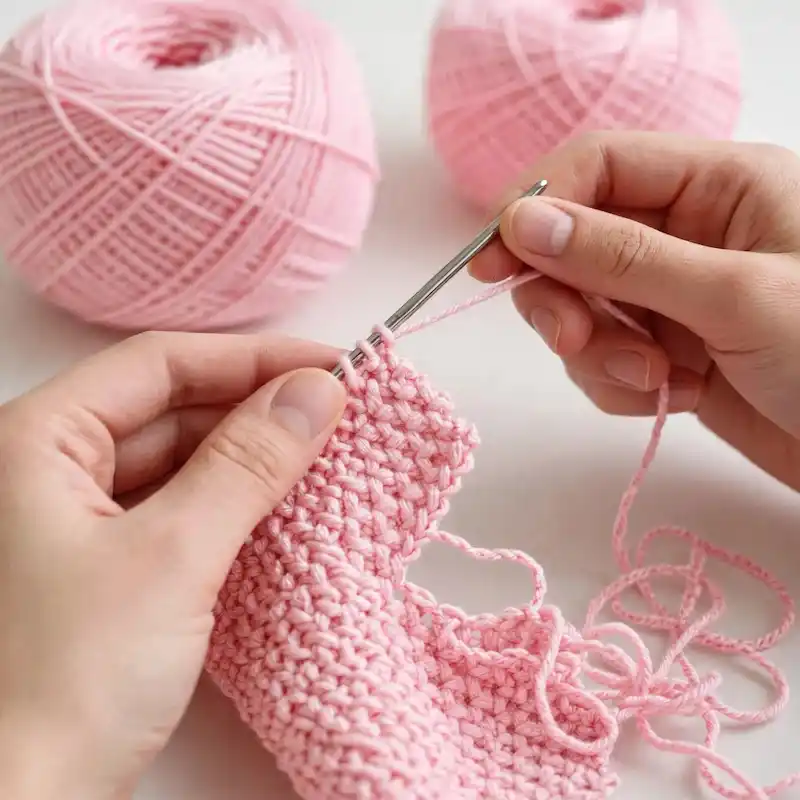
That tangled loop of pink yarn on the right of this photo looks intimidating, a section pulled out and left in a knotted mess rather than reworked.
Frogging, ripping back stitches to fix a mistake, is a normal part of crochet, but a lot of beginners quit the moment the unraveled yarn stops looking neat and starts looking like this.
Do this:
- Pull out stitches slowly, one at a time, rather than yanking the whole tail at once
- Once you’re back to a clean stitch, gently smooth the yarn between your fingers to relax any kinks before continuing
- Keep your hook nearby and reinsert it into the live stitch the moment you reach a clean spot, so you don’t lose your place
Skip this:
- Don’t rip out an entire project over one small mistake a few rows back, count back and pull only what you need to
- Don’t assume kinked or crimped yarn is ruined, most yarn relaxes back out once it’s worked again or given a light steam
A messy pile of yarn on the table doesn’t mean the project failed. It means you caught the mistake and you’re fixing it, which is exactly what experienced crocheters do too.