
18 Easy Hand Embroidery Stitches to Take Your Craft Projects to the Next Level

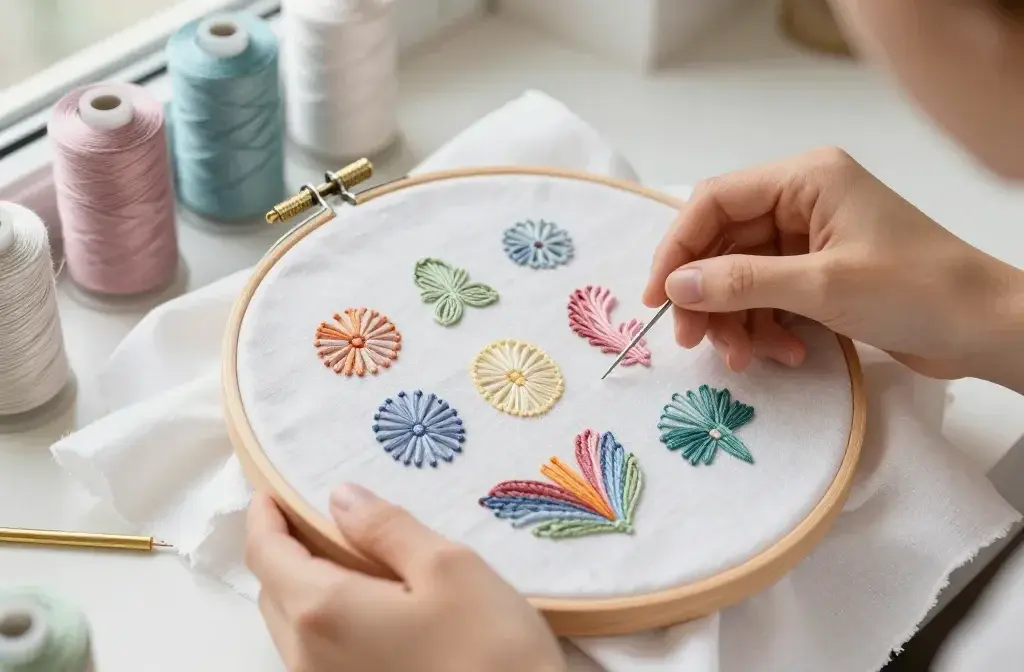
Mastering hand embroidery comes down to building a versatile toolkit of fundamental techniques, whether you are outlining crisp line art, weaving dimensional flora, or filling geometric canvases with rich texture.
From elevated woven wheel roses and soft long-and-short thread painting to precise counted cross-stitch and sweeping fly stitch fronds, each technique offers a unique way to bring fabric to life.
This comprehensive guide breaks down 18 essential embroidery stitches with real-world project examples, practical tension tips, and step-by-step visual inspiration from featured fiber artists to help you elevate your next hoop project.
1. Construct Dimensional Florals with the Woven Rose Stitch
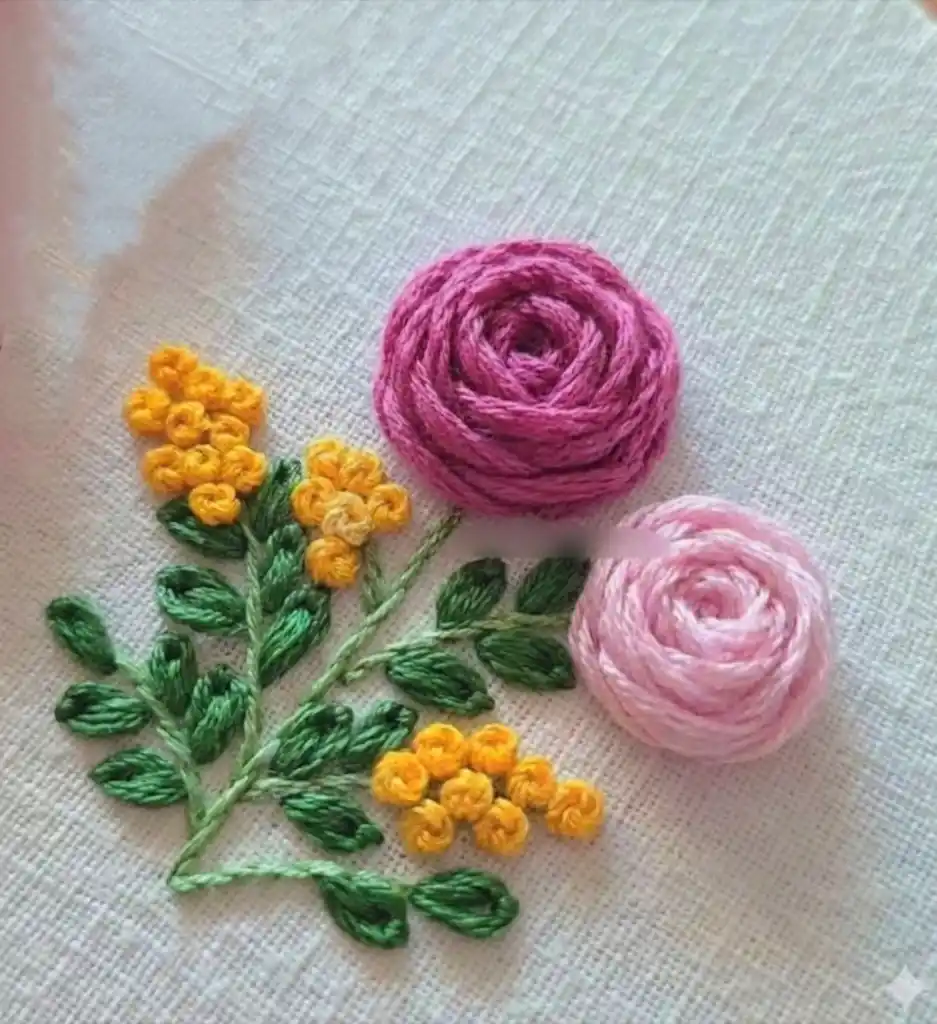
Also known as the woven wheel or spider web rose, this stitch sits distinctly elevated off the fabric surface.
By weaving embroidery floss in and out of a base framework of straight stitches, you build thick, rounded rosebuds that pop out against soft background foliage.
The technique relies on a simple structural rhythm:
- The Spoke Foundation: Lay down five straight stitches meeting in a central point like a wheel, ensuring an odd number of spokes so the weaving sequence alternates correctly.
- Under-and-Over Weaving: Pass your needle over and under the spokes continuously without piercing the underlying linen, gently pulling thread until the base spokes are fully covered.
- Textured Accents: Contrast the dense, spiraled roses by flanking them with bright yellow French knot clusters and crisp lazy daisy leaves along green stem stitches.
2. Outline Characters with Precision Blanket Stitches
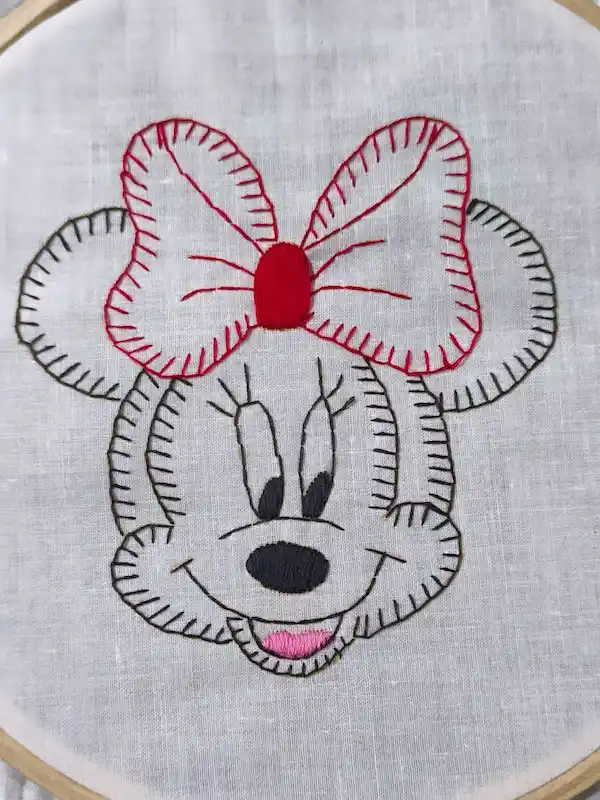
While traditionally used to bind fabric edges, the blanket stitch serves as an illustrative outline technique for cartoon motifs.
Stitches loop along the outer perimeter of each shape, creating a distinctive combed edge that frames character details like Minnie Mouse’s bow and face silhouette.
Align the baseline of every blanket stitch along your traced border line so the perpendicular “teeth” point uniformly inward to define the shaded shape.
3. Combine Mixed Stitches for Pastoral Pastel Scene Collections
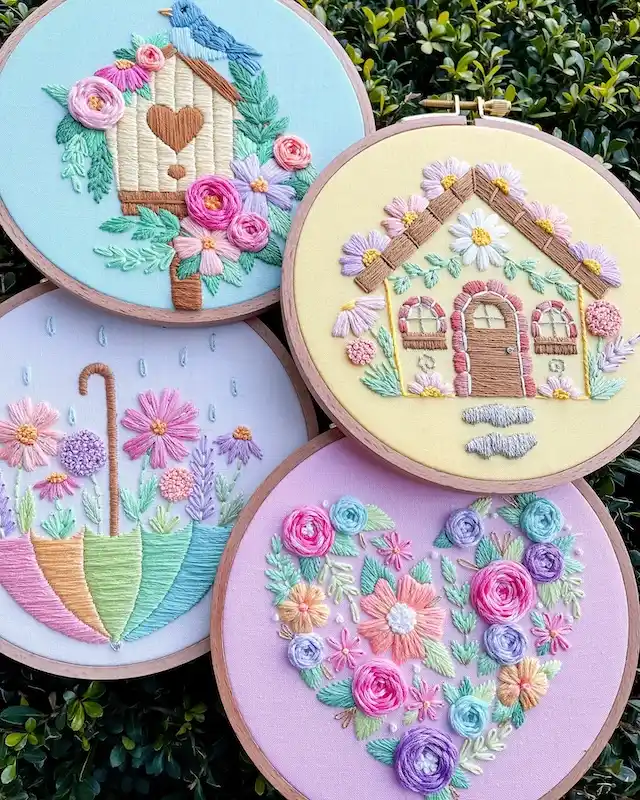
beksstitches
When stitching a multi-hoop collection, varying your foundational background colors (sky blue, butter yellow, soft lilac, and pale lavender) keeps cohesive pastel themes from looking repetitive.
Combining satin stitch architectural elements with woven rose borders creates a rich, cottagecore aesthetic across different motifs.
- Architectural Lines: Vertical satin stitches form smooth wooden siding on the birdhouse, cottage walls, and umbrella panels, giving flat surfaces a tidy, polished sheen.
- Textured Foliage: Fern-like branches are created with overlapping fly stitches and fishbone leaves, filling out spaces around floral clusters.
- Dimensional Accents: Raised woven wheel roses, French knot flower centers, and tiny straight-stitch rain droplets introduce multi-layered tactile elements to each piece.
Keeps large elements like umbrella stripes, birdhouse walls, and cottage doors smooth and even.
Adds 3D relief around roofs, heart shapes, and umbrella bases for instant visual depth.
Builds dense lavender stalks, path cobblestones, and flower centers with tactile grain.
4. Build Abstract Textures with Concentric Running Stitches and Sashiko Rhythms
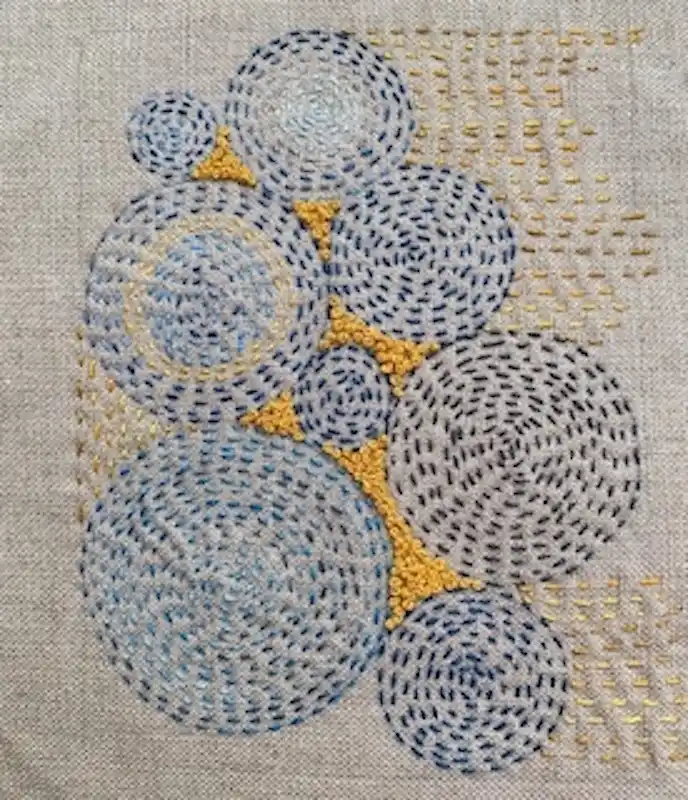
This piece features simple running stitches arranged in tight concentric circles, combined with Japanese Sashiko-style straight stitching and packed French knots for structural accents.
Rather than filling a shape with solid thread, concentric running stitches create a calming, wave-like movement across raw linen using short, evenly spaced dashes.
- Concentric Circles: Starting from a central point, spiraling rows of simple running stitch build up overlapping geometric modern circles in varying shades of denim blue, slate, and ice blue.
- Textured Focal Nodes: Dense clusters of golden-yellow French knots form sharp triangular shapes that bridge the circular motifs, adding punchy color contrast and 3D relief.
- Grid Background: Parallel rows of golden running stitches in the upper right quadrant ground the composition, establishing a subtle grid layout reminiscent of traditional darning or boro embroidery.
5. Layer Shaded Long and Short Stitches for Feather Motifs
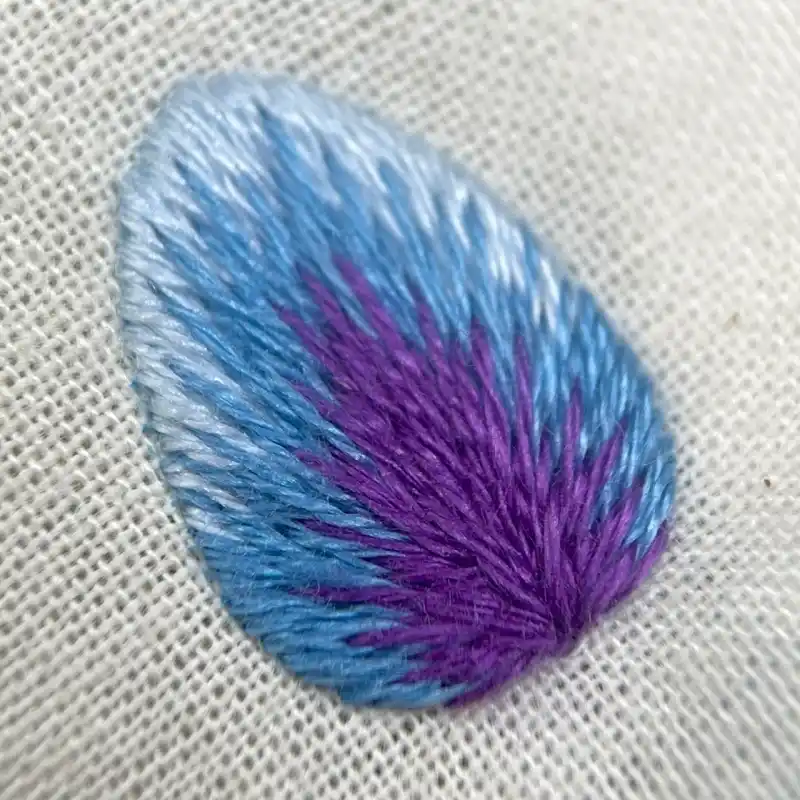
While often confused with the open, looped feather stitch (RSN Stitch Bank entry #184), compact gradient motifs like this blue and purple feather are crafted using dense long and short stitch thread painting.
By fanning overlapping stitches outwards along a central spine, you create a soft, natural plumarian texture with seamless gradient blending.
- RSN Stitch Bank References:
- Long and Short Stitch: #117 (Historically referred to as Opus Plumarium or “feather stitch” in early texts).
- Feather Stitch: #184 (The open, looped V-shaped vine stitch).
- Color Blending Strategy: Deep royal purple occupies the center core, transitioning into mid-tone azure blue, and finishing with pale icy blue at the outer tips.
- Directional Layering: Stitches angle outwards at roughly 45 degrees along both sides of the central ridge, giving the motif its organic, tapered silhouette.
Solid, shaded fill technique used to embroider realistic feathers and petals.
Open, looped embroidery line stitch used for foliage vines and decorative seams.
6. Outline Floral Motifs with Stem Stitch Lines
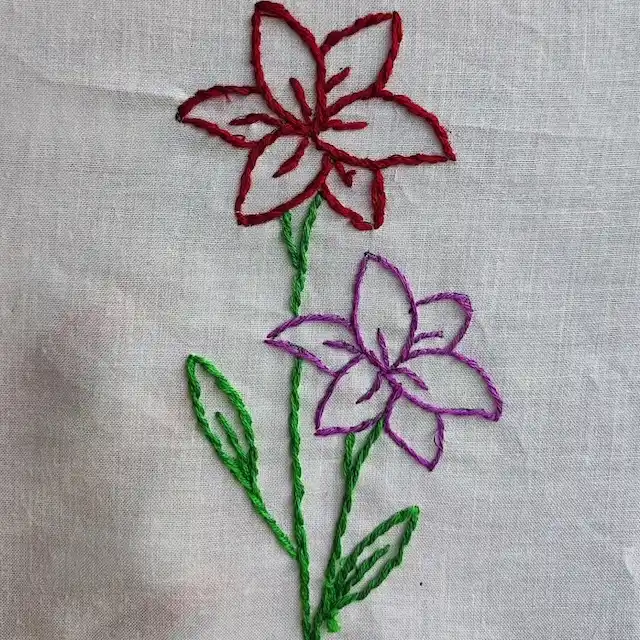
This piece uses the stem stitch (or twisted line stitch) to form clean, continuous outlines for flower petals, stems, and leaves.
Rather than filling the interior of the petals with solid thread, the stem stitch creates a rope-like line with a slight twist, making it an ideal technique for delicate line-art floral embroidery.
- Rope-like Texture: Passing the needle through the fabric with the working thread held consistently to one side gives each stroke a smooth, continuous spiral effect.
- Petal Detailing: Short straight stitches extend from the center of the red and purple lily blooms to define the inner stamen filaments without cluttering the light linen background.
- Flowing Stems: Long, continuous rows of green stem stitch frame the tall flower stalks and leafy outlines, demonstrating how a single versatile stitch can construct an entire design.
When stitching sharp turns around petal tips, shorten your stitch length to keep the twisted rope outline crisp and prevent gaps.
7. Fill Cursive Script with Textured French Knot Gradients
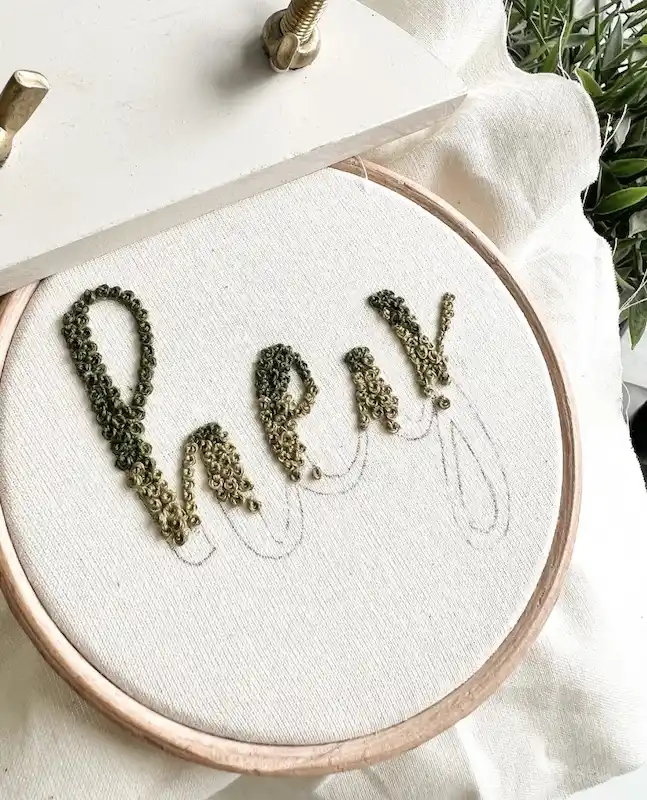
French knots aren’t just for floral centers—they make a stunning, highly tactile fill for calligraphic typography.
By packing knots tightly together along traced pencil guidelines, script lettering gains a plush, beaded 3D effect that lifts off the canvas.
- Vertical Ombré Shading: Blending dark forest green at the top loop of each letter down to a soft olive and sage green creates smooth, gradual color shifts across the name.
- High-Density Line Coverage: Setting knots tightly against one another eliminates fabric gaps, giving thin script strokes crisp edges and distinct calligraphic weight.
- Tension Consistency: Keeping thread tension uniform while pulling each knot flush to the fabric prevents loose loops and maintains a neat, raised texture across the entire word.
Work single-loop French knots along narrow upstrokes, then pack double-wrap knots into wider downstrokes to naturally mirror calligraphic weight and contrast.
8. Create High-Contrast Florals with Radial Satin Stitching
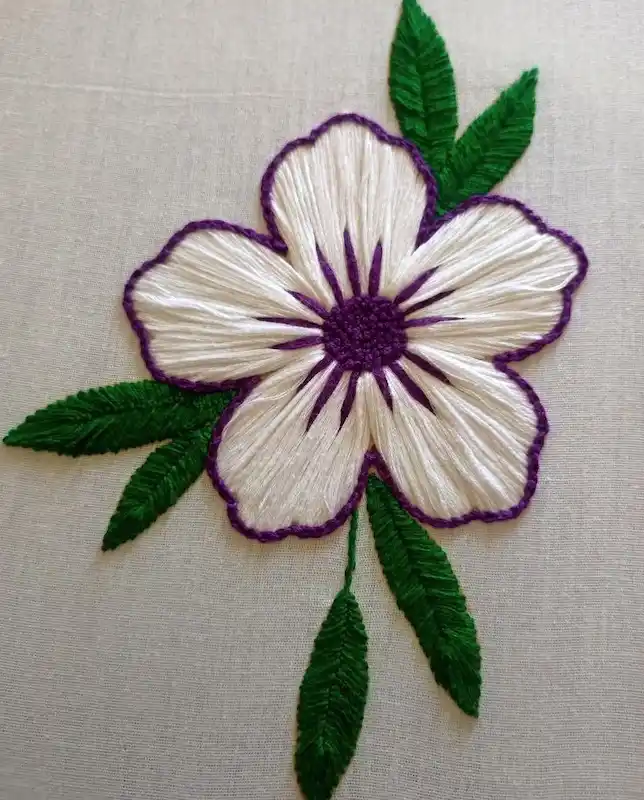
Filling wide petals with smooth satin stitch requires careful angle control to keep the threads lying flat and silky.
By fanning bright white stitches radially from the core toward the scalloped petal edges, the flower gains a luminous, light-reflecting sheen.
- Radial Alignment: Long satin stitches angle inward toward the center, creating natural petal contours while maintaining uniform thread tension across wide surface areas.
- Graphic Outlining: A deep purple chain or stem stitch frames each petal, establishing a sharp, high-contrast border that makes the white petals pop off the neutral linen background.
- Layered Center Details: Dark violet straight stitches radiate from a dense French knot center, mimicking natural floral stamen lines and pulling the entire bloom together.
When stitching wide rounded petals, fan your stitches out from a central focal point rather than laying them in parallel rows. This radial orientation preserves natural floral proportions and maximizes thread sheen.
9. Layer Lazy Daisy Stitches for Full Classic Daisies
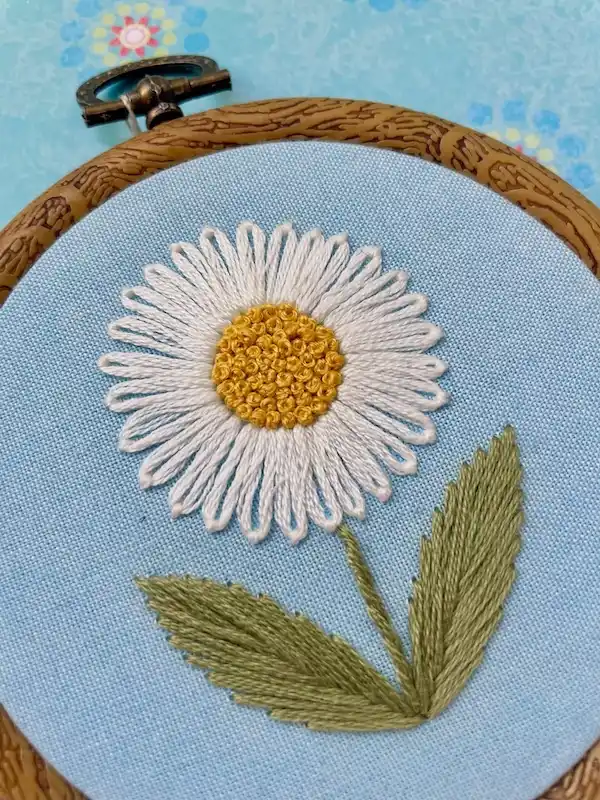
The lazy daisy stitch (detached chain stitch) is a staple for floral embroidery, creating delicate teardrop-shaped loops anchored by a tiny tacking stitch.
Staggering two concentric rows of white loops around a golden French knot center creates a full, double-petaled daisy with natural dimensional depth.
- Concentric Petal Layering: Stitching an outer ring of long loops followed by a shorter inner ring fills in gaps, giving the bloom a dense, realistic shape against soft blue fabric.
- Textured Golden Core: A tight cluster of bright yellow French knots forms a raised, tactile center that grounds the radiating white petals.
- Serrated Foliage: Angular leaf stitches angle along a central spine to form realistic, feathered leaves that offset the smooth, rounded loops of the flower head.
To prevent visible fabric gaps in large daisies, stitch an outer ring of long lazy daisy loops first, then tuck a second inner ring of shorter loops into the open spaces between them.
10. Contour Delicate Petals with Fine Chain Stitch Outlines
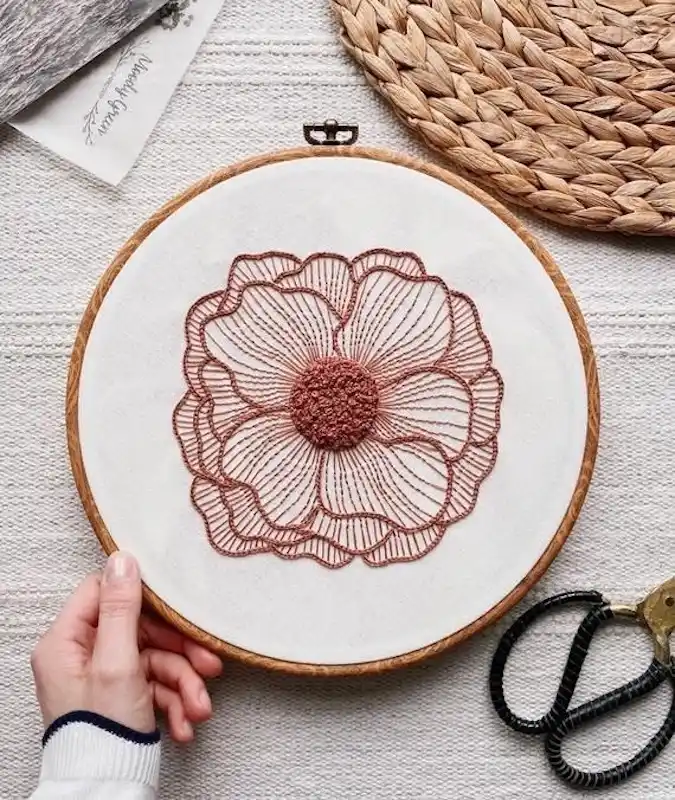
The chain stitch creates a continuous series of linked loops, making it one of the most effective techniques for outlining fluid, organic shapes.
By working in a single warm terracotta color on light linen, delicate line-art flowers gain continuous structural definition without needing solid fill.
- Layered Petal Contours: Rows of tight chain stitch trace each scalloped petal border, building a multi-layered, semi-transparent bloom with distinct line weight.
- Radiating Interior Lines: Fine lines of tiny chain stitches sweep inward toward the center, imitating natural petal veining and shading through pure line work.
- Textured Center Core: A dense cluster of monochromatic French knots creates a focal point at the flower’s center, balancing the open loops of the surrounding line work.
To achieve crisp, graceful curves on delicate line-art florals, shorten your chain stitch loop length around tight curves to maintain a smooth, unbroken line.
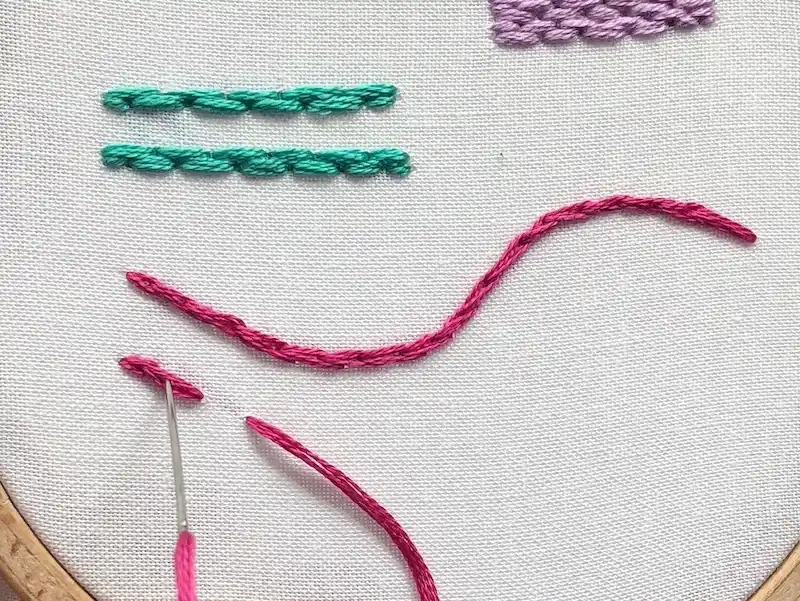
11. Master Smooth Outlines with the Versatile Backstitch
mcreativej
The backstitch is the fundamental workhorse of hand embroidery, prized for its ability to create crisp, continuous lines.
By working the needle backward into the end of the previous stitch, it forms an unbroken foundation perfect for line art, text, and decorative borders.
- Needle Mechanics: Bringing the needle up one stitch length ahead and plunging it backward into the hole of the preceding stitch creates a tight, gap-free line with uniform strength.
- Curved Flexibility: Adjusting your stitch length allows you to navigate graceful curves and wavy lines—like the bright pink sample—with smooth, fluid precision.
- Foundation for Stitch Variations: A simple backstitch row acts as a versatile base that can be whipped or threaded with contrasting thread (as shown in the teal and purple samples above) to add instant dimension.
To maintain smooth, fluid lines along sharp or gentle curves, shorten your backstitch length as the curve tightens to prevent harsh, boxy angles.
12. Craft Realistic Foliage with the Fishbone Stitch and Leaf Variations
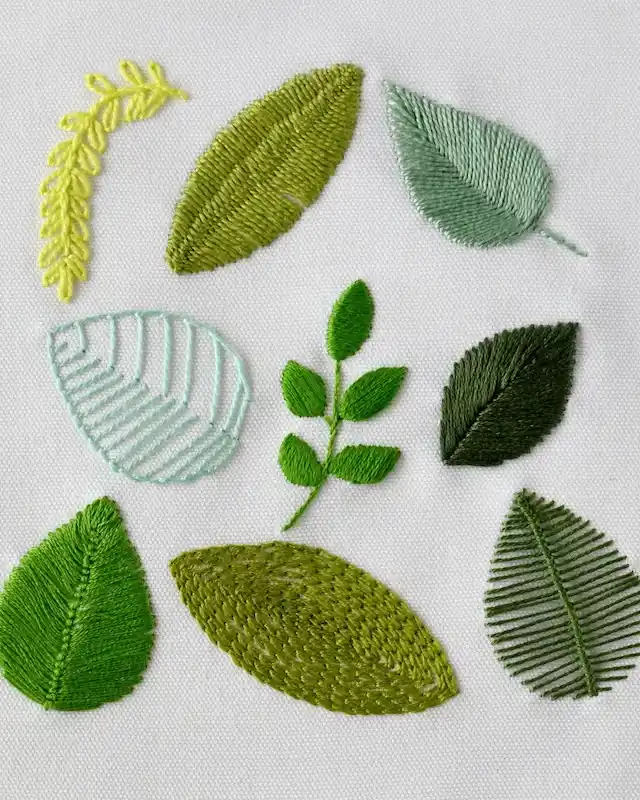
This leaf sampler demonstrates multiple techniques for embroidering botanical foliage, centered primarily around the fishbone stitch and its openwork variations.
By angling stitches diagonally toward a central spine, fishbone techniques naturally replicate the intricate veined structure of leaves.
- Classic Fishbone Stitch: Stitches alternate from left to right, overlapping slightly at the central guide line to construct a dense, smooth surface with a pronounced ridge down the middle.
- Open Fishbone (Skeleton Leaf): Leaving even gaps between the diagonal stitches—as seen in the light mint and dark green openwork samples—creates lightweight, transparent leaf outlines.
- Fly Stitch Fronds & Satin Leaflets: Rowed fly stitches (shown in the bright yellow frond) and small satin-stitched leaf pairs provide distinct textures for smaller branches and fern motifs.
Always place a single straight stitch directly at the top tip of your traced leaf outline first, then alternate diagonal stitches left-to-right across the central spine for perfectly symmetrical edges.
13. Construct Wildflower Umbels with Radiating Straight Stitches and Knot Clusters
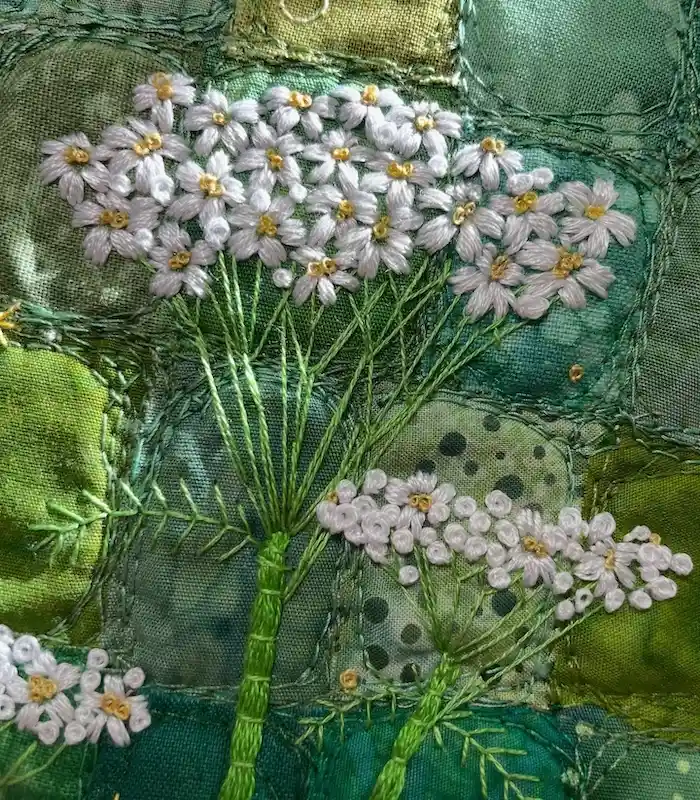
Recreating umbrella-like wildflower structures—such as Queen Anne’s Lace, yarrow, or cow parsley—requires a combination of structural line work and delicate, clustered surface stitching.
Fanning fine support threads across a pieced background creates an organic, airy floral silhouette with rich botanical detail.
- Radiating Umbel Rays: Long, slender straight stitches fan out from central stem nodes in a wide arc, forming the structural framework that supports each flower head.
- Clustered Petal Heads: Small white straight stitches or tiny lazy daisy loops cluster around bright yellow French knot centers, building dense, cloud-like floral sprays.
- Banded Stems & Feathery Leaves: Thick, horizontally wrapped straight stitches (or ladder/banded stem stitches) provide sturdy visual weight to the main stalks, while delicate fly stitches create soft, fern-like side leaves.
Stitch the green radiating support rays first before embroidering the white flower clusters. Overlaying the petals directly onto the tips of the rays conceals raw thread junctions and creates a natural, connected structure.
14. Map Symmetrical Geometric Mandalas with Counted Cross-Stitch
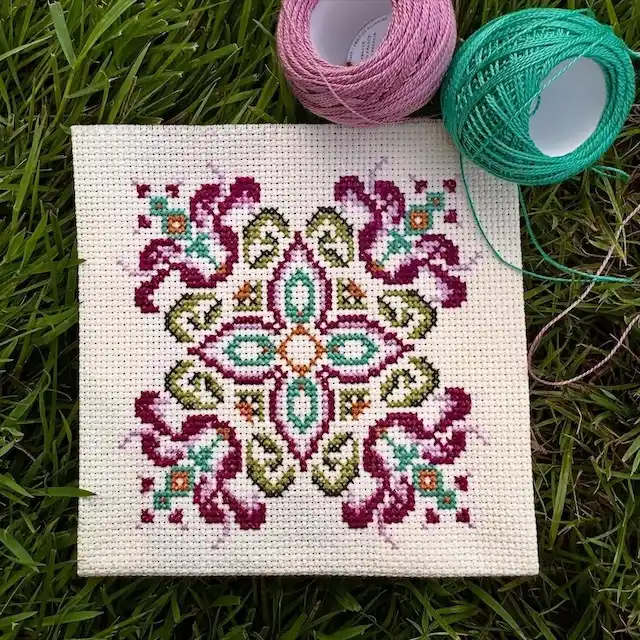
stchnpeace
This ornate kaleidoscope tile showcases the precision of counted cross-stitch on structured Aida fabric.
By building uniform “X” stitches across an evenweave grid, intricate symmetrical motifs emerge with clean geometric definition.
- Grid-Based Symmetry: Working outward from a central intersection allows four-way mirrored motifs to form perfectly balanced, tile-like medallions.
- Pearl Cotton Sheen: Utilizing twisted Perlé/pearl cotton threads gives each stitch a plump, lustrous finish with rich surface coverage over the fabric weave.
- Vibrant Jewel-Tone Contrast: A palette of magenta, emerald teal, olive green, and warm ochre highlights nested central diamonds and sweeping corner scrollwork against the ivory background.
When stitching large symmetrical cross-stitch motifs, find the exact center of your fabric by folding it in quarters before making your first stitch. Working from the center outward ensures equal margins and flawless four-way alignment.
15. Layer Abstract Botanical Landscapes with the Fly Stitch
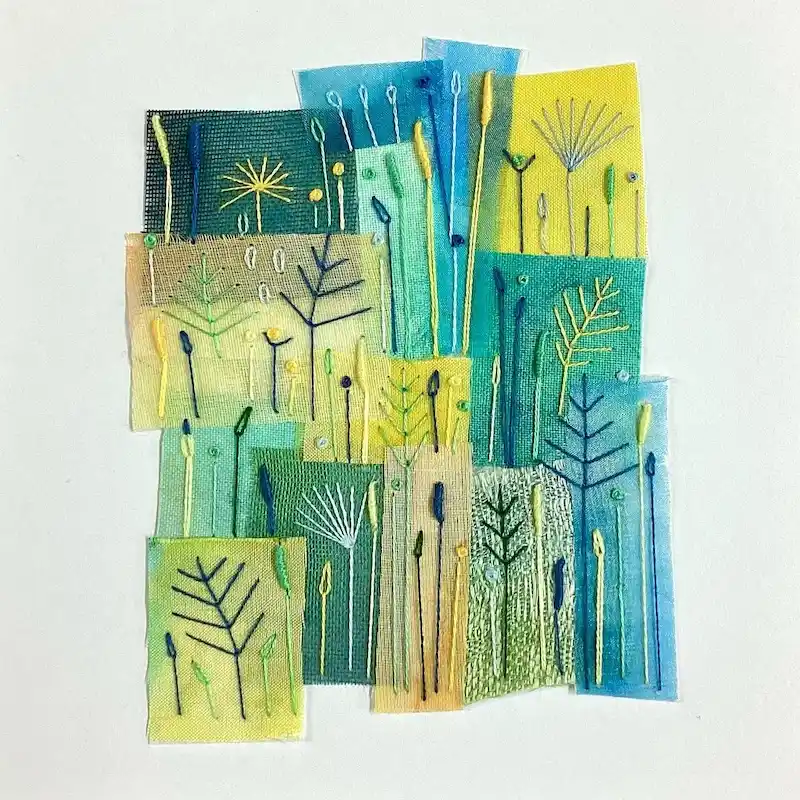
Stacking fly stitches along a central stem line is one of the most effective ways to create stylized ferns, pine branches, and leafy meadow foliage.
In this modern textile collage, rows of V-shaped fly stitches in contrasting thread colors bring energetic structure to overlapping fabric patches.
- Stacked Branching: Working a series of open V-shaped loops with a tiny central tacking stitch builds neat, symmetrical pine branches and fern fronds across the canvas.
- Mixed-Media Substrate: Embroidering over a patchwork grid of sheer green, yellow, and teal linen scraps creates a rich color-blocked backdrop for the thread work.
- Textured Meadow Accents: Combining stacked fly stitch stems with straight-stitch dandelion rays, single-loop leaves, and French knot blossoms builds a dynamic, multi-layered botanical scene.
Varying the width of your loop and the length of your central anchoring tail transforms the stitch—wider loops create fan-like palm fronds, while narrow, tightly spaced loops yield dense pine branches.
16. Master the Spider Web and Satin Stitch Combination
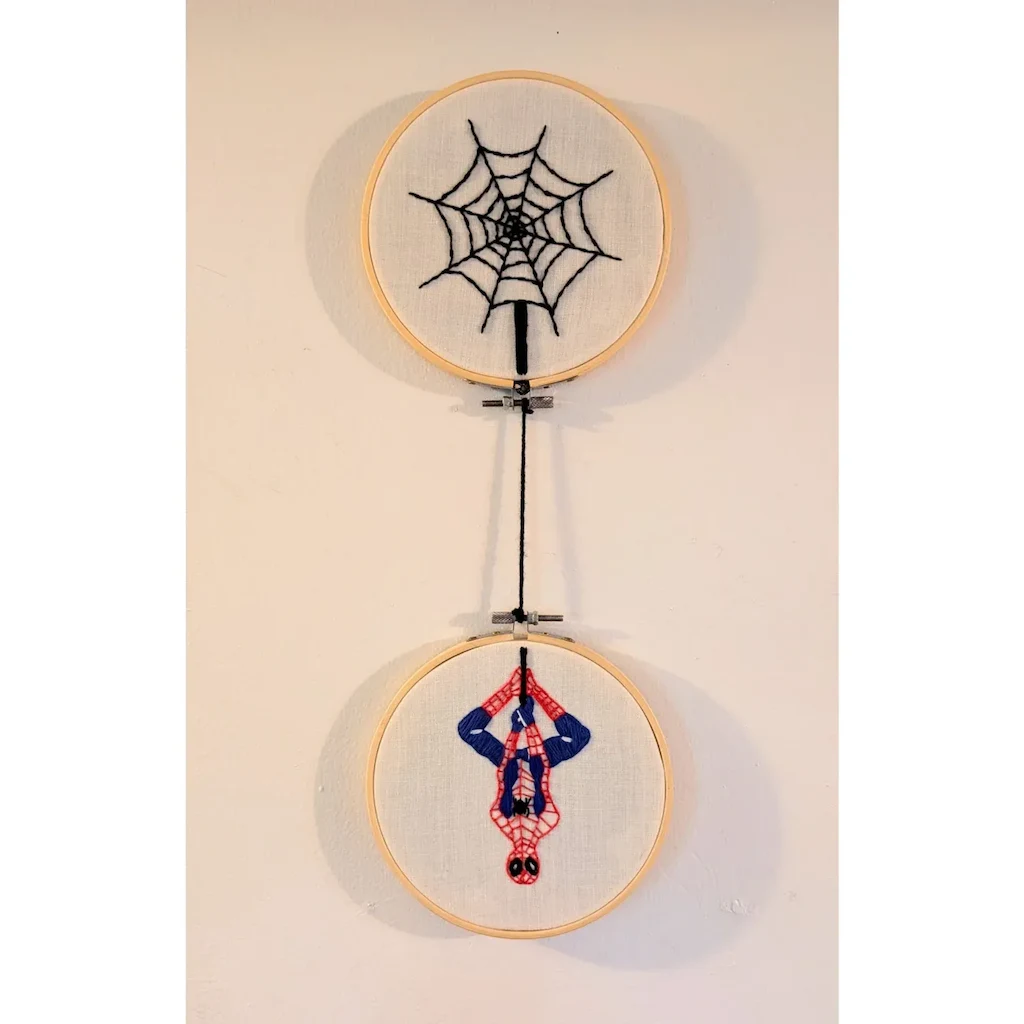
The magic in this piece comes down to contrasting bold outline stitches with solid satin filling.
By varying line weight and stitch types, the two frames achieve completely different tactile feels on a simple linen ground.
How to Execute the Stitches:
- Woven Spider Web Stitch: Work five straight radiation spokes from the center outwards, then weave your thread under and over the spokes in a continuous circle to build the web hub.
- Backstitch Line Work: Outline the outer web rings and Spider-Man’s suit grid using a tight backstitch for crisp, connected linear definition.
- Satin Stitch Filling: Lay parallel, smooth satin stitches close together across the suit’s red and blue panels to create a bold, raised block-color finish.
17. Layer Fishbone and French Knots for Realizing Animal Textures
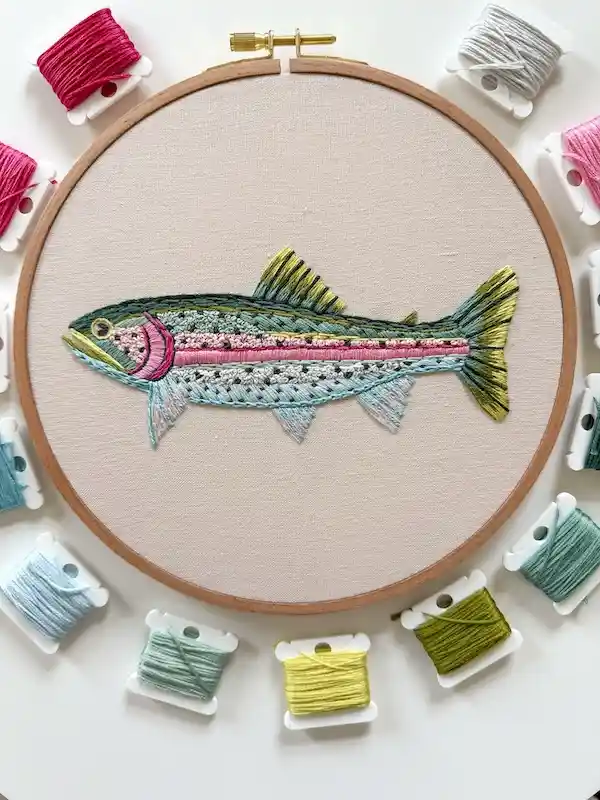
Using the fishbone stitch to create realistic motifs allows angled threads to mimic scales, feathers, or natural grain.
In this detailed trout embroidery, overlapping angled stitches form the fish’s body while French knots pack the interior striping to add scale-like dimension.
- Angled Overlap: The fishbone stitch crisscrosses along a central spine, locking down thread ends so narrow areas like the belly and tail base stay smooth without gaps.
- Textured Stripe Fill: Dense clusters of French knots in vibrant pink and soft grey sit adjacent to long satin lines, creating a natural speckled pattern across the scales.
- Fin Detail: Extended straight stitches in bright chartreuse form the fin rays, anchored by a dark outline backstitch to give structural crispness against the linen background.
Draw a light guideline down the middle of your shape to mark where the stitches will cross over.
Bring the needle up at the top point of the shape and take a short straight stitch directly down the center line.
Bring thread up along one outer edge, entering slightly across the spine, then repeat on the opposite side to lock down the feathering.
18. Blend Gradient Tones with Long and Short Stitch Thread Painting
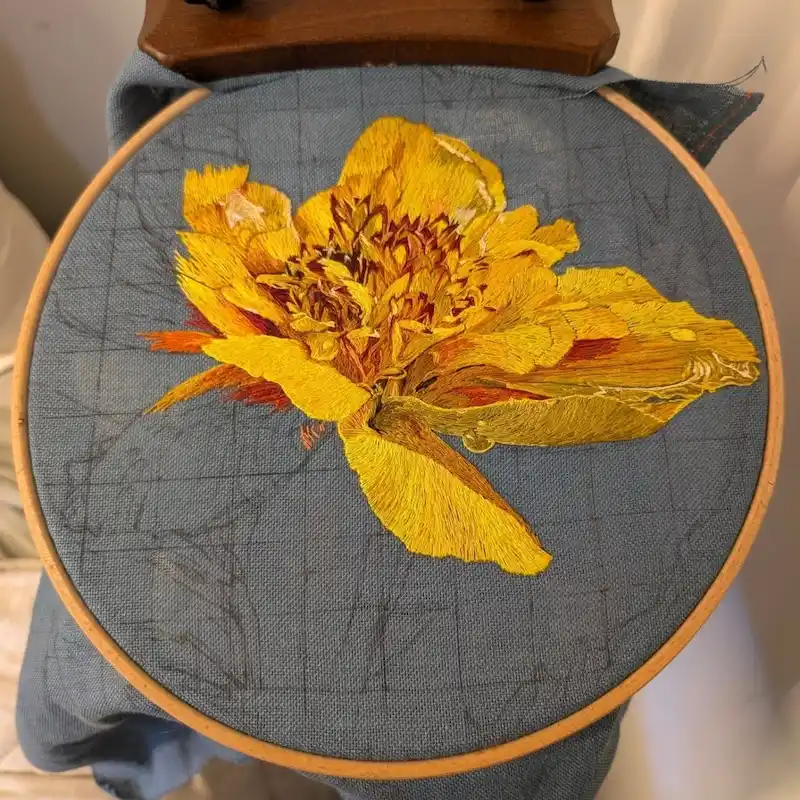
Thread painting (or needle painting) relies almost entirely on the long and short stitch to create seamless color transitions that mimic oil paintings.
Using a slate blue linen background, bright golden yellow petals transition smoothly into deep terracotta and crimson centers by overlapping varying stitch lengths.
- Directional Flow: Every stitch follows the natural curve of the petal, fanning outward from the flower’s center to capture realistic movement and dimension.
- Single-Strand Blending: Working with a single thread strand allows delicate shifts between bright canary, honey gold, and dark amber without creating harsh linear breaks.
- Highlighting Techniques: Tiny touches of pale cream along the petal edges catch light, while dark red stitches tucked inside the central stamen core create realistic visual depth.
Creates solid block colors with hard edges. Great for geometric patterns, but lacks realistic shading transitions.
Interlocks staggered stitch lengths seamlessly. Essential for thread painting, smooth gradients, and floral petals.