
26 Holiday Decor Craft Trends for 2026

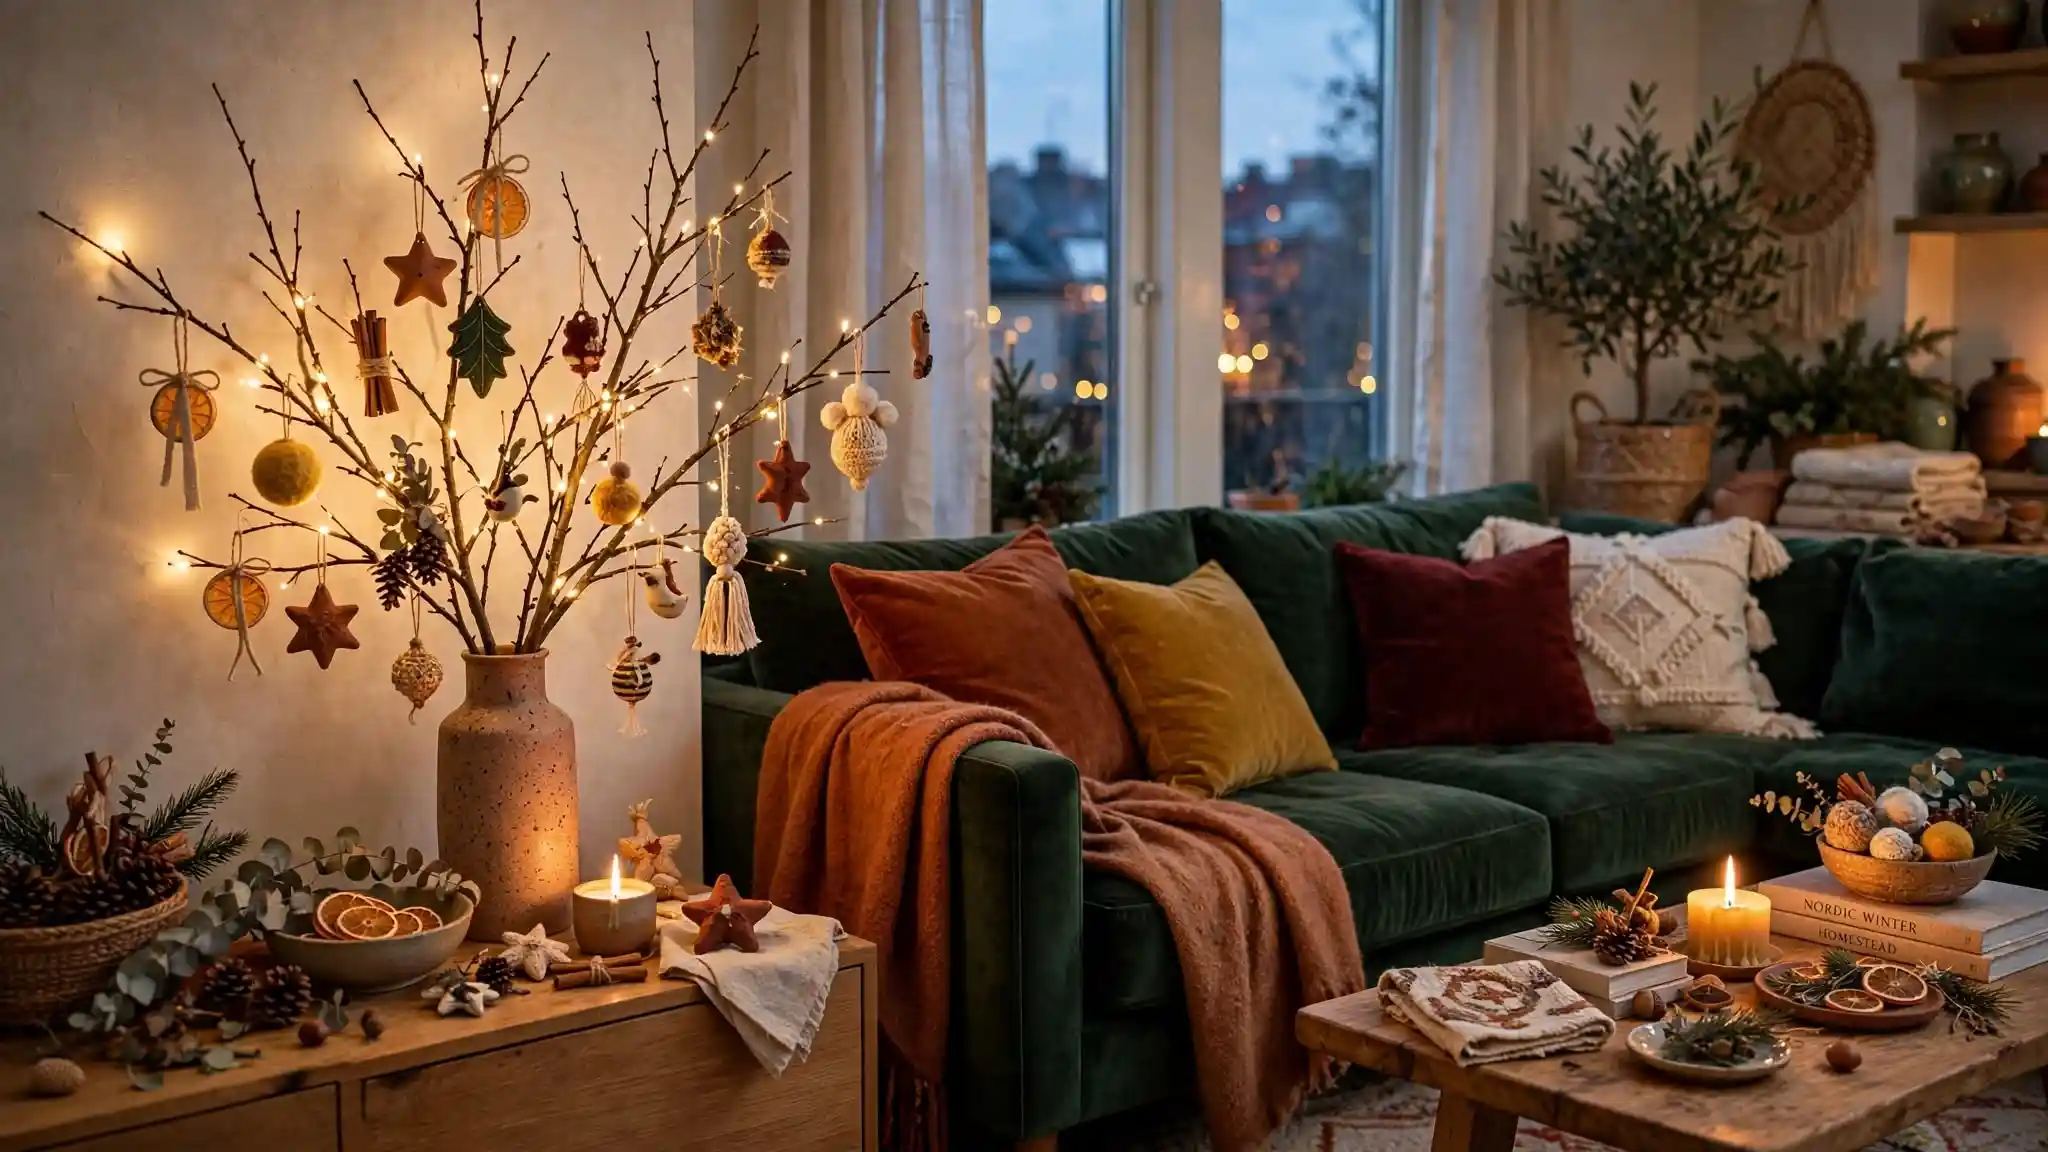
Lost in a 2 AM Pinterest scroll, saving every holiday craft in sight? We’ve all been there.
Whether you’re looking to completely transform your living space or just searching for that one perfect weekend DIY project, this ultimate collection of 26 holiday decor ideas has you covered.
From upcycled denim creations and heirloom-worthy needlework to maximalist color-drenched rooms and Scandi-inspired natural branch trees, these viral trends are about to blow up your feed and bring instant magic to your home.
They’re fresh, they’re gorgeous, and honestly—they’re way easier than those overly complicated crafts your aunt makes.
Grab your supply kit and get ready to screenshot your favorites, because your home is about to look like it belongs straight in a magazine.
1. Build a Wall-Mounted Branch Christmas Tree with Fairy Lights
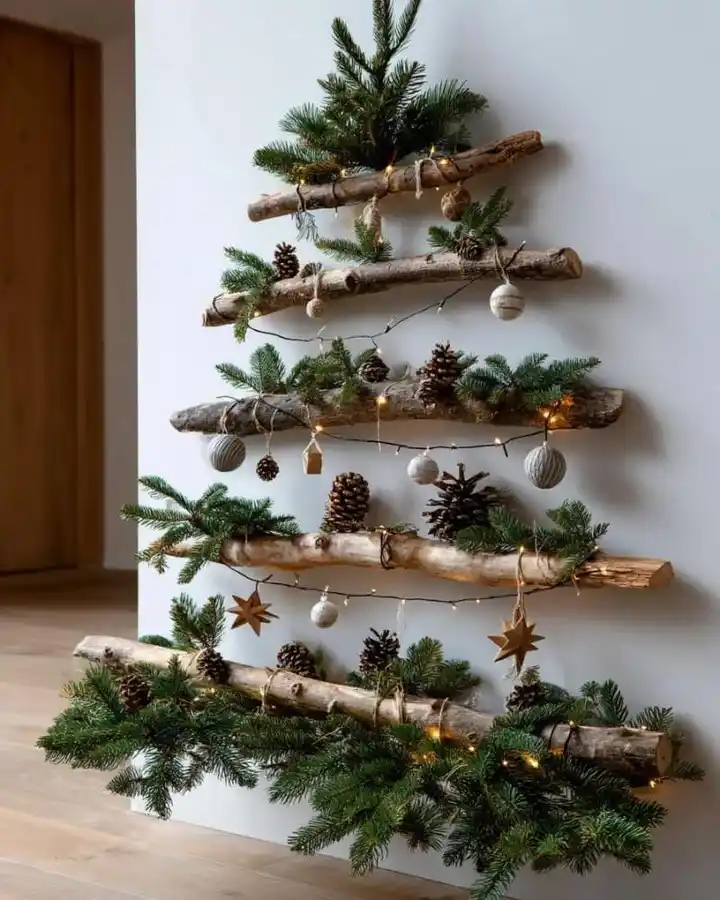
Mounting horizontal wooden logs directly onto a wall in a decreasing triangular scale creates a striking, space-saving Christmas tree alternative.
Layering fresh evergreen clippings, pinecones, wooden stars, and delicate micro-fairy lights across each branch gives the installation a warm, organic holiday glow.
Key steps for designing a wall-mounted branch tree:
- Arrange Horizontal Logs: Select sturdy tree branches cut to progressive lengths, mounting them securely to the wall or a backing board to mimic a Christmas tree silhouette.
- Layer Greenery & Pinecones: Tuck fresh pine or fir boughs along the top of each branch, adding cluster arrangements of varying pinecones for woodland texture.
- Hang Ornaments & Lights: String micro-fairy lights horizontally across the tiers, dangling small wooden stars, yarn-wrapped spheres, and tiny ornaments from the branches.
2. Vintage Glass Ornaments Bring an Old World Holiday Craft Trend Back for 2026
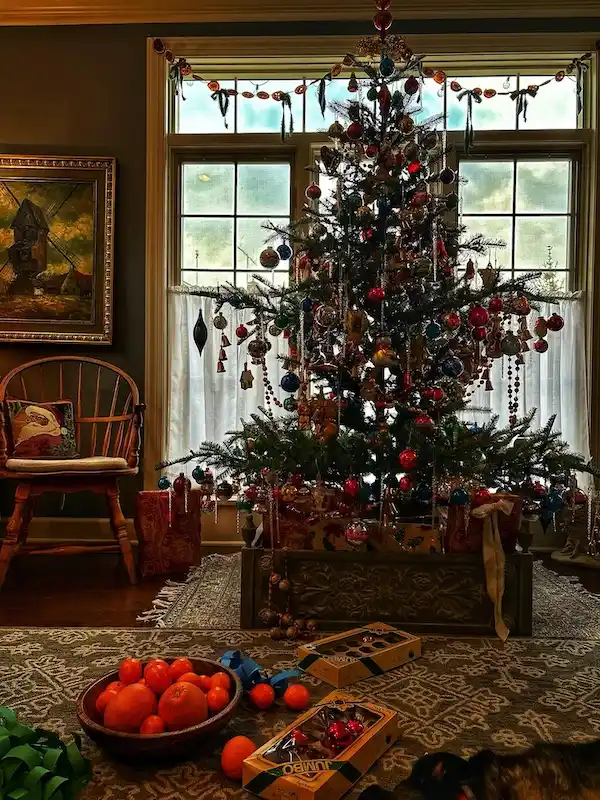
Deep jewel tones do the heavy lifting here. Instead of a coordinated palette, this tree leans into a mixed collection built up over years, with mercury glass balls, painted figural ornaments, and strings of glass beads layered from top to bottom.
The real, full branches give every piece room to hang and catch the window light behind it.
A few ways to get the look:
- Start with a full, natural feeling tree, even if it’s artificial, so ornaments have space to dangle rather than sit flush against the branch
- Mix finishes on purpose. Matte, glossy, and painted ornaments sitting together read as collected, not matched
- Hang glass icicles and beaded garland loosely instead of wrapping them tight, so they move and catch light
- Layer in old world touches on the windowsill, like a dried citrus garland, to carry the theme past the tree itself
The bowl of clementines on the table isn’t styled. It’s just there, and that’s part of why the whole room feels lived in instead of staged.
3. Hang Wire Star Frames Beneath Fresh Shelf Garland
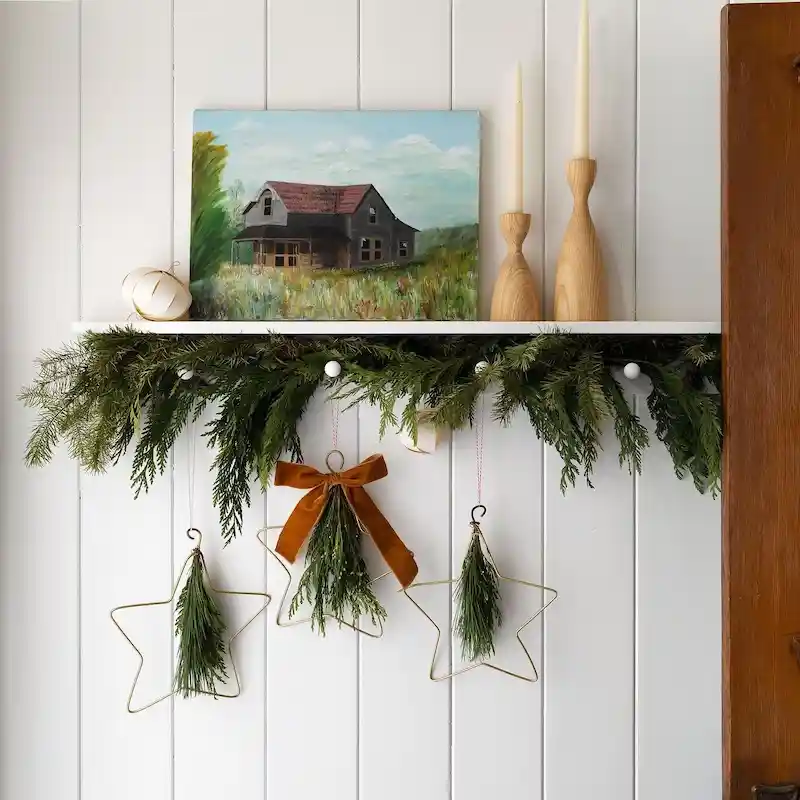
A clean white peg rail offers the ideal anchor point for layered foliage and minimalist geometric accents.
Suspending delicate wire star frames filled with pine sprigs right below a drape of fresh evergreen cedar creates a peaceful, rustic cottage display that stays elegant rather than cluttered.
A quick look at the styling choices:
- Minimalist Wire Stars: Thin brass or gold metal frames tied with pine needles and slender twine give holiday greenery a modern silhouette.
- Warm Velvet Accent: A single plush rust-cinnamon velvet bow breaks up the cool forest greens with cozy organic texture.
- Tonal Wood Pairings: Turned wooden candlestick holders sit alongside a landscape painting, balancing the greenery with neutral earth tones.
4. Assemble Molded Candle Flower Boxes
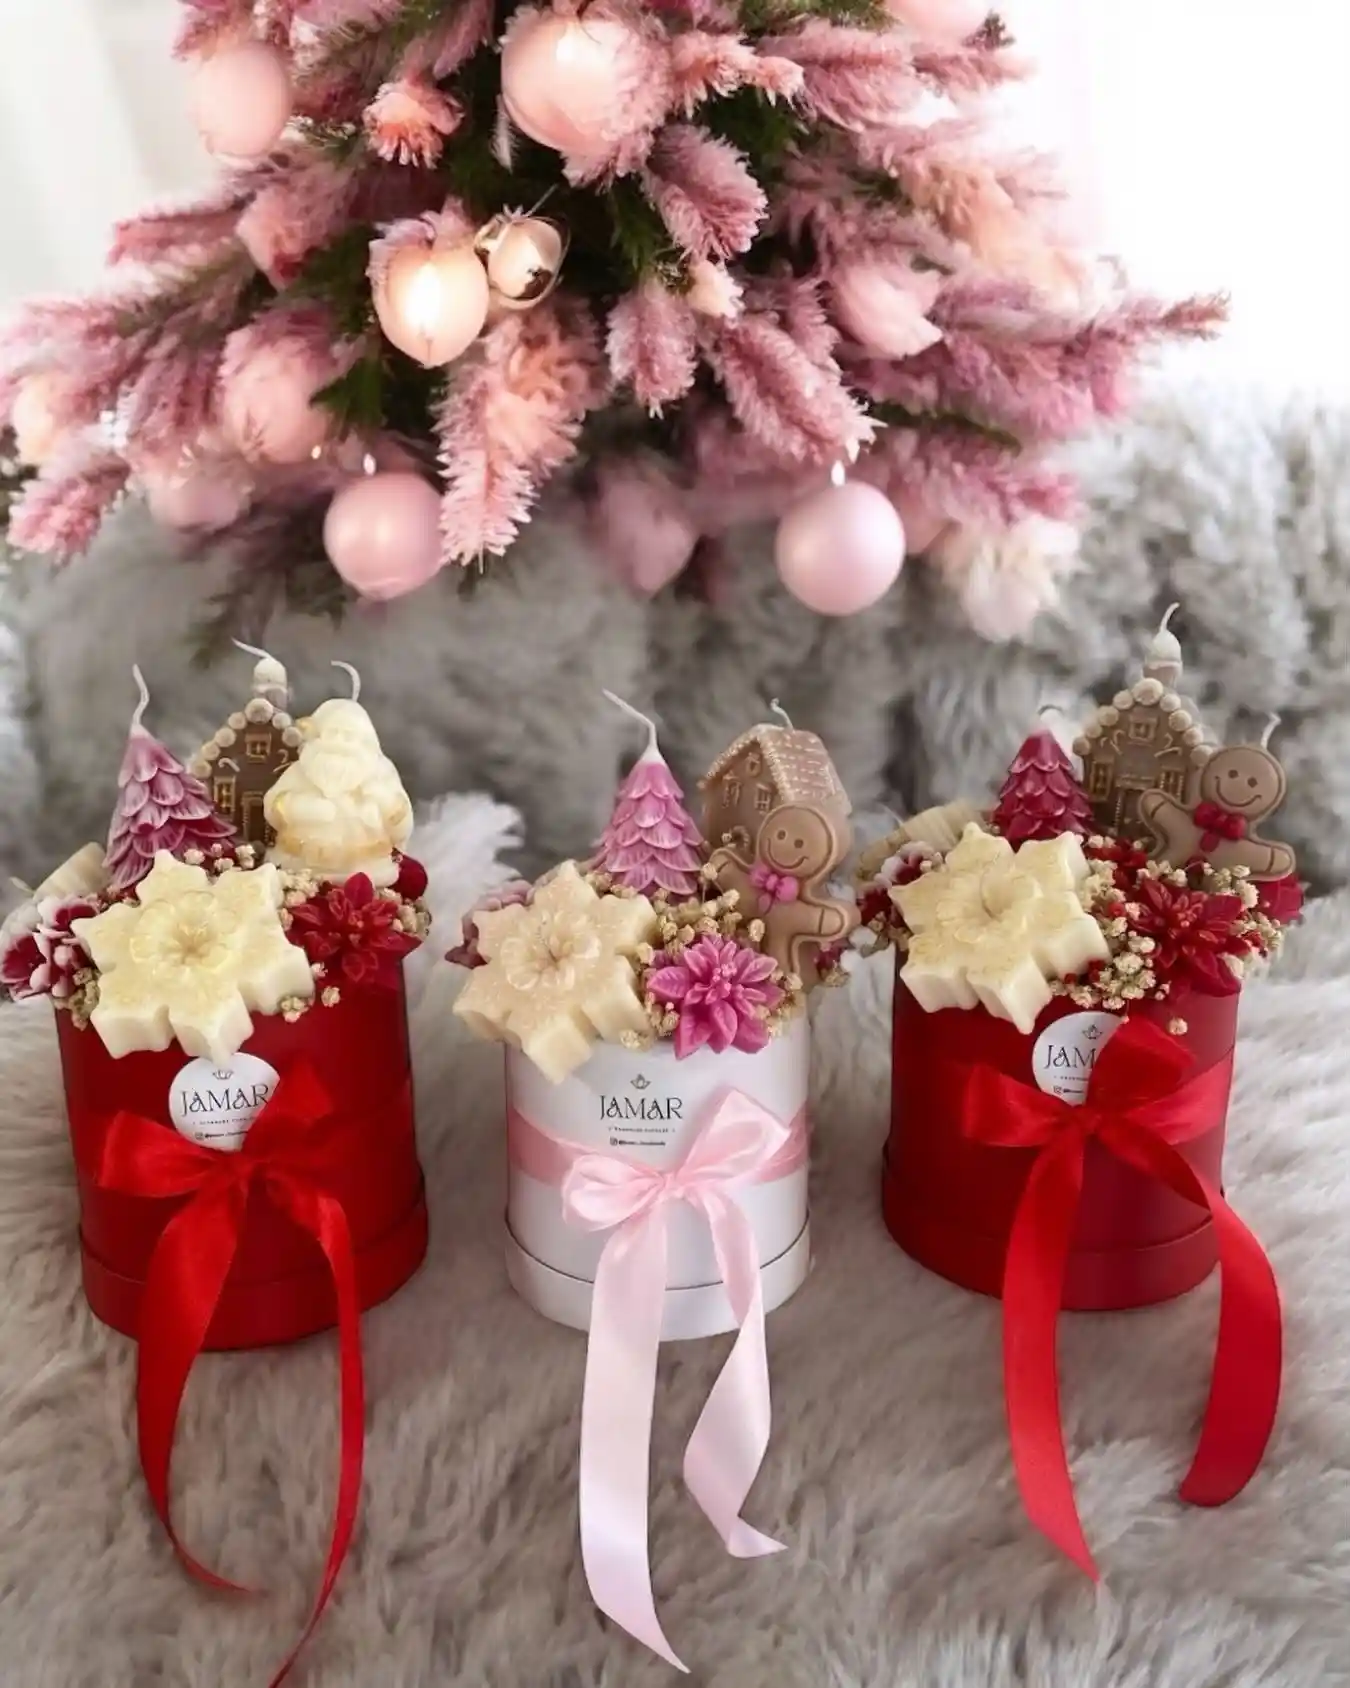
Turning specialty wax candles into sculpted hatbox arrangements creates a striking alternative to standard floral displays.
By surrounding detailed candle shapes—such as molded snowflakes, gingerbread men, tiny Santas, and pine trees—with dried baby’s breath and mini poinsettia blooms, you build a festive table centerpiece that doubles as a luxury gift set.
Key design elements for this arrangement:
- Varied Candle Heights: Position taller figurative candles (gingerbread houses and trees) in the back, placing detailed snowflakes front and center.
- Coordinating Color Schemes: Match the decorative box ribbon color directly to the wax accents—bright crimson for traditional red, soft pastel pink for blush themes.
- Textured Fillers: Tuck small sprigs of dried floral fill between candle bases to secure the pieces and hide structural gaps seamlessly.
5. Macrame Reindeer Charms Turn Knot Work Into Tiny Holiday Ornaments
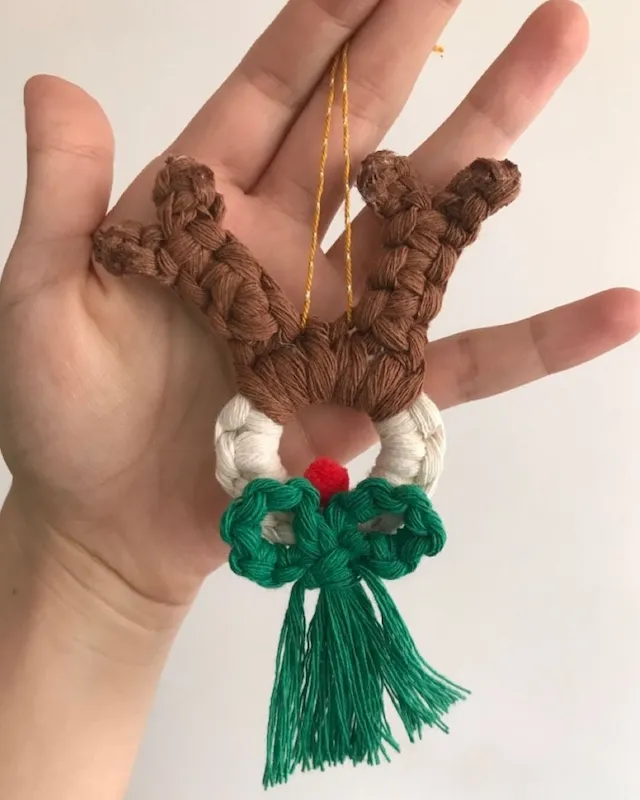
Knotted cotton cord takes the shape of a reindeer face here, sized to sit in the palm of a hand. Brown cord builds the antlers, a cream ring forms the head, and a small red pom sits where the nose should go.
It’s a compact project that borrows straight from macrame technique instead of crochet or felt, which is a fresh direction for a tree charm.
What makes it work:
- The antlers use simple square knots, no advanced macrame stitches needed
- A tiny pom for the nose adds color without extra knotting
- Green tassels at the bottom double as a bow and a wreath shape
- Gold cord for hanging keeps the whole piece lightweight on the branch
Beginners could knock out a batch of these in an afternoon, and the small scale means leftover cord scraps from bigger projects won’t go to waste.
6. A Basket of Weathered Metallic Ornaments Skips the Shiny Christmas Look Entirely
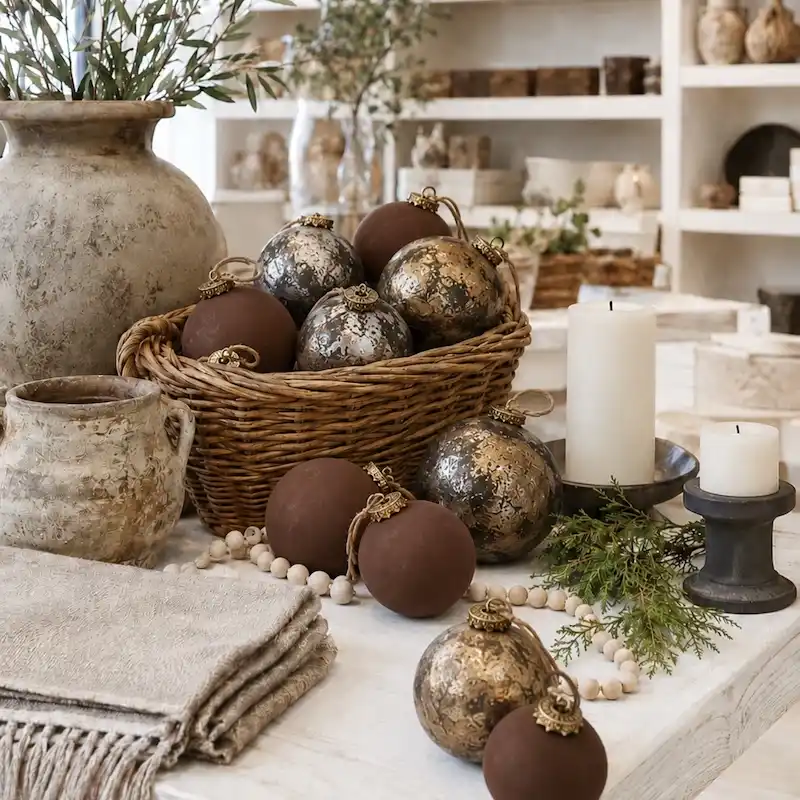
Two finishes carry this whole display. Matte chocolate brown balls sit next to ones with a mottled, antiqued gold and pewter surface, the kind that looks hammered or oxidized rather than polished.
A woven basket holds the bulk of them, with a few spilling out onto the table next to wood bead garland and cedar sprigs.
Matte brown balls stay quiet and let the metallics do the talking.
Antiqued metallic balls catch light unevenly across their surface, so no two look identical even in the same batch.
Pairing the two finishes, instead of picking one, is what keeps the whole vignette from reading too matched.
The rest of the styling leans into worn textures on purpose.
Aged stoneware vases, a linen throw with fringe, and a dark stone candle holder all point away from anything glossy or new looking.
Even the greenery is a single loose cedar branch rather than a full garland.
7. A Branch Centerpiece Turns Painted Peanuts Into a Pair of Nesting Birds
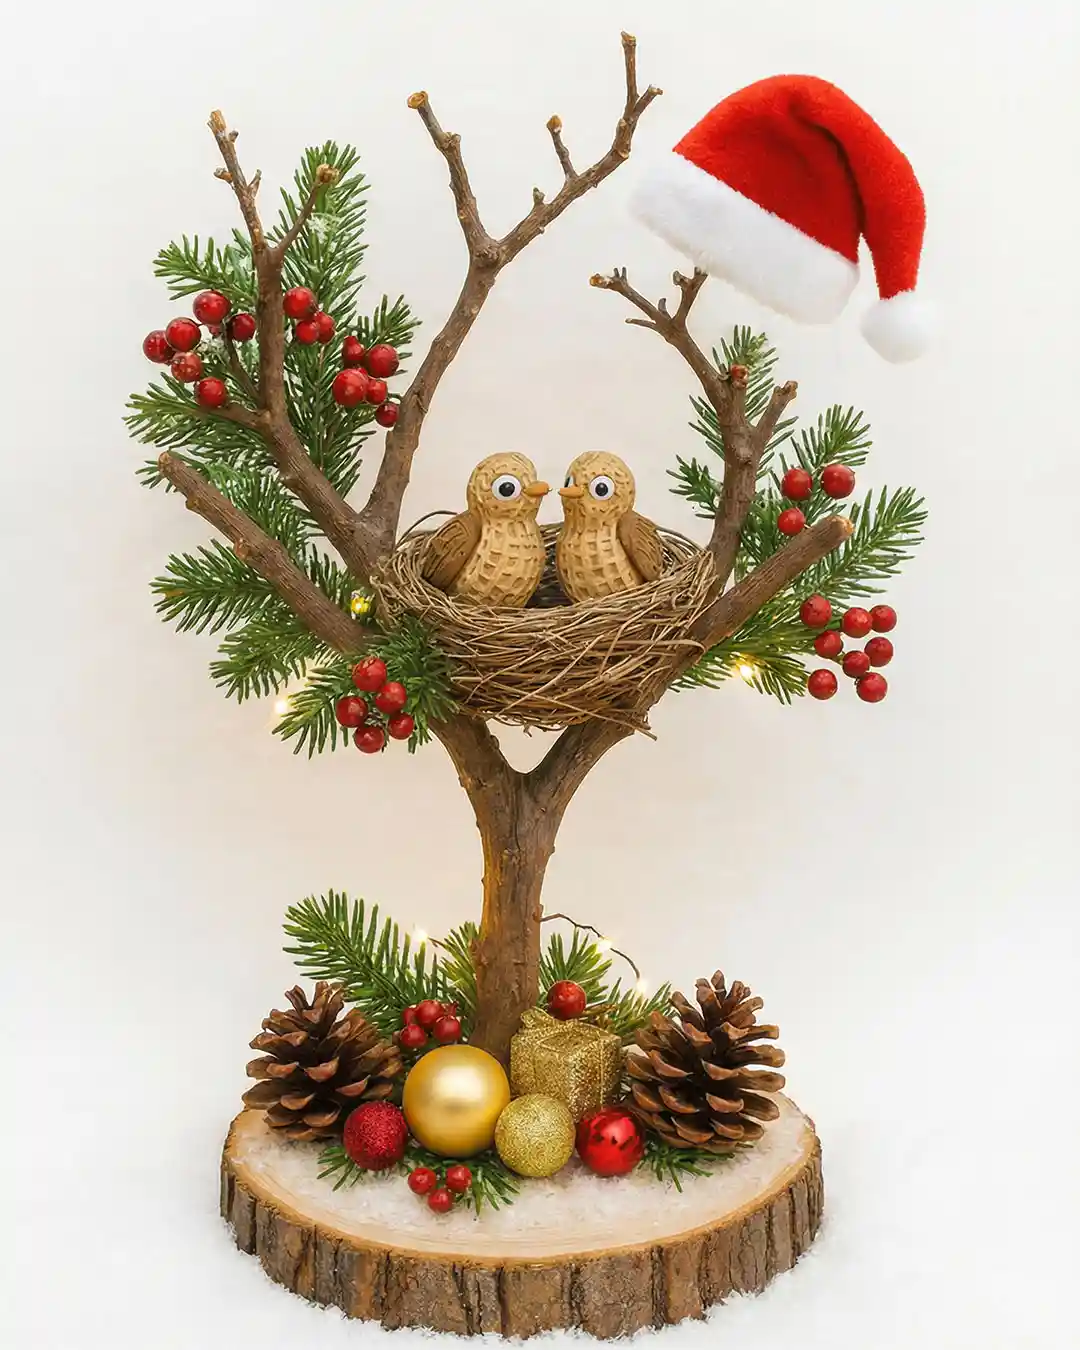
A pair of painted peanut shells sit inside a twig nest here, googly eyes and tiny painted beaks turning them into birds mid conversation.
The nest itself sits in the fork of a real branch, propped in a wood slice base and dressed with pinecones, berries, and small ornaments.
A tiny felt santa hat hangs off to the side like it’s waiting to be placed.
How to build something similar:
- Find a forked branch with some height and stability, then anchor it into a wood slice or small pot with floral foam
- Wire a small twig nest into the fork where the branches split
- Paint peanut shells with simple bird faces and set them inside the nest
- Fill the base with pinecones, mini ornaments, and a few sprigs of berry pick
- Tuck warm white fairy lights through the branches before adding the final greenery so the wiring stays hidden
It’s a slower build than most tree ornaments, closer to a tabletop sculpture, but the payoff is a centerpiece nobody else will have.
Set a forked branch into a wood slice or pot with floral foam so it stands steady.
Wrap a small twig nest into the fork where the branch splits.
Paint peanut shell birds for the nest, then fill the base with pinecones, berries, and lights.
8. Maximalist, No-Rules Trees Let Color and Personality Take Over
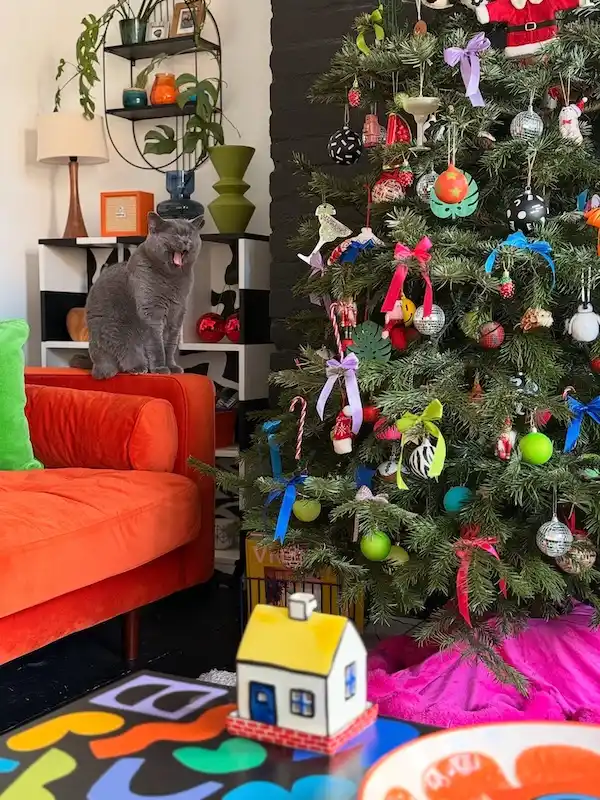
Color rules get thrown out completely here.
Lime green, hot pink, cobalt blue, and black and white patterned ornaments sit on the same branch without any attempt to coordinate, and the tree skirt is a bold magenta faux fur instead of anything neutral.
It reads more like a personality collection than a styled display, which is exactly the appeal for anyone tired of matching everything.
What’s actually on this tree:
- Disco ball ornaments mixed with felt Santas and hand painted characters
- Satin ribbon bows in five or six different colors, tied loose instead of trimmed neat
- Nutcrackers, candy canes, and a margarita glass ornament thrown in for humor
- Zebra print and polka dot balls next to solid matte colors
Nothing here matches on purpose, and that’s the whole point.
9. Upcycle Denim Pockets into Rustic Holiday Wall Hangers
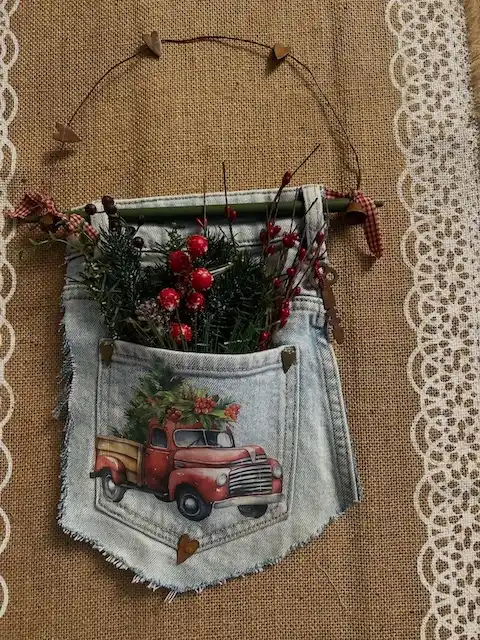
Repurposing the back panel and pocket of old denim jeans creates a rustic, country-style wall pocket for holiday greenery.
Featuring a vintage red Christmas truck graphic printed or decoupage-applied onto the pocket face adds charm, while a slim wooden dowel and arched wire handle make it easy to display on doors or pegboards.
Key steps to assemble a denim holiday pocket:
- Cut the Denim Base: Trim a back pocket section from old jeans, leaving raw, frayed edges for a cozy, primitive aesthetic.
- Add Graphic Details: Iron on a vintage holiday transfer or decoupage a fabric graphic—like a vintage pickup hauling a Christmas tree—onto the pocket face.
- Finish the Hanger: Slide a painted wooden dowel through the top waistband loops, accent with gingham ribbon ties and a skeleton key, then attach a bent craft-wire hanger for display.
10. A Flocked Pink Tree That Skips Green Almost Entirely
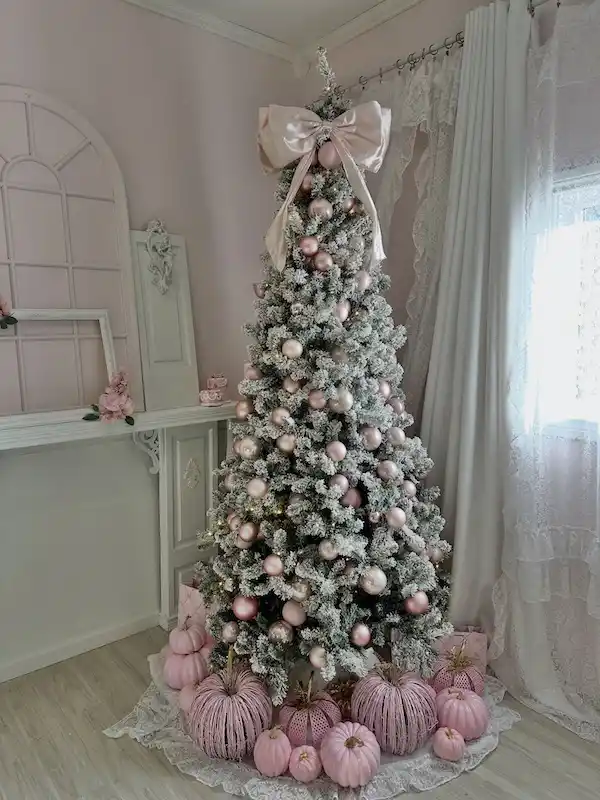
This tree keeps the frosted branches as the only nod to a traditional evergreen, then covers everything else in blush and rose gold.
The ornament mix isn’t one shade repeated. It’s matte pink, glossy pink, and a warmer rose gold ball layered together so the tree has depth instead of looking flat.
A few things make this one stand out:
- The topper is an oversized satin bow in pale blush instead of a star or angel
- Ornaments are clustered thick near the top and thin out slightly lower, which draws the eye upward
- Small warm white lights are tucked inside the flocking rather than wrapped on top of it
- The base skirt is layered lace, softer than felt or burlap
The most surprising detail is what sits at the bottom. Woven pink pumpkins, in raffia and mesh textures, ring the tree instead of wrapped gifts. It reads like fall decor got folded straight into the holiday setup, and it works because the color stays consistent the whole way down.
One tight color story, from the flocking to the pumpkins on the floor, makes a maximalist tree feel curated instead of cluttered.
11. Frame Cross-Stitch Smallies in a Vintage Display Tray
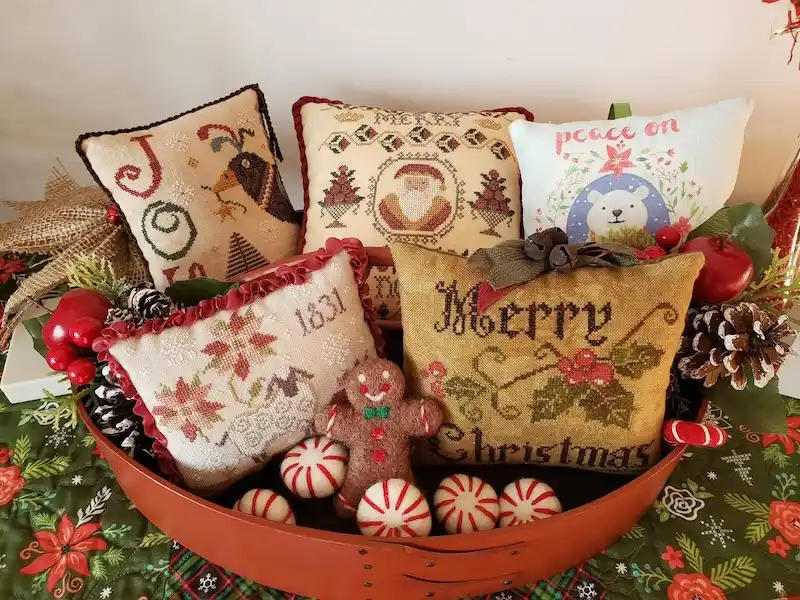
Arranging embroidered or cross-stitched mini pillows inside a shallow decorative tray immediately transforms individual ornaments into a cohesive holiday centerpiece.
The warm tan, muted gold, and deep red tones of the fabric backgrounds naturally complement classic festive motifs like poinsettias, gingerbread figures, and cheerful seasonal lettering.
- Nest small stitched cushions of varying heights against each other to create natural depth.
- Tuck in felted peppermints and a plush gingerbread character to fill empty gaps with soft texture.
- Accent the tray edge with evergreen sprigs, pinecones, and faux berries for an organic border.
12. Layer Cut Felt Shapes for Mid-Century Retro Baubles
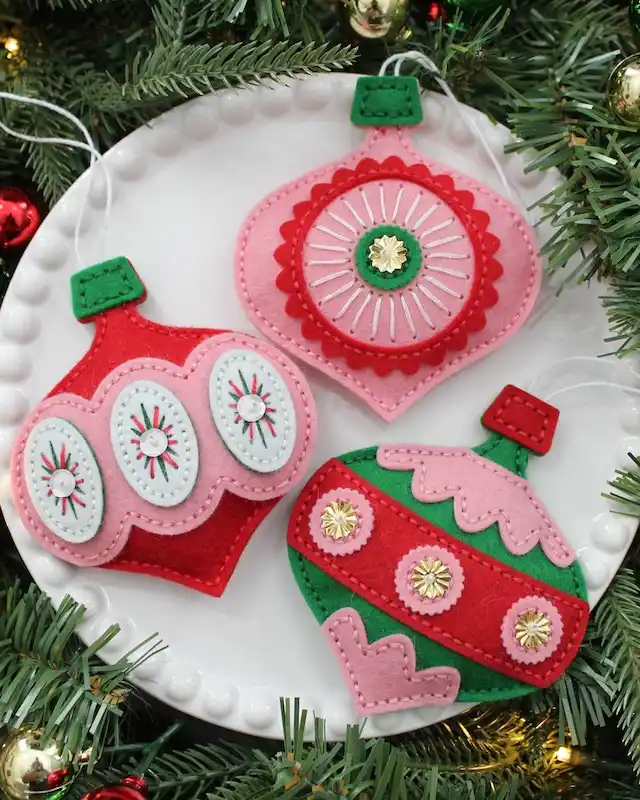
Combining vibrant pink, cherry red, and emerald green felt layers gives traditional holiday ornaments an unmistakable vintage mid-century feel.
Simple embroidery details—like white radial straight stitches, scalloped trim edges, and small sequin centers—bring extra dimension to flat felt cutouts without requiring complex stitching techniques.
To build these retro ornaments step-by-step:
- Cut the base silhouette: Snip two matching bauble outlines from dense felt for the sturdy front and back panels.
- Layer contrasting accents: Stitch scalloped caps, center bands, and oval windows using small running stitches in a contrasting thread color.
- Add sparkling embellishments: Anchor metallic gold sequins or seed beads in the center of starburst embroidery lines for extra holiday catch-light.
Use 100% wool or wool-blend felt instead of acrylic. It holds crisp scalloped edges better, resists pilling over time, and keeps your embroidery stitches flat and tight.
13. Craft Beaded Velvet Jellyfish Ornaments
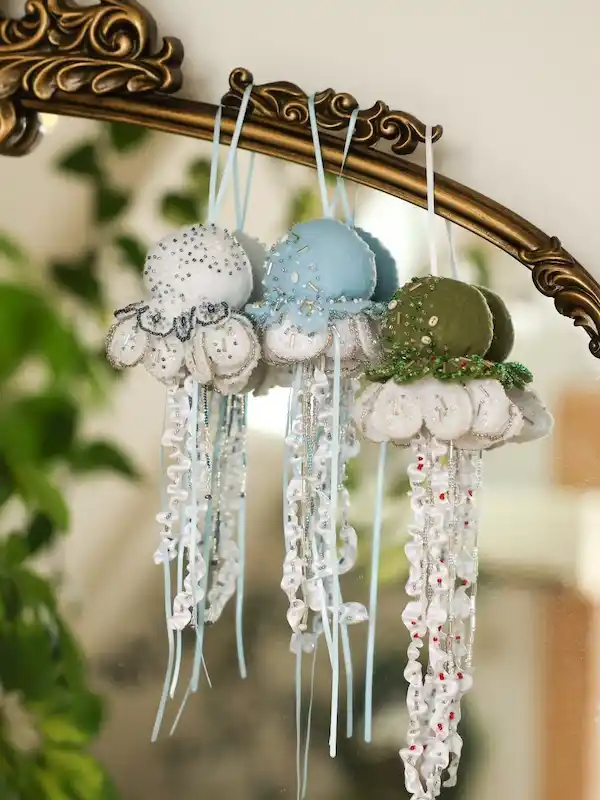
Crafting whimsical jellyfish ornaments using soft velvet domes, delicate seed beads, and ruffled ribbon tentacles adds an ethereal, coastal touch to traditional holiday trees.
The interplay of icy blues, muted sage greens, and shimmering silver beads catches string lights beautifully while offering a unique ocean-inspired silhouette.
Three design features that make these jellyfish stand out:
- Embellished Velvet Caps: Padded velvet domes sprinkled with seed beads, bugle beads, and tiny sequins mimic organic marine textures.
- Cascading Ribbons & Trim: Alternating ruffled organza trims, satin ribbons, and strung bead strands create fluid, swaying tentacles.
- Scalloped Underbellies: White felt scalloped layers outlined in metallic thread neatly separate the top dome from the hanging tendrils.
14. Elevate a Living Room Coffee Table with Gold-Accented Reindeer
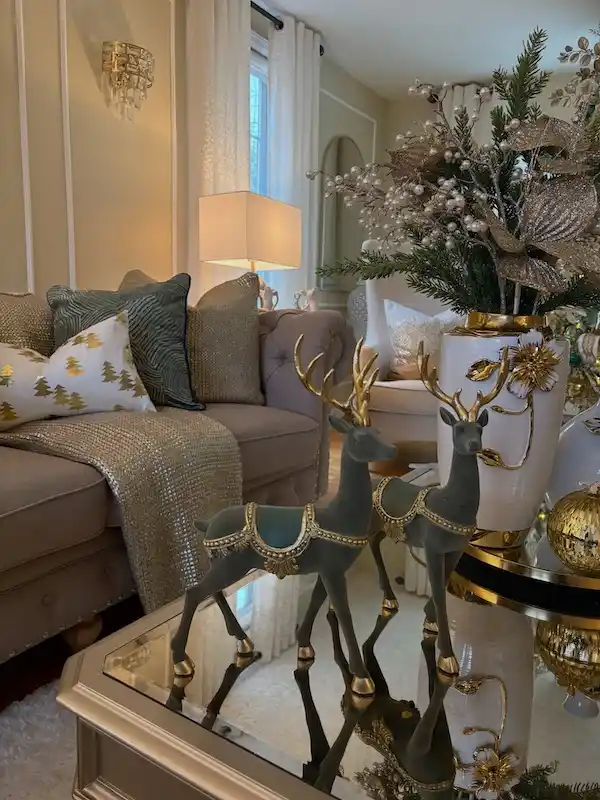
Pairing matte sage green or velvet-flocked reindeer figurines with gilded antlers creates a refined, high-end holiday focal point on a mirrored coffee table.
Surrounding the display with champagne gold picks, pearl-beaded branches, and metallic throw pillows grounds the space in sophisticated, warm seasonal glamour.
Key styling techniques for this look:
- Layered Textures: Complement smooth ceramics and reflective glass surfaces with flocking, metallic embroidery, and soft knit textiles.
- Cohesive Palette: Stick to warm champagnes, antique golds, muted sage, and creamy off-white tones for an elegant, non-traditional Christmas aesthetic.
- Vertical Dimension: Balance low-profile reindeer statues on the table surface with tall floral picks arranged inside a wide-mouth ceramic vase.
15. Layer Plaid and Ruffled Placemats for a Festive Tablescape
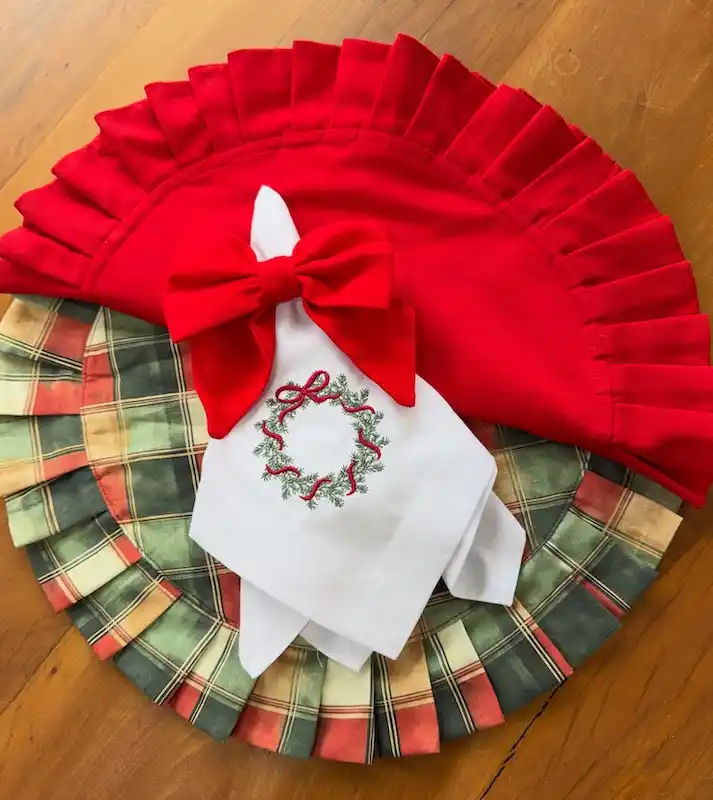
Offsetting a crisp, traditional plaid woven charger with a solid crimson ruffled top mat adds instant warmth and dimension to holiday dining settings.
Topping the place setting with an embroidered linen napkin—secured by a coordinating fabric bow ring—creates an inviting, hand-crafted look that feels traditional yet playful.
Key elements for styling this place setting:
- Textural Contrast: Combine structured tartan patterns with soft, pleated or ruffled edges to frame plates with rich detail.
- Embroidered Accents: Feature fine seasonal needlework, like a delicate pine-and-ribbon wreath, centrally on folded cloth napkins.
- Coordinating Bow Rings: Cinch napkins using structured fabric bows in matching crimson fabric to tie the charger and top layer together.
When layering circular placemats, rotate the top mat slightly off-center to let 2–3 inches of the bottom plaid trim peep out around the rim for extra contrast.
16 . Decoupage Ceramic Surfboard Pendants for Storybook Charm
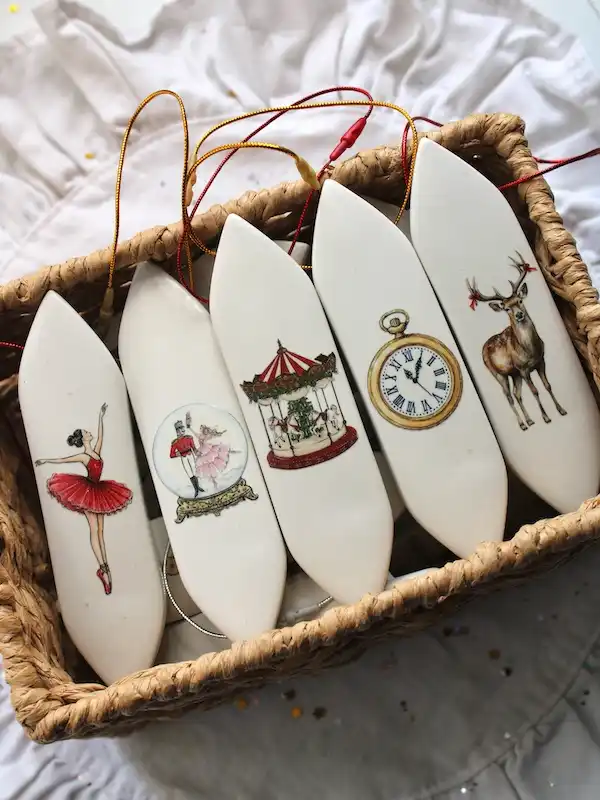
Applying vintage-style storybook illustrations—such as classic ballerinas, snow globes, carousels, pocket watches, and stags—onto smooth, surfboard-shaped white ceramic pendants offers a unique blend of coastal structure and nostalgic holiday charm.
Grouping the finished tags inside a woven seagrass basket creates an inviting display before hanging them on the tree.
Steps to create decoupage ceramic pendants:
- Prepare the ceramic blanks: Clean smooth white porcelain or ceramic surfboard blanks with rubbing alcohol to remove dust and oils.
- Apply the graphics: Cut out detailed paper illustrations or printed napkins, then smooth them onto the ceramic using a thin layer of decoupage medium.
- Seal and trim: Coat with a protective matte or satin varnish, then thread metallic gold or red hanging cords through the top hole.
17. Welcome Guests with a Lush Botanical Wreath & Espresso Ribbon
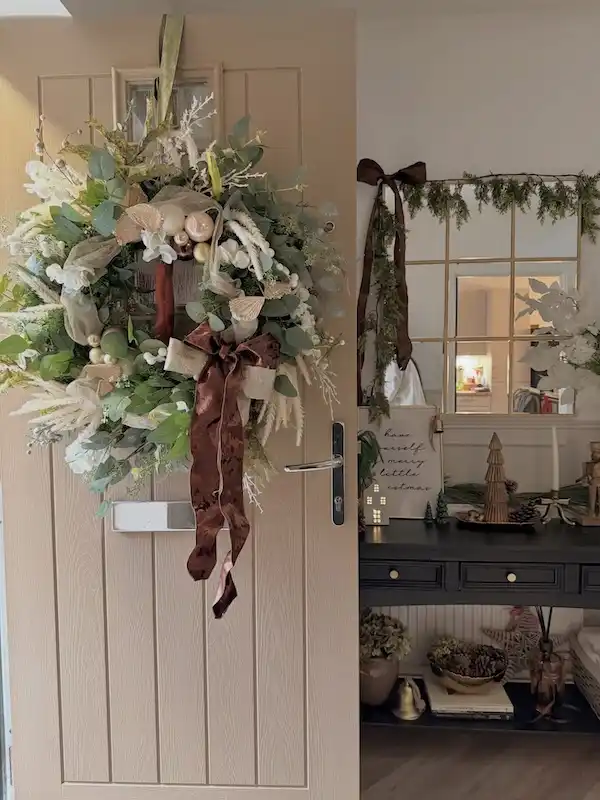
Combining muted eucalyptus, feathery pampas grass sprigs, and soft white florals creates a rich, organic front door entryway wreath.
Anchoring the lush foliage with a deep espresso brown velvet ribbon adds an unexpected warmth that perfectly bridges neutral decor with cozy winter textures.
Key styling notes for this welcoming entryway scene:
- Entryway Mirror Framing: Mirror the wreath’s organic greenery indoors by draping a matching cedar garland across a grid wall mirror directly inside the front door.
- Console Table Layering: Anchor the entryway table below with warm wooden Christmas trees, lit ceramic house lanterns, and a simple seasonal framed print.
- Deep Earth Tones: Swap bright crimson ribbons for chocolate or espresso velvet to maintain a sophisticated, neutral color story throughout your hall.
18. Construct Wooden Log Planter Reindeer for Porch Decor
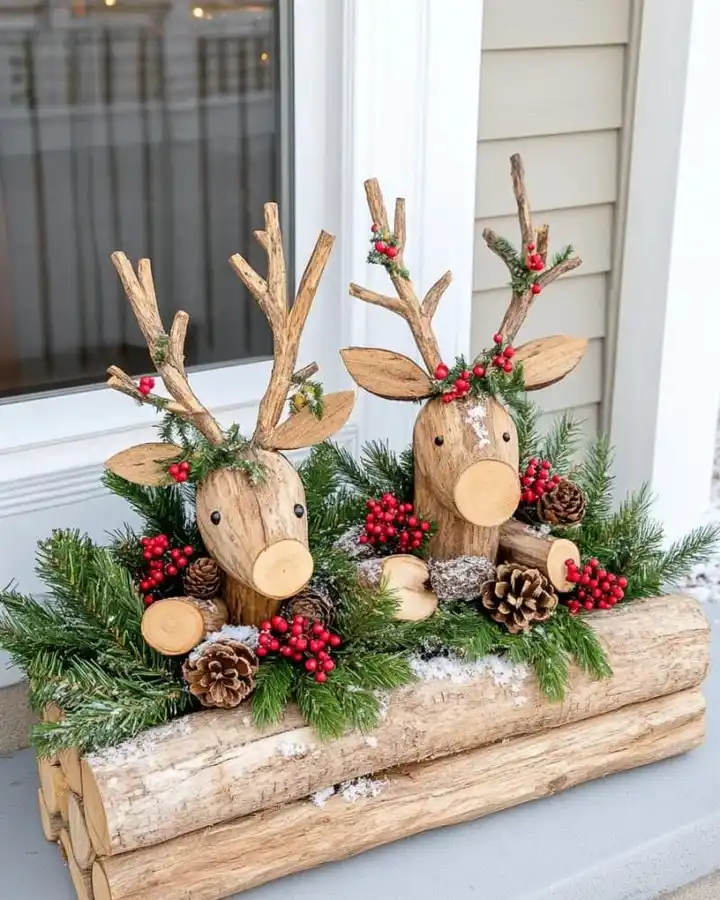
Building rustic reindeer out of natural wood logs, sliced wood ears, and branch antlers creates a charming, sustainable outdoor planter display for front steps or porches.
Nesting the wooden characters into a hollowed log basin packed with pine boughs, pinecones, and bright red winter berries brings immediate woodland warmth to seasonal entryway decor.
Key steps to craft this natural log display:
- Assemble Reindeer Heads: Secure thick birch or pine branch cross-sections together using wood glue or screws, attaching forked branch pieces for antlers and carved wood ovals for ears.
- Build the Log Basin: Stack split logs or hollow out a timber trough to hold fresh evergreen branches and structural floral foam securely.
- Add Festive Accents: Tuck natural pinecones, bright holly berry sprays, and faux snow flocking around the base of the reindeer to conceal the inner frame.
19. Craft Walnut Shell Miniature Snowman Dioramas
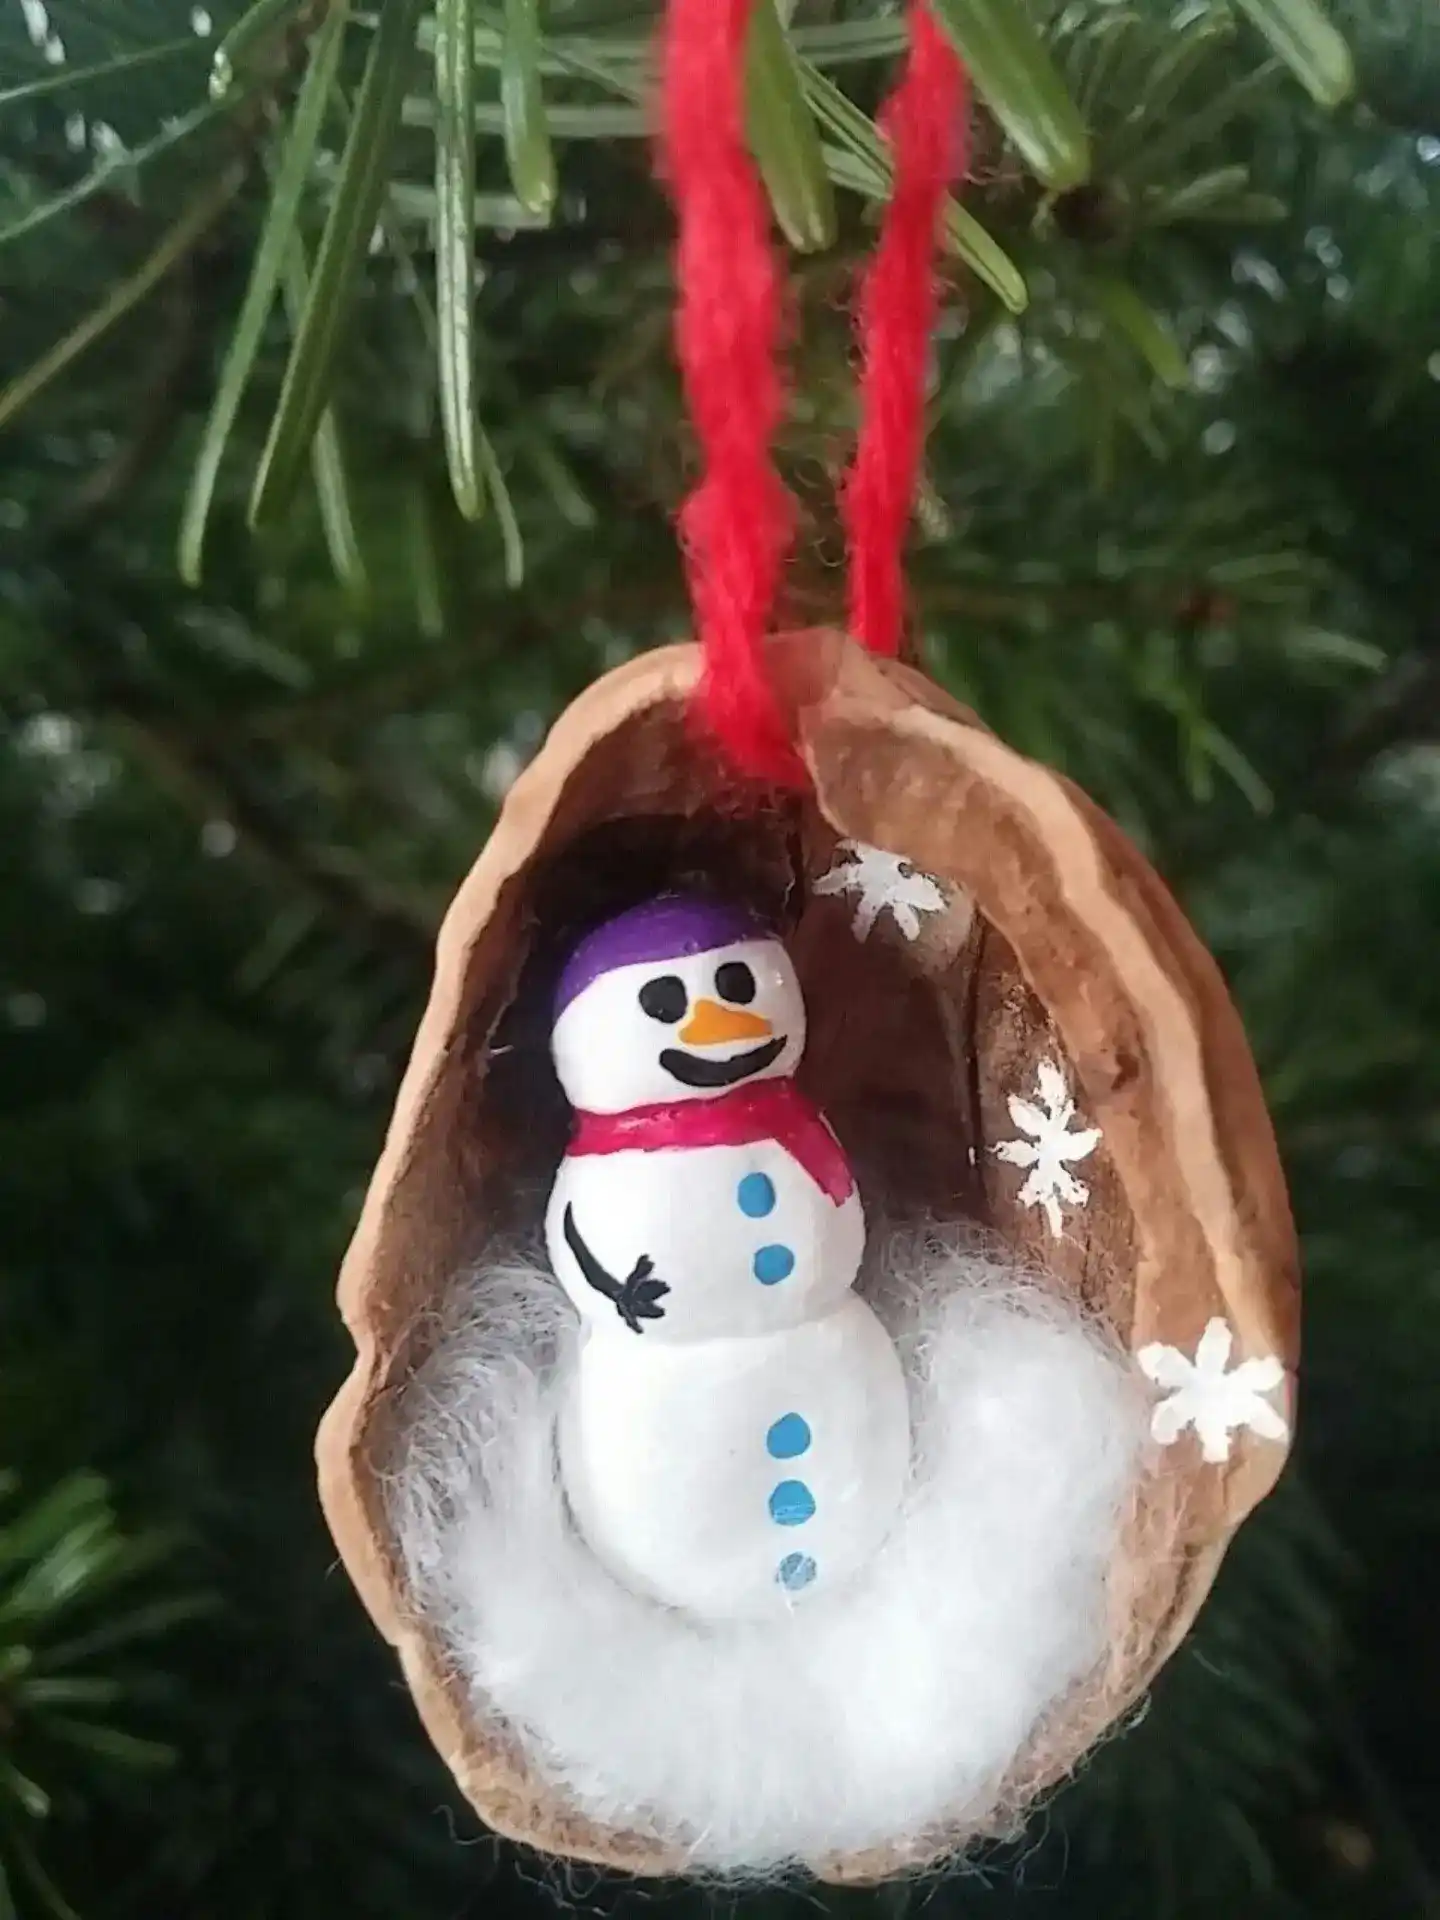
Transforming hollowed walnut shells into tiny winter dioramas is a classic, eco-friendly project that brings whimsical detail to tree branches.
Nesting a painted wooden bead snowman inside a cotton-wool snowdrift creates a nostalgic ornament that kids and adults alike can make together.
Quick steps to build a walnut diorama:
- Prep the Shell: Split a whole walnut cleanly down its natural seam using a butter knife, then clear out the nut inside.
- Paint the Interior: Dab tiny white acrylic stars or snowflakes onto the inside shell wall to mimic a gentle snowfall.
- Assemble the Scene: Glue a bed of fluffy white fiberfill into the base, nestle your painted mini snowman on top, and hot-glue a loop of red yarn or twine to the top edge for hanging.
20. Display an Embroidered Winter Village in a Rustic Wooden Frame
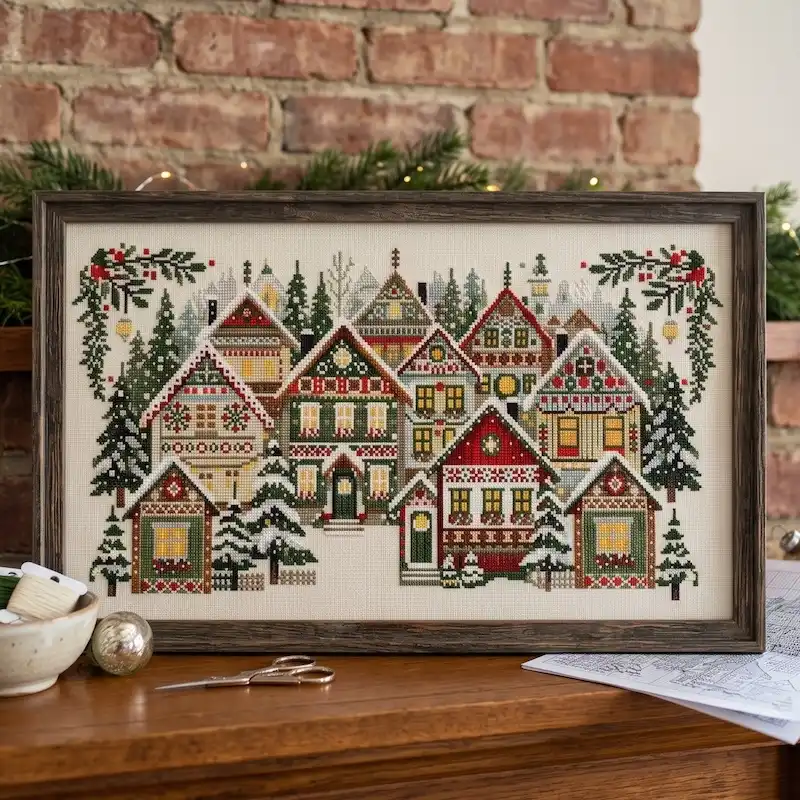
Stitching a cozy, folk-style winter village with patterned gables, glowing windows, and snow-dusted pine trees creates a timeless focal piece for a mantel or entryway shelf.
Mounting the completed needlework in a dark, weathered wood frame gives the detailed threadwork a clean border while enhancing its rustic, hand-crafted feel.
Essential touches for styling framed cross-stitch art:
- Dark Wood Framing: A rustic espresso or weathered charcoal wooden frame creates bold contrast against a light linen background.
- Cozy Vignette Placement: Prop the frame against exposed brickwork or paneled walls alongside brass embroidery scissors and neutral ceramics.
- Corner Border Detail: Frame the central village motif with stitched evergreen swags and tiny holly berries to tie the entire piece together.
Lace or stretch your finished cross-stitch over acid-free foam board before framing to ensure every house line stays straight and taut without bunching inside the glass.
21. Stitch a Merry Christmas Botanical Wreath Hoop

Stitching script lettering framed by a delicate botanical wreath offers a classic, elegant look for festive wall art or handmade gifts.
Finishing the wooden hoop with a neutral velvet ribbon bow at the top gives the embroidery a polished, boutique-ready look.
Stitches featured in this botanical hoop design:
- Stem & Cursive Script: Smooth backstitch or stem stitch in deep red embroidery floss creates fluid, cursive script for the central text.
- Evergreen Pines & Twigs: Green fly stitches angled along central stem lines form pine needles, while simple straight stitches make up the berry branches.
- Snowy Accents & Berries: Crisp French knots in crimson create plump winter berries, paired with white French knots and lazy daisies for delicate snow-dusted foliage.
22. Dried Orange Garlands Give an Entryway a Foraged, English Cottage Feel
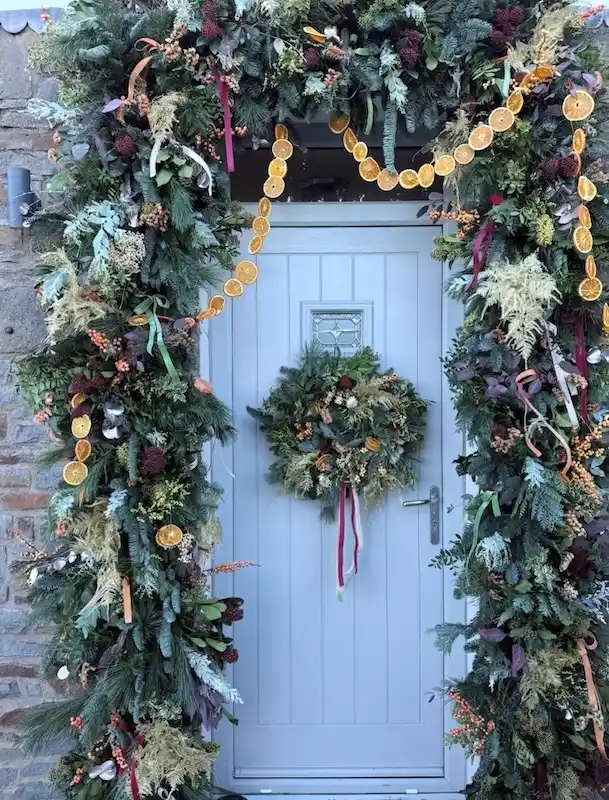
Fresh greenery does the framing on this doorway, but dried elements carry the personality.
Loops of dried orange slices swing across the transom window in soft scallops, threaded on twine so they drape instead of hang stiff.
The garland running down both sides of the door mixes pine, eucalyptus, and what looks like dusty miller and pittosporum, with clusters of dark burgundy dried flowers tucked in throughout.
Here’s what’s doing the work:
- A wreath on the door pulls the same dried orange and burgundy palette down to eye level
- Long ribbon tails in burgundy and cream hang loose off the wreath rather than tied in a bow
- The greenery mix stays mostly muted, silvery green and sage, so the orange slices actually pop
- Streamers of thin ribbon are woven into the garland itself, not just at the wreath
Building the full arch takes real material and time, but a single strand of dried orange slices draped over a smaller wreath gets most of the same charm.
Threaded slices drape in loose scallops across the transom instead of a straight line.
Pine, eucalyptus, and dusty miller keep the base muted so the orange reads bright by contrast.
Burgundy and cream ribbon hangs untied off the wreath, adding movement without looking fussy.
23. Sew a Patchwork Hexagon Corduroy Christmas Stocking
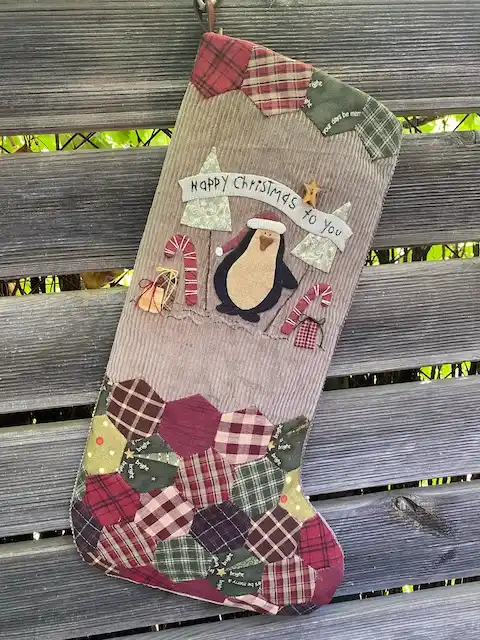
Combining English Paper Piecing (EPP) fabric hexagons with textured taupe corduroy creates a charming, heirloom-style holiday stocking.
Appliquéd details—like a festive penguin character, fabric candy canes, present pockets, and a stitched banner—give this piece a playful, storybook appeal.
Key techniques for crafting this detailed stocking:
- English Paper Piecing (EPP): Piecing together plaid, gingham, and holiday-print fabric hexagons creates patterned borders along the top cuff and lower boot.
- Textured Corduroy Body: Using fine-wale corduroy in a neutral taupe tone provides a sturdy, tactile background that makes colorful appliqué pieces pop.
- Interactive Felt Appliqué: Stitch a central penguin in a Santa hat, flanking it with small fabric trees, wooden star buttons, and mini present pockets holding candy canes.
24. Sew a Fabric Circus Canopy Advent Calendar
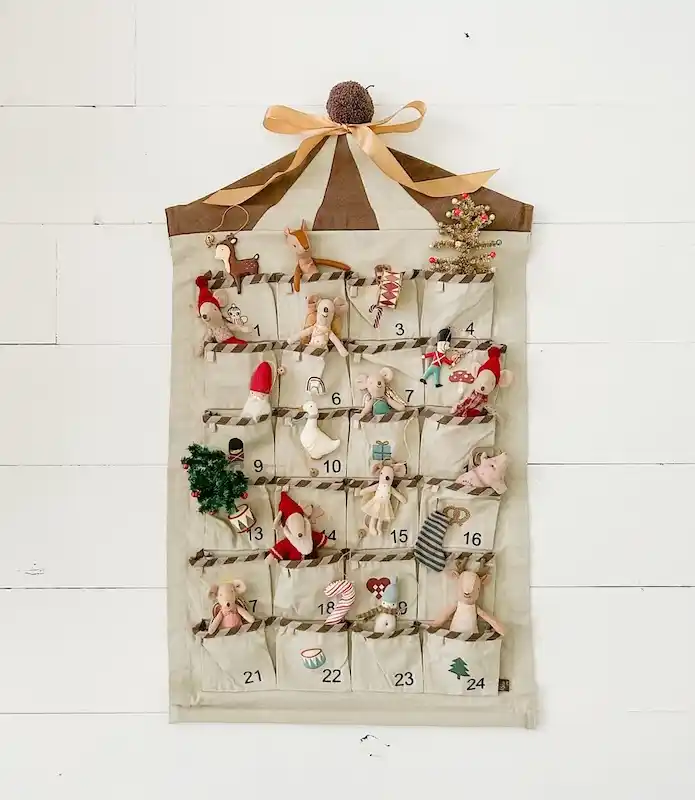
Crafting a linen advent calendar styled like a classic circus tent canopy brings interactive magic and vintage-inspired charm to the holiday countdown.
Numbered cloth pockets trimmed with striped bias tape create sweet homes for mini plush mice, wooden ornaments, and small surprises each day of December.
Key elements for crafting this heirloom countdown calendar:
- Circus Tent Canopy Header: Piece alternating brown and cream fabric wedges to form a tent roof shape, topped with a soft yarn pom-pom and satin hanging bow.
- Numbered Pocket Grid: Stitch 24 linen pockets onto a sturdy canvas backdrop, edging the tops with diagonal striped trim for a polished finish.
- Whimsical Pocket Fillers: Tuck small treasures inside—such as Maileg-style mice characters, mini tin drums, candy canes, and felt woodland creatures.
25. Assemble an Upcycled Denim Waistband & Patchwork Tabletop Tree
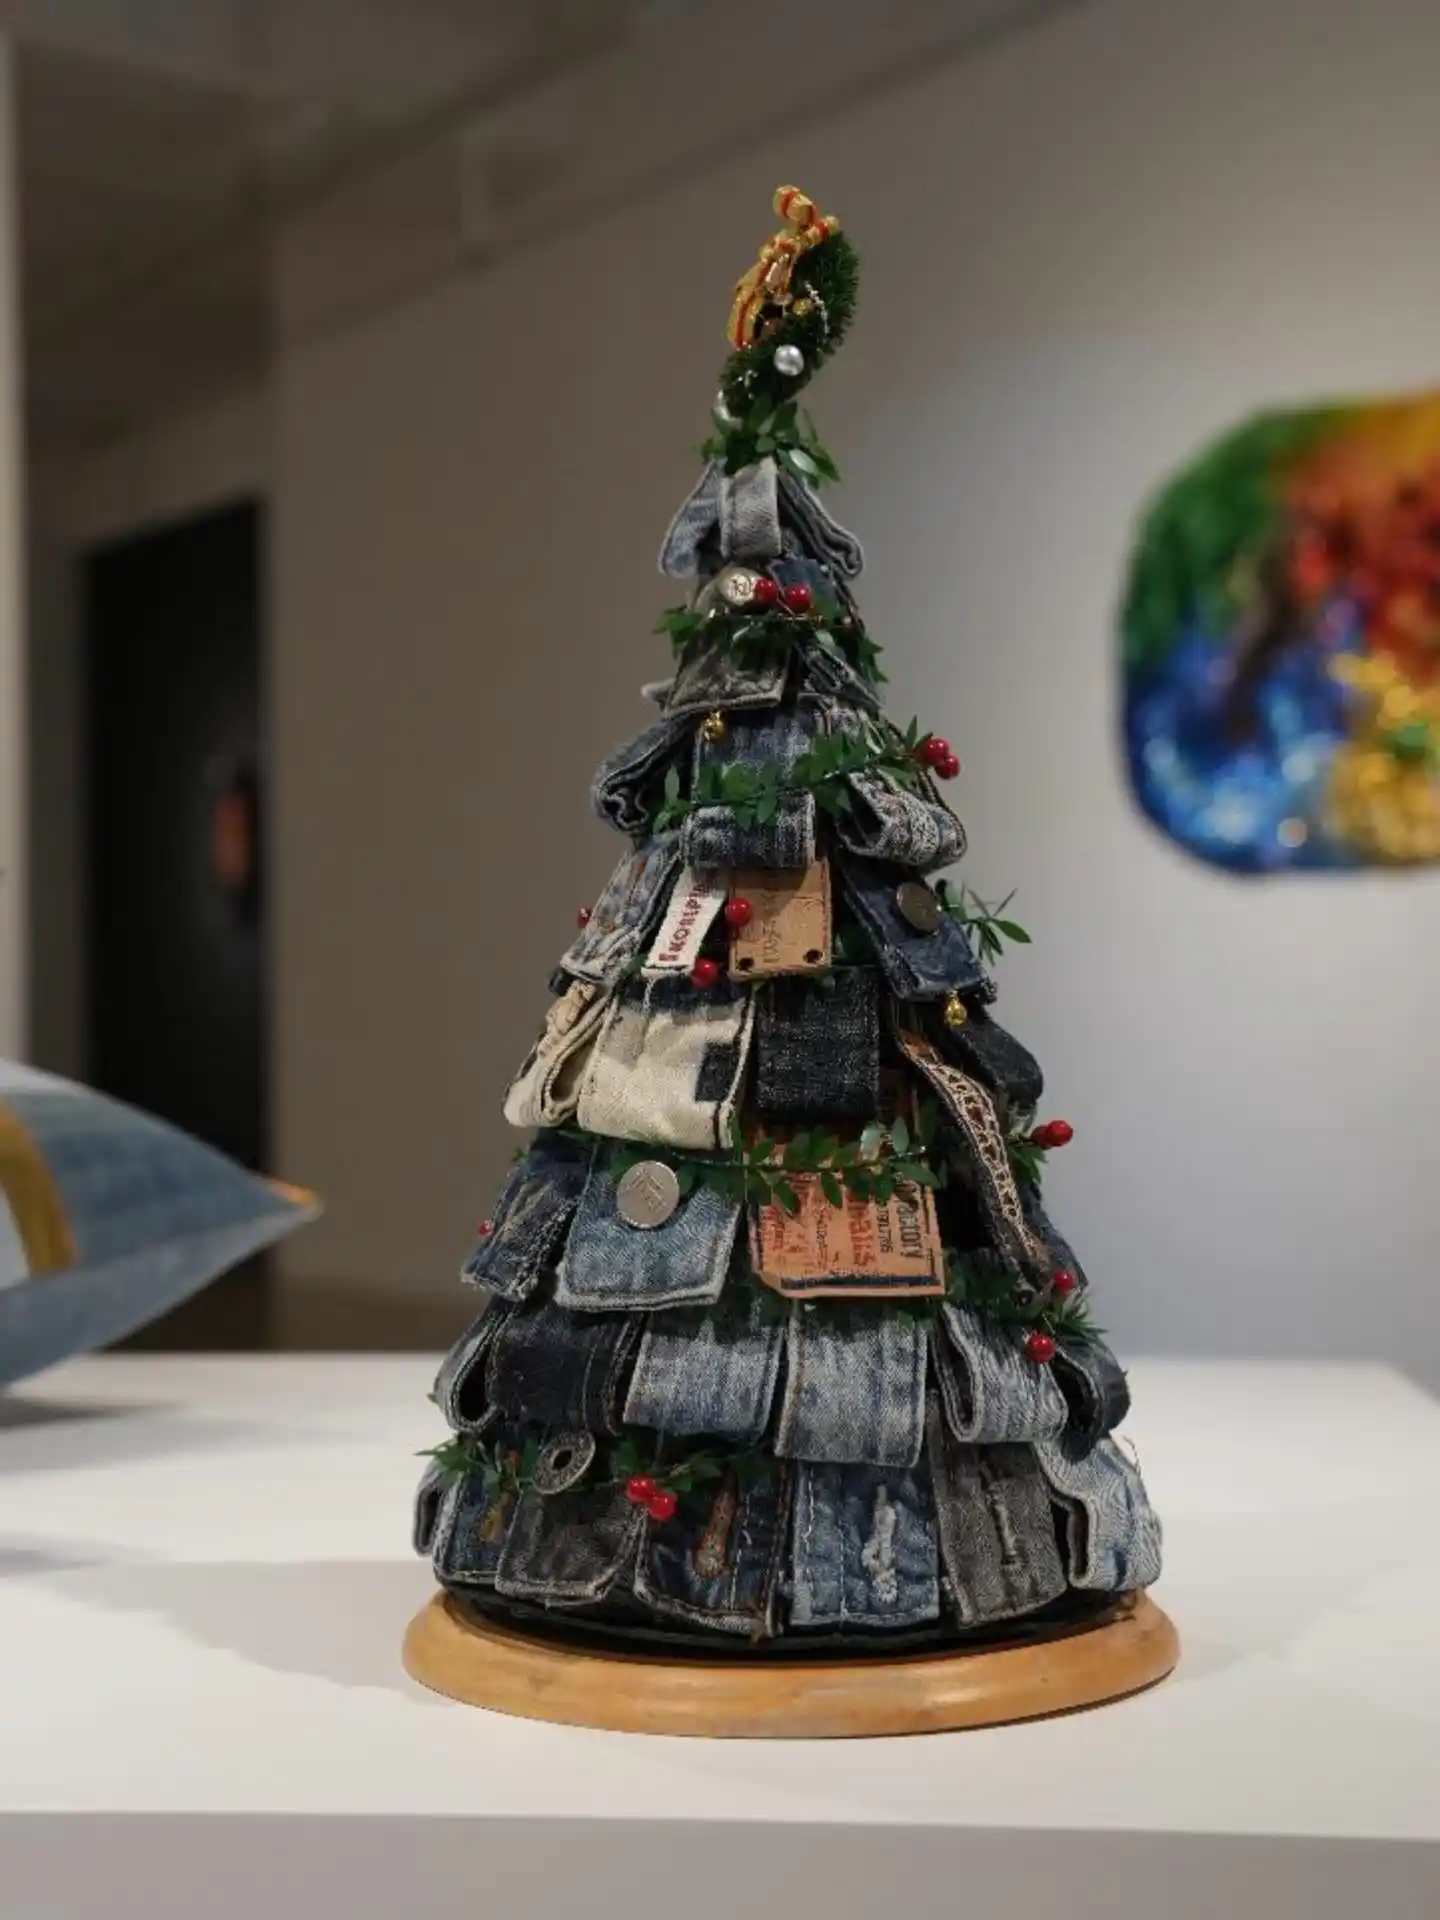
Crafting a rustic tabletop Christmas tree using layered strips of upcycled denim jeans—complete with belt loops, leather brand patches, and metal rivets—offers an eco-friendly focal piece for holiday displays.
Wrapping the denim layers with delicate boxwood garland and tiny red berries brings classic holiday contrast to the distressed blue tones.
Key elements for constructing this upcycled denim tree:
- Layered Denim Loops: Secure folded strips of repurposed denim waistbands and hem edges in overlapping tiers around a foam or wire cone base.
- Hardware & Leather Accents: Showcase authentic jeans details like leather logo patches, metal buttons, and woven tags directly on the tree tiers.
- Greenery & Berry Garland: Spiral thin leafy greenery and bright crimson berries around each level to outline the tree’s silhouette.
26. Style a Color-Drenched Eclectic Living Room for Christmas
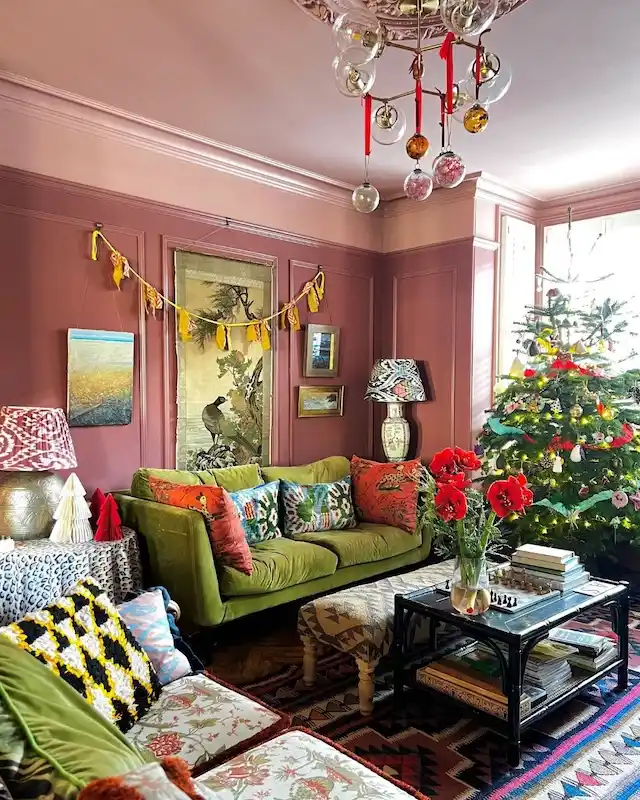
Drenching walls and crown molding in dusty mauve-pink shades creates a warm, expressive backdrop for rich holiday layering.
Pairing a moss-green velvet sofa with bold pattern-blocked throw pillows, red amaryllis blooms, and colorful paper garlands brings a playful, maximalist energy to classic Christmas decor.
Key elements for styling an eclectic, color-drenched holiday room:
- Pendant Light Ornaments: Hang blown-glass baubles from the brass arms of a ceiling chandelier using thin red silk ribbons to elevate lighting fixtures into festive features.
- Vibrant Pattern Mixing: Layer geometric footstools, patterned ikat lampshades, and botanical wall scrolls alongside structured holiday elements like paper tree cones.
- Warm Floral Centerpieces: Display tall stems of deep red amaryllis in clear glass vases on coffee tables to echo bright crimson accents on the Christmas tree.
Use a complementary contrast by placing olive or moss green furniture against muted mauve-pink walls to make primary holiday red accents pop without overwhelming the room.