
20+ DIY Paper Flower Ideas That Look Amazingly Real

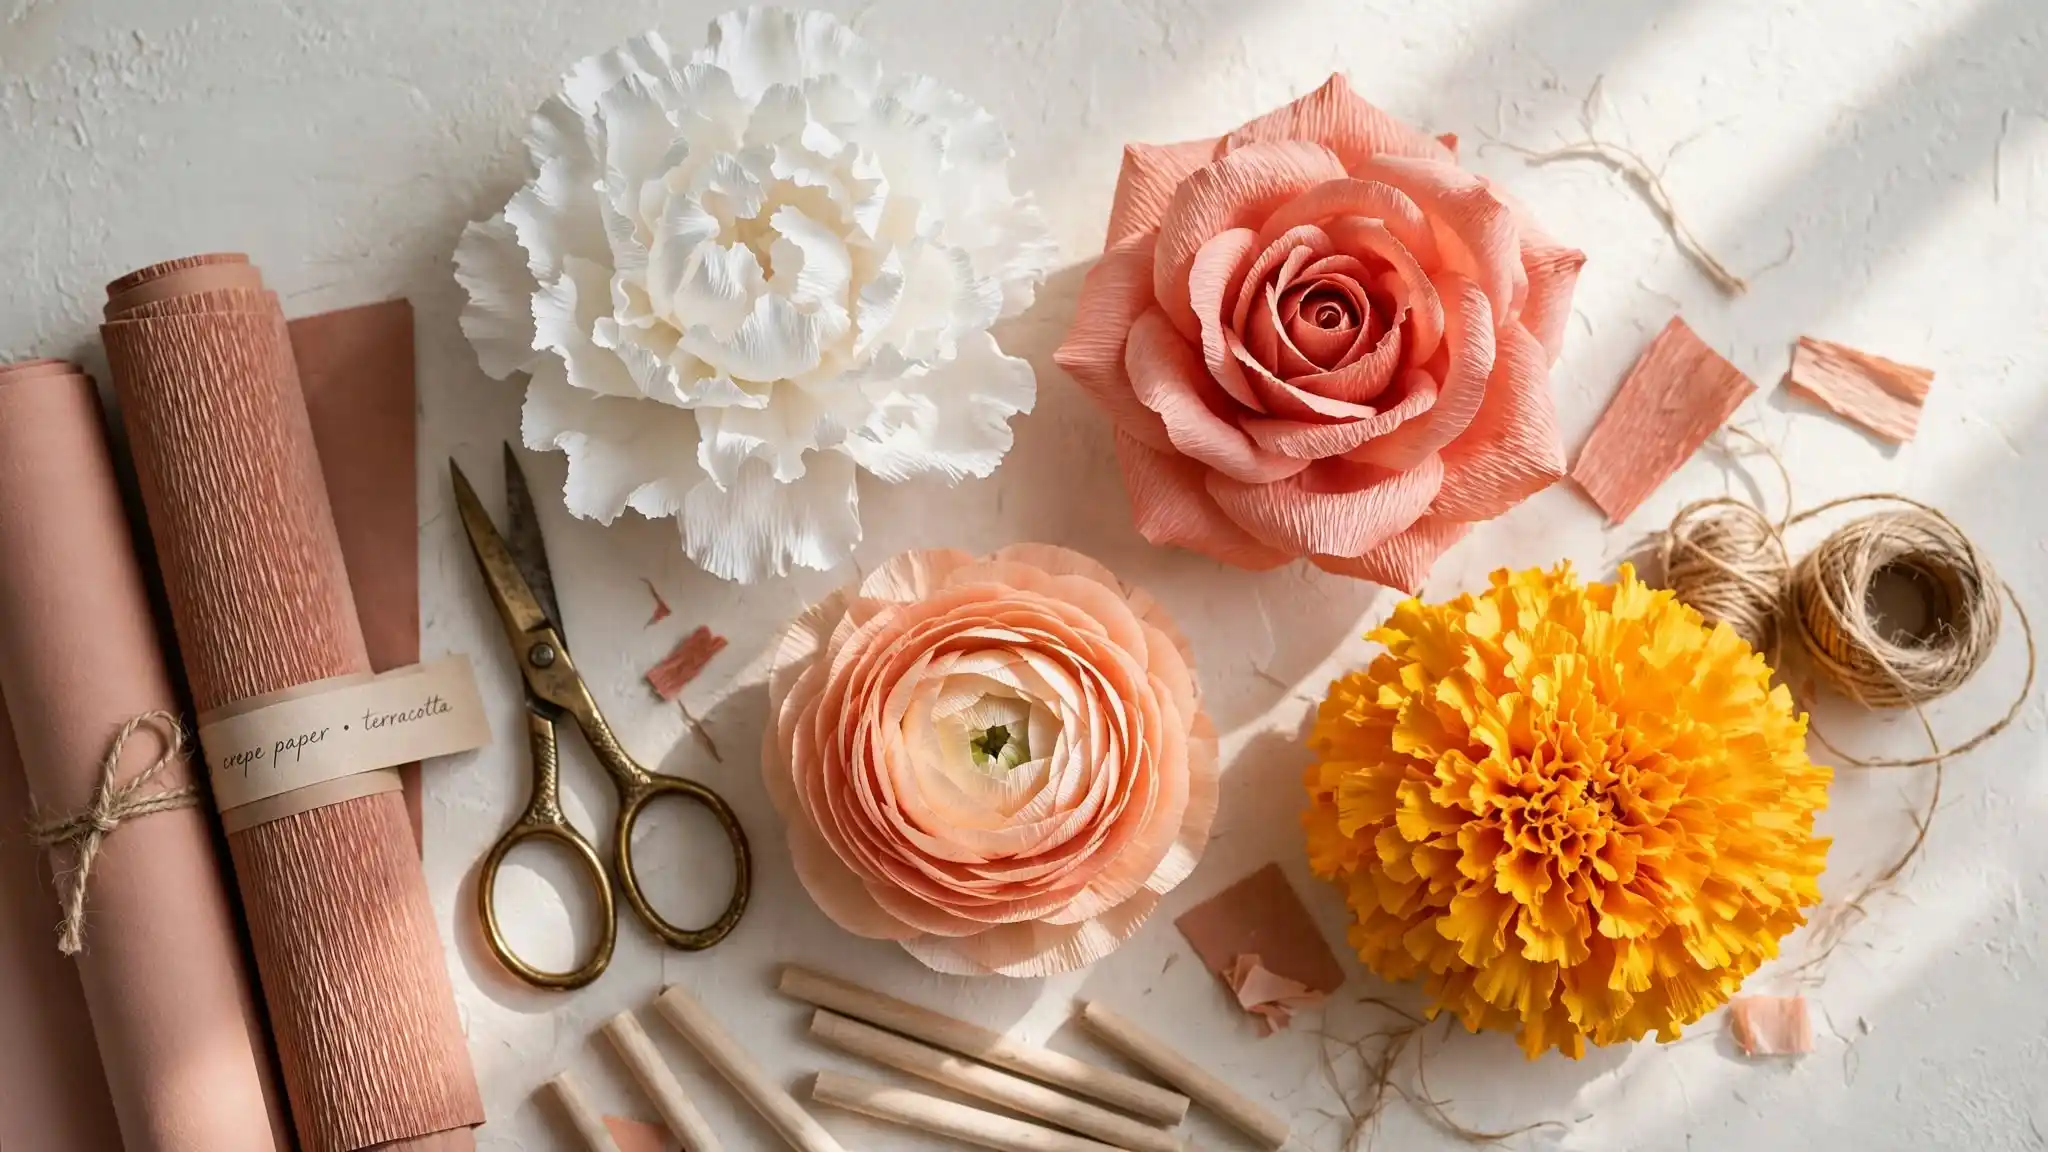
Ever wished you could fill your home with lush, peak-season blooms that never wilt, drop petals, or need a drop of water? Crafting realistic paper flowers is the ultimate secret to permanent botanical elegance—no green thumb required.
From deep-cupped white peonies and ruffled garden roses to textured marigolds and delicate jasmine buds, simple crepe paper and pastels can recreate nature’s finest details.
Get ready to build jaw-dropping, hyper-realistic arrangements your guests will reflexively lean in to smell.
1. Master the Ruffled Peony Look with Heavy Crepe
paper.lene
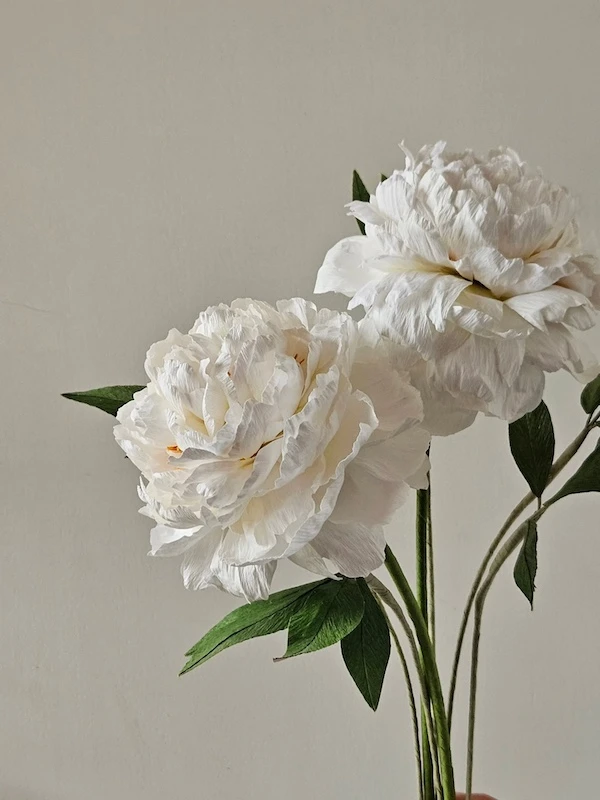
The secret to these incredibly lifelike white peonies isn’t just the sheer number of petals—it is the choice of paper.
Using a heavy-weight crepe allows for deep stretching and cupping without tearing, which creates that signature cabbage-like volume you see here.
Notice the subtle warm tint at the very center of the blooms.
Adding a tiny touch of soft yellow or peach pastel to the base of the innermost petals before assembling makes the stark white paper feel organic and dimensional.
Once the heavy bloom is built, pairing it with dark, textured paper leaves grounds the ethereal white flowers and adds a beautiful, moody contrast.
Aggressively stretching the center of each petal with your thumbs creates the deep, realistic cupping.
A light wash of warm pigment at the base of the inner petals adds natural, shadow-like depth.
Thick floral wire wrapped tightly in dark green floral tape ensures the heavy, oversized blooms stay upright.
2. Flare Outer Petals for Classic Garden Rose Realism
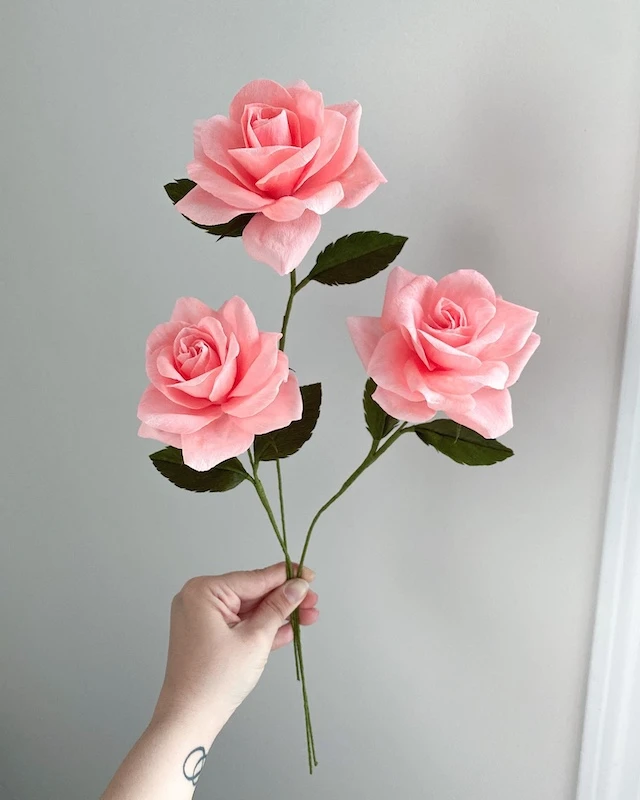
Achieving that high-end florist look comes down to curling the outer petal edges back over a wooden dowel or bone folder before gluing.
Building outward from a tight central spiral in soft coral-pink crepe paper creates a soft, newly-opened effect as the layers expand.
Positioning small, serrated olive green leaves immediately below the bloom base conceals exposed glue lines while mirroring natural rose calyces.
Gathering three stems together at varied heights gives the bouquet organic visual weight without needing extra filler stems.
3. Sculpt Fringed Centers and Organic Stem Curves for Wild Poppies
min.ven.kir
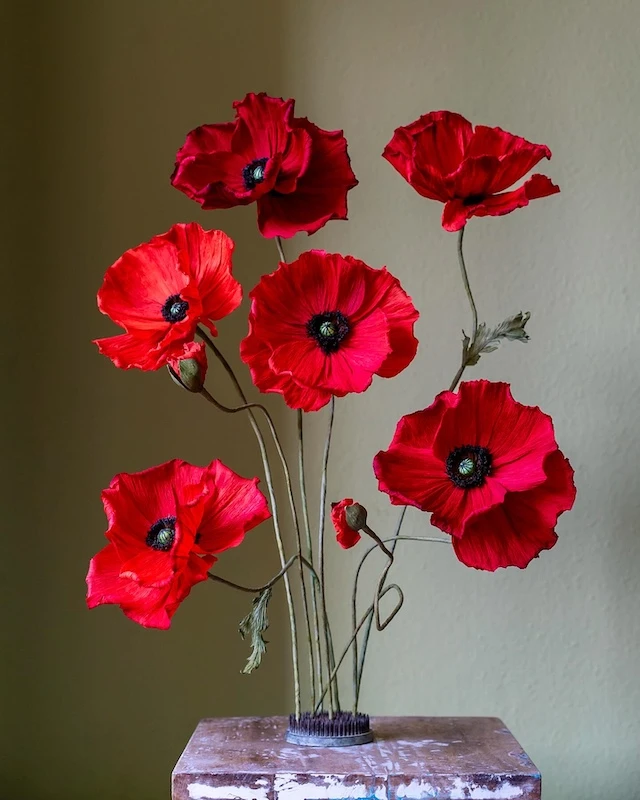
Deep scarlet poppies command attention when you pair their wide, tissue-thin petals with ultra-detailed dark centers.
Crafting a realistic center requires two distinct layers: a tiny, ridged green seed capsule glued right in the middle, encircled by a dense fringe of fine black paper stamens.
Rather than forcing stems straight up, bend your floral wires into sweeping, organic curves that mimic wild field poppies.
Adding a few small unopened buds on delicate curlicue stems creates immediate botanical authenticity, while anchoring the arrangement in a weighted metal flower frog (kenzan) provides an artful, minimalist presentation.
4. Layer Dense Quills for an Ultra-Full Chrysanthemum
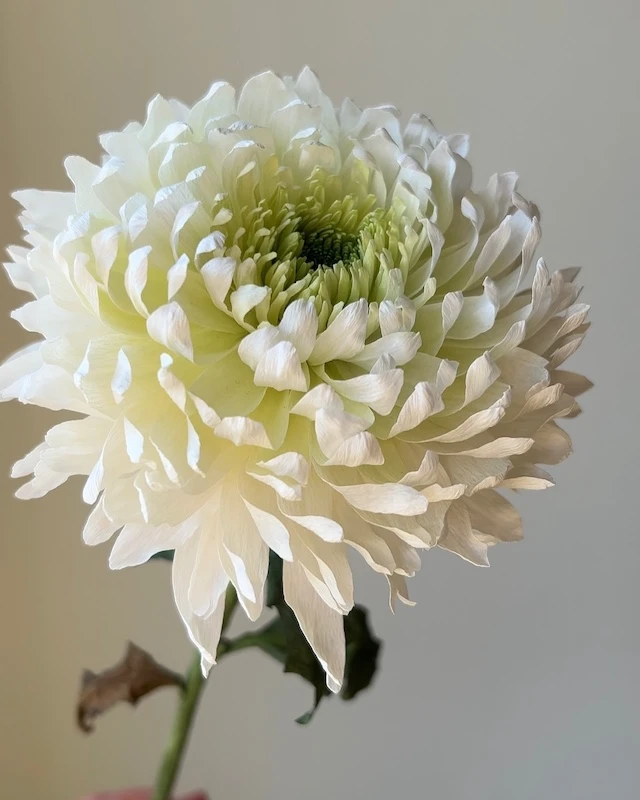
blomsterklip
Building a full-headed chrysanthemum requires hundreds of slender, inward-curling petals arranged with precision.
The secret to this bloom’s captivating realism is the subtle ombre transition: start at the core with tightly packed lime green quills, soften into a faint chartreuse wash, and finish with dramatic ivory-white outer layers.
To achieve that seamless spherical shape, pre-curl each individual paper strip with a bone folder before gluing.
Lightly scraping the underside curves the paper inward, creating a natural cupped guard around the tight center eye.
Roll tightly fringed lime green paper around a floral wire to form a dense, button-like inner center.
Run fine paper strips gently across a bone folder or dull blade to set an inward C-curve before mounting.
Glue petals in alternating, staggered rows, increasing petal size as you move toward the outer stem base.
5. Shade Petal Tips with PanPastel for Soft Gradient Depth
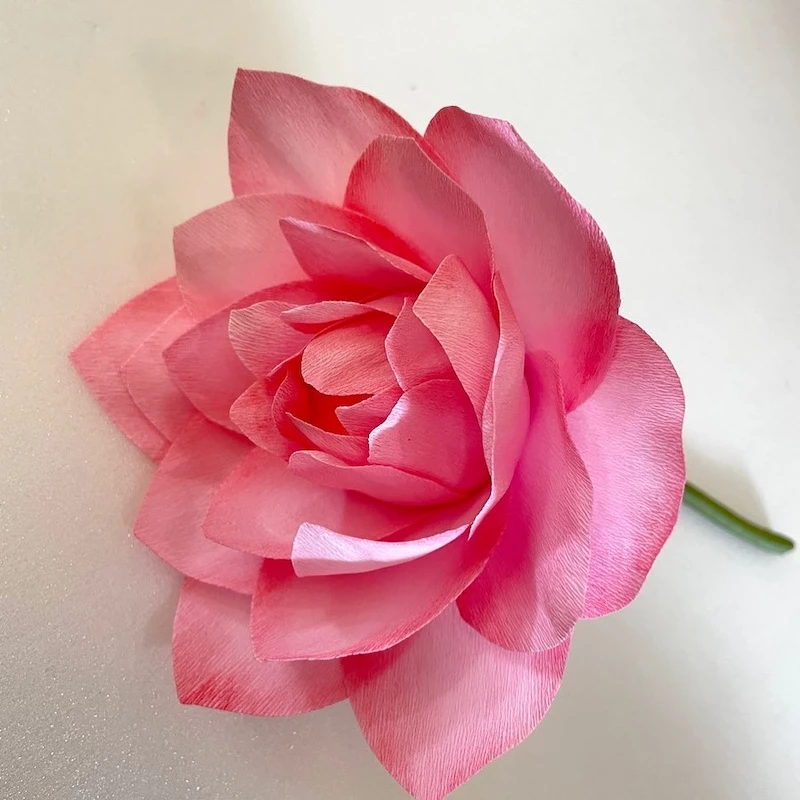
Soft gradient color transitions give pointed lotus petals an unmistakable porcelain sheen.
Dusting the top outer edges of fine crepe paper with soft pink pastels or alcohol-based pigments before assembly creates dimensional shadow without saturating the paper’s natural grain.
Gently pinch each petal tip into a sharp point while cupping the center outward.
Layering these triangular shapes from a tight inner cup into broad, star-like outer rows leaves you with a remarkably crisp, elegant silhouette.
Apply chalk pastels with a dry makeup sponge prior to stretching paper.
Pinch each petal tip sharply to accentuate the lotus-like geometric structure.
Spraying liquid paint directly, which relaxes and flattens fine crepe ridging.
Using wet white glue on delicate outer edges where water bleeding can occur.
6. Paint Fine Veins and Build 3D Orchid Columns
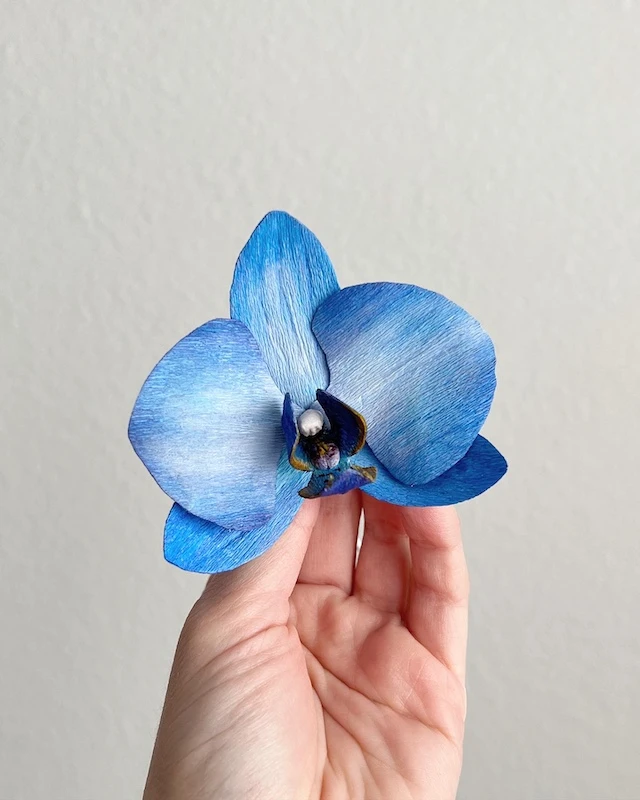
yiyagami
Crafting realistic blue Phalaenopsis orchids relies on combining subtle streak painting with an intricate 3D throat.
Layering light blue crepe paper with dry-brushed cobalt pigment along the vertical grain creates natural botanical striations that draw the eye inward.
The true focal point is the center labellum and column.
Shaping a tiny, cupped center piece painted in dark violet with bright yellow-speckled throat details grounds the vibrant blue petals and gives the bloom believable architectural depth.
Use a dry, stiff brush or colored pencil along the paper grain to create crisp feather-like vein lines without saturating the paper fibers.
7. Wrap Sunset-Gradients for Architectural Calla Lilies
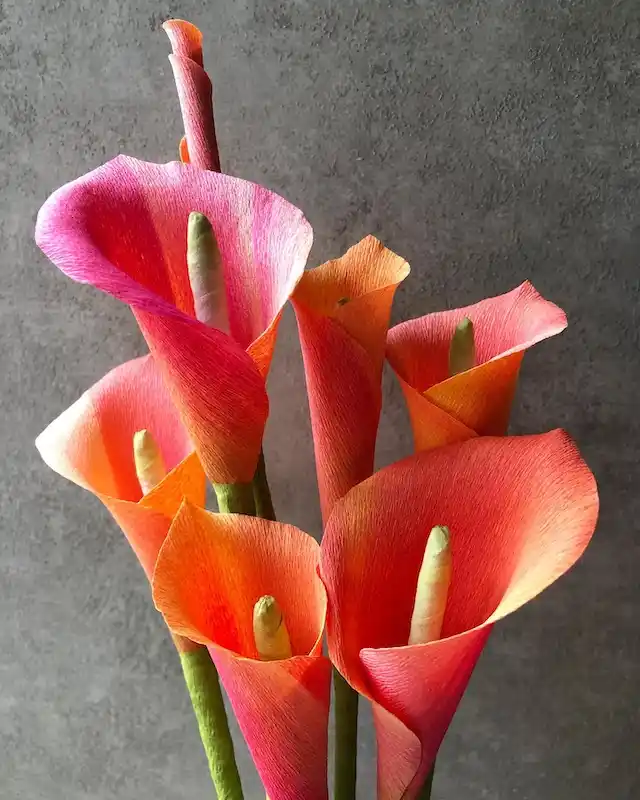
Seamlessly wrapping a single sheet around a central spadix gives calla lilies their sleek, sculptural architecture.
The magic in this bunch comes from blending vivid magenta and sunset orange onto a single piece of heavy crepe paper prior to rolling the flower into shape.
Before rolling the spathe around the core, cup the top rim outward while twisting the pointed tip slightly backward.
Wrapping a thick floral wire in smooth light green paper creates the central spadix, giving the vibrant trumpet a grounding focal point that mimics live botanical specimens.
| Styling Feature | Execution Detail |
|---|---|
| Color Blend | Magenta top edge fading into warm coral-orange base. |
| Spathe Shape | Funnel-wrapped sheet with a backward-curled peak point. |
| Inner Spadix | Pale olive green clay or tightly paper-wrapped wire core. |
8. Cluster Delicate Cherry Blossom Branches with Fine Filaments
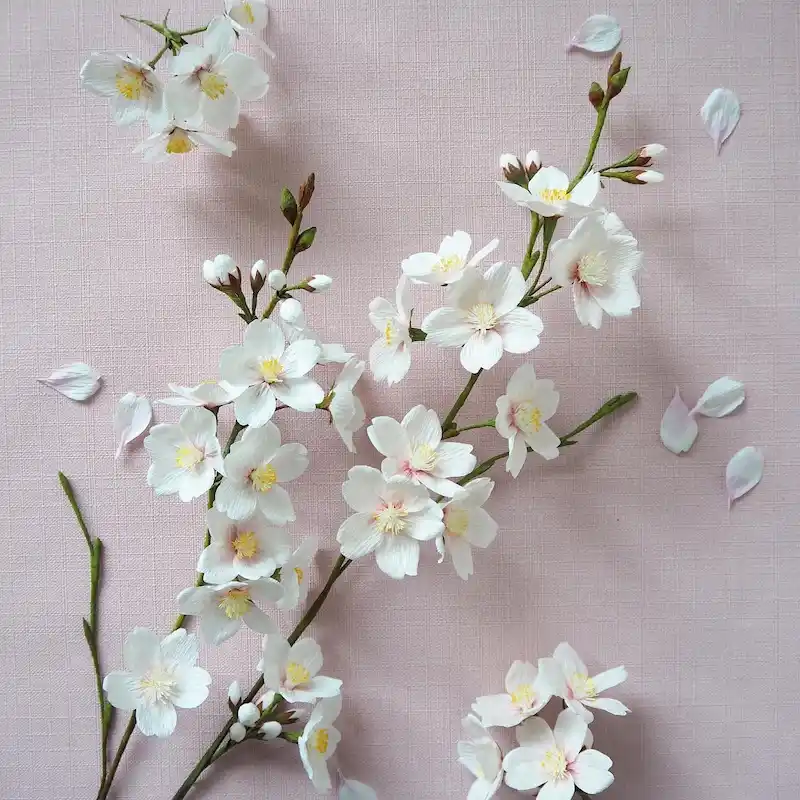
Capturing the fleeting elegance of cherry blossoms demands extreme attention to micro-details like fine thread stamens and papery brown calyxes.
Notice how each individual blossom features a subtle blush pink gradient spreading from the center, framed by a delicate halo of white filaments tipped in pollen-yellow.
Instead of mounting large standalone flowers, build small clusters of two to four blooms along slender wire branches.
Adding unopened, reddish-brown teardrop buds at the tips of the stems creates believable spring growth, while scattering a few loose, notched petals across your display area brings a poetic, botanical realism to the arrangement.
9. Frame Saturated Magenta Camellias with Heavy Foliage
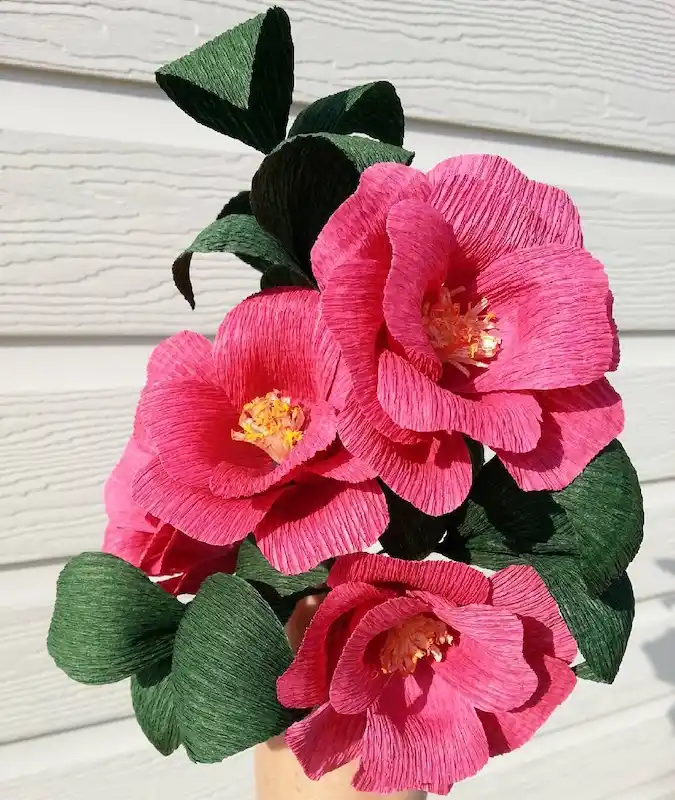
krummy_
Rich magenta camellias rely on deep texture and high-contrast foliage to feel truly realistic.
Using extra-heavy 180-gram crepe paper gives broad petals the structural stiffness required to hold a deep, cupped curve without sagging under their own weight.
The secret to making these bold blooms pop is in the surrounding greenery.
Cutting leaves from dark forest green crepe paper and scoring a crisp center crease gives them a leathery, evergreen weight that grounds the vibrant pink petals.
A dense cluster of yellow-tipped stamens nestled in the center finishes off the classic camellia profile.
Heavy 180g paper holds deep structural petal curves, giving bold camellias a realistic, leathery texture that matches live evergreen shrubs.
10. Roll Fringed Centers for Crisp White Cosmos
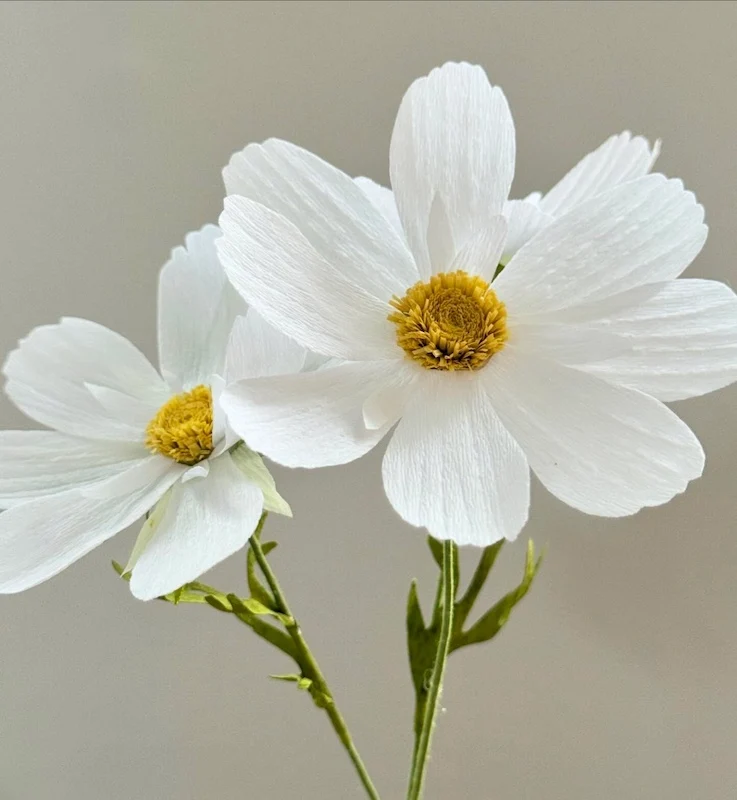
flowersby_kf
White cosmos thrive on crisp contrast: broad, delicately scalloped petals radiating from a dense, textured yellow disc center.
Achieving that signature cushion eye requires snip-cutting razor-thin fringes into a narrow strip of golden paper, then rolling it tightly around your stem wire to create a compact button floret.
For the outer petals, cut individual white strips with subtle triple-notched tips.
Gently cup the center of each petal along the grain to give them a soft wind-swept curve before adhering them in a clean, alternating radial layer directly beneath the yellow core.
Snip 1mm fringes along a 10cm strip to form the dense disc core.
Trim top edges with three tiny rounded ridges for natural bloom edges.
Attach 5 small pointed green sepals tucked tight under the petal base.
11. Assemble Tapered Lilac Panicles with Micro Florets
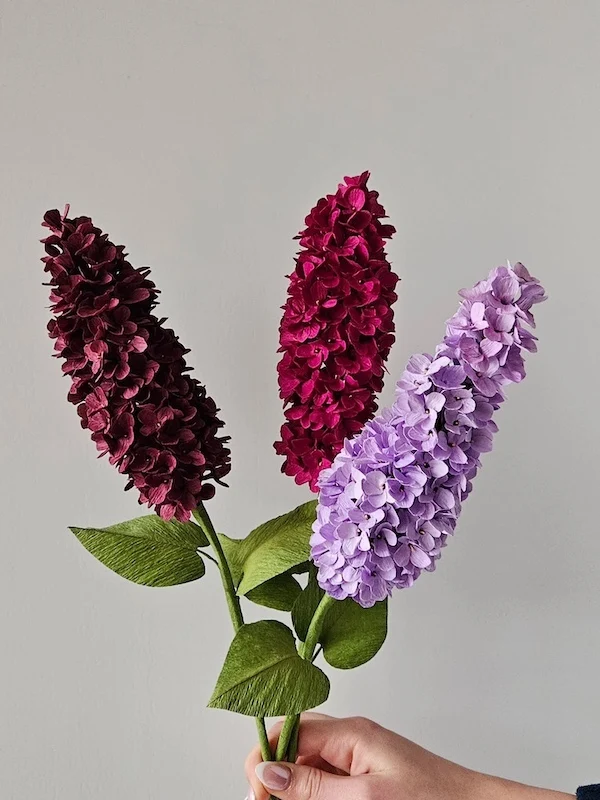
paper.lene
Constructing realistic lilac stems requires micro-assembly and patience.
Each lush, conical flower head is built by attaching dozens of tiny four-petaled florets to a tapered stem wire.
Start with tiny unopened teardrop buds at the top tip, gradually transitioning to fully open, star-shaped blossoms as you work your way down.
Grouping stems in a range of rich tones—from dark plum burgundy to bright magenta and soft lavender—adds instant depth and visual harmony.
Anchor the top-heavy flower spikes by attaching broad, heart-shaped leaves at the base, scoring deep center veins to mirror natural foliage.
12. Sculpt Weathered Bark and Cupped Plum Blossoms
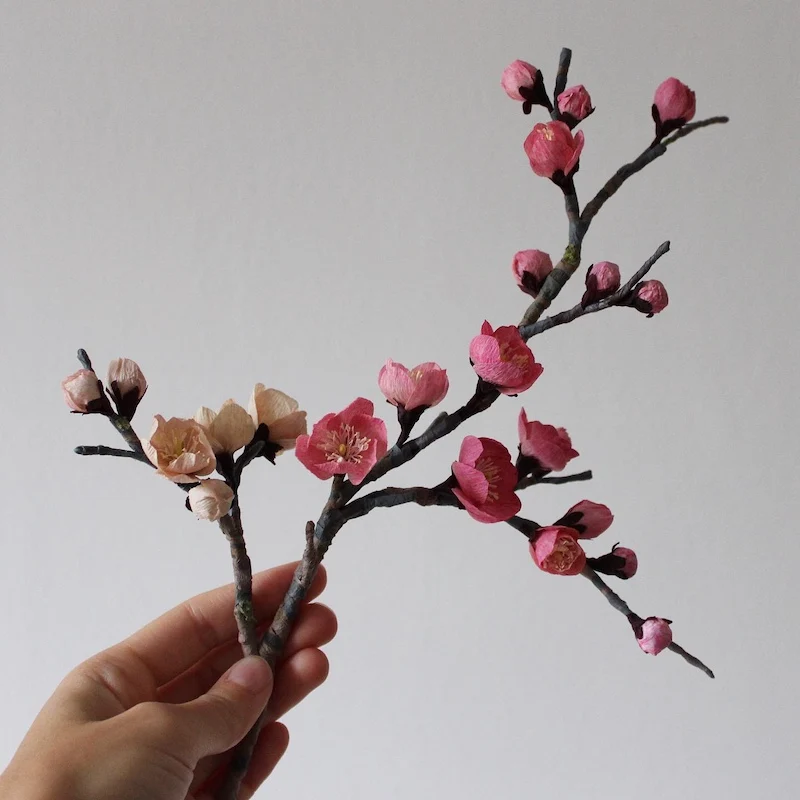
Recreating winter plum or peach branches relies on the dramatic contrast between delicate, cupped petals and rough, aged wood.
The key to capturing their wild elegance is building gnarled, angular stem structures with variable branch thickness rather than straight, smooth wire stems.
To give stems authentic botanical age, wrap thick floral wires in dark charcoal-brown floral tape, occasionally layering papier-mâché or thick paper paste at stem junctions to form knobby nodes.
Snip deep burgundy cup-shaped sepals to hug every bud base, then finish the branches with subtle dry-brushed moss green highlights to mimic wild lichen growth.
Wrap twisted wires in dark brown tape, then dry-brush with charcoal paint and moss green pigment for textured bark.
Encase every bud and flower base in tiny dark maroon sepals to form authentic, knobby flower nodes along the stems.
13. Layer Contrasting Foliage for a Sculptural Paper Wreath
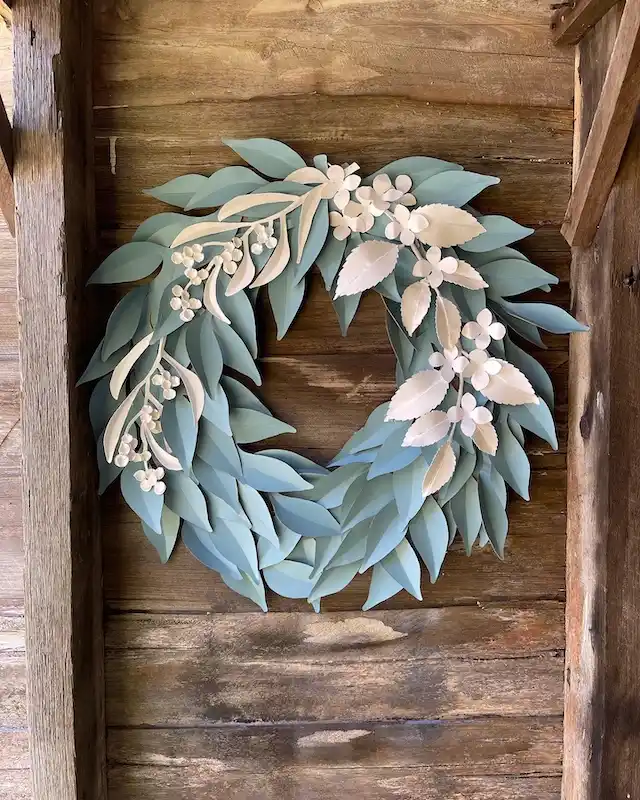
Creating a modern paper wreath relies on depth, color contrast, and intentional asymmetry.
Instead of spreading blooms evenly around the entire circumference, anchor your design with a dense base of smooth slate-blue eucalyptus leaves, then cluster stark white accents along one side to create a dramatic focal sweep.
To prevent the flat paper from looking lifeless, score a central crease down every leaf and gently fold the sides upward before gluing.
Mixing smooth-edged base leaves with serrated white foliage and delicate five-petal florets adds rich texture that catches light and shadow beautifully against natural wood backgrounds.
14. Build Concentric Fringed Discs for a Textured Sunflower Core
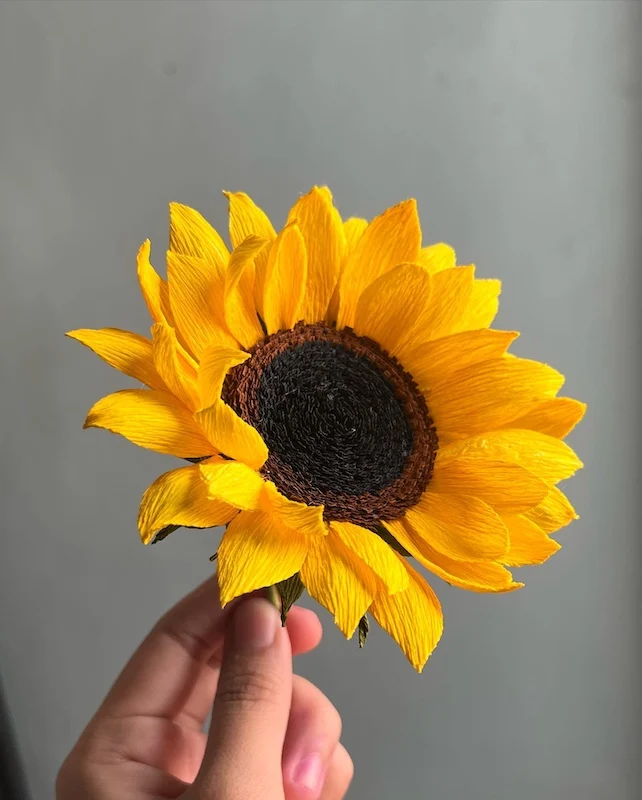
paperukka
The striking presence of a crepe paper sunflower relies on the depth and texture of its large central disc.
Instead of using a flat single-color core, build a two-toned seed head by wrapping a tightly fringed strip of charcoal-black crepe paper first, followed immediately by an outer ring of warm chocolate-brown fringed paper to mimic natural florets.
To give the vibrant yellow ray petals their dynamic, sunburst appearance, cut two distinct sizes of pointed petals.
Gently stretch the center of each petal along the crepe grain to form a slight bowl shape, then stagger the rows so the outer petals peek through the gaps of the inner layer.
15. Stack Tiered Tissue Layers for Whimsical Unicorn Centerpieces
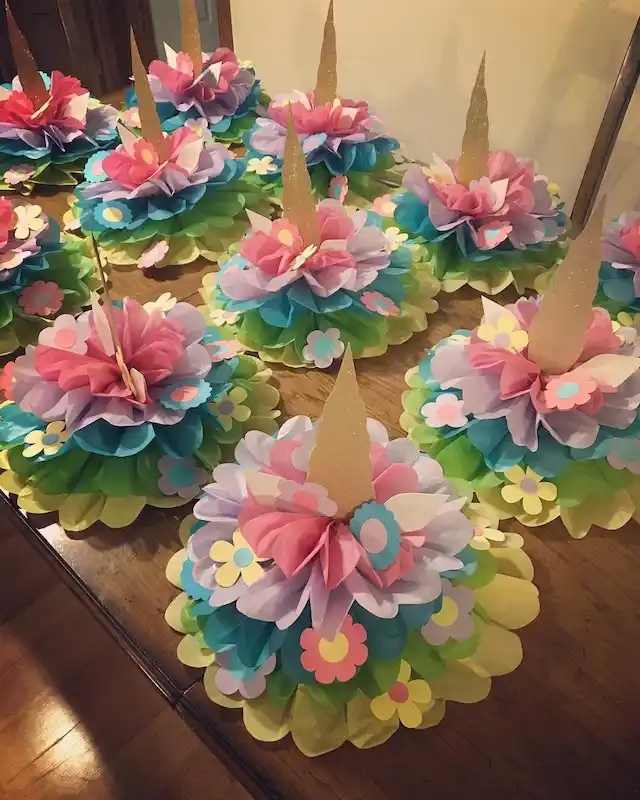
Crafting high-impact party centerpieces relies on building dimension through contrasting paper textures and stacked pastel gradients.
Rather than assembling a single pom-pom, layer concentric accordion-folded tissue paper circles—moving from wide chartreuse bases up through aqua blue, lavender, and rich bubblegum pink.
Anchor the top center with a tall, tapered horn cut from glitter gold cardstock, framed by small white and pastel ear cutouts tucked into the ruffled crown.
Scattering flat, multi-colored floral die-cuts along the lower paper ridges breaks up monochromatic bands and connects the magical motif throughout the entire base.
16. Swirl Concentric Layers for a Spiral Ranunculus
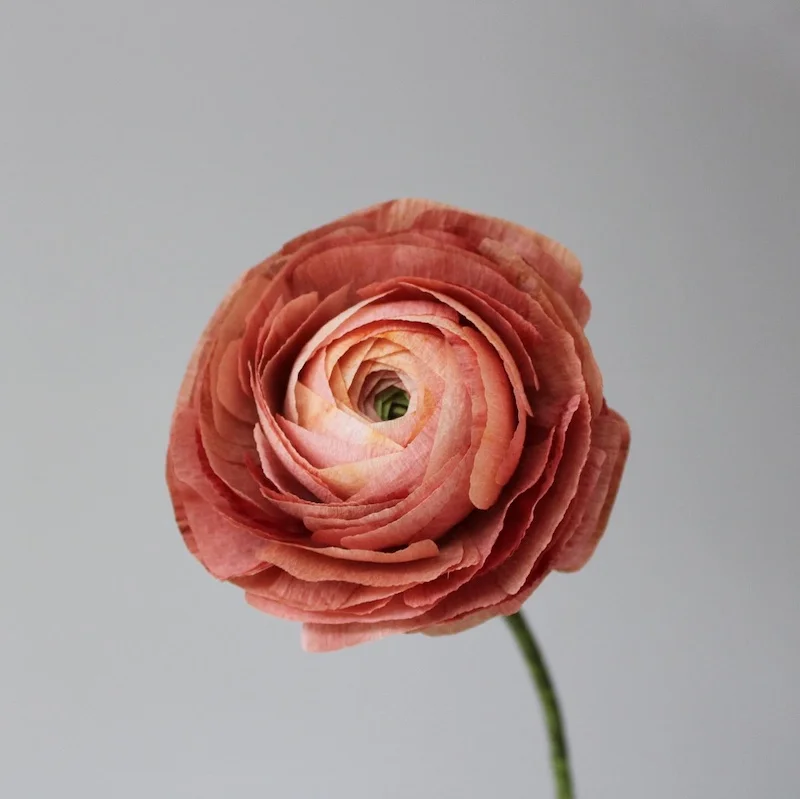
Capturing the delicate geometry of a paper Ranunculus requires spiraling dozens of paper-thin, tightly cupped petals around a tiny green eye.
The secret to its lifelike depth is a seamless ombre gradient—softly transitioning from pale apricot-peach at the innermost folds to a rich terracotta-rose along the outer rim.
Shape each micro-petal with a subtle, shallow cup along the grain.
Glue the smallest petals tightly folded inward around the central core, then overlap each successive layer by half its width as you expand outward to build that iconic, spherical buttercup rosette.
17. Cluster Micro-Florets into Voluminous Hydrangea Spheres
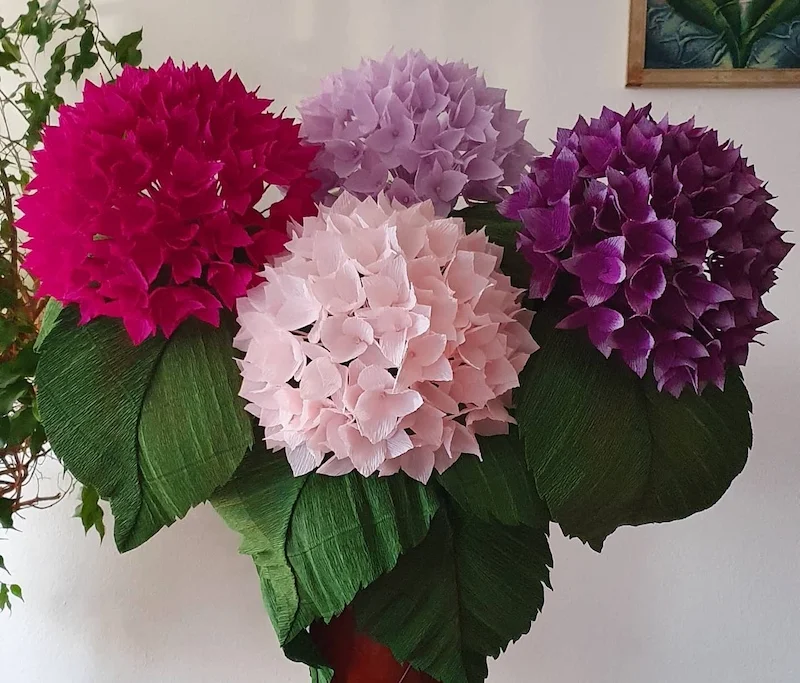
Achieving the lush, mophead volume of paper hydrangeas relies on assembling dozens of individual four-petal florets into a seamless spherical dome.
Grouping vibrant jewel tones—such as magenta, soft lavender, blush pink, and rich royal purple—creates a striking, full-bodied arrangement where every blossom head catches the light from different angles.
To ground these dense floral clusters, frame the base of the bouquet with oversized, heavy-grade crepe leaves in deep forest green.
Scoring pronounced vertical grain into the leaves gives them the structural rigidity needed to support the massive flower heads visually and physically.
18. Fringe and Ruffle Dense Layers for Marigold Pom-Poms
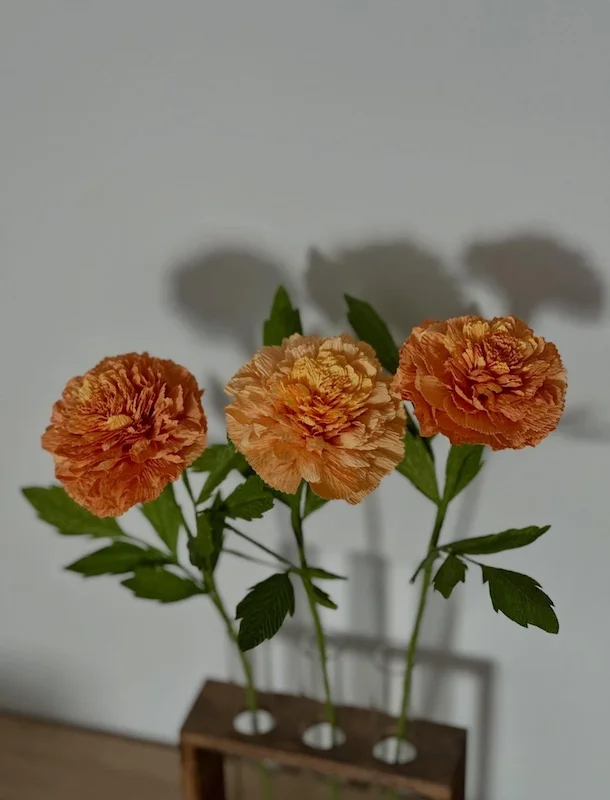
tesh_flowers
Recreating the rich, pom-pom volume of marigolds relies on tight micro-fringing and dense radial gather techniques.
Cutting fine serrated fringe into strips of crepe paper before spiraling them around a core creates thousands of ruffled petal tips that puff outward into a solid spherical bloom.
To achieve natural botanical depth, transition color shades from a bright golden-yellow center out to a warm apricot-orange perimeter.
Finish the slender floral stems with deeply notched, multi-lobed foliage in rich forest green to offset the dense, vibrant flower heads.
19. Wrap Tight Teardrop Buds for Delicate Jasmine Clusters
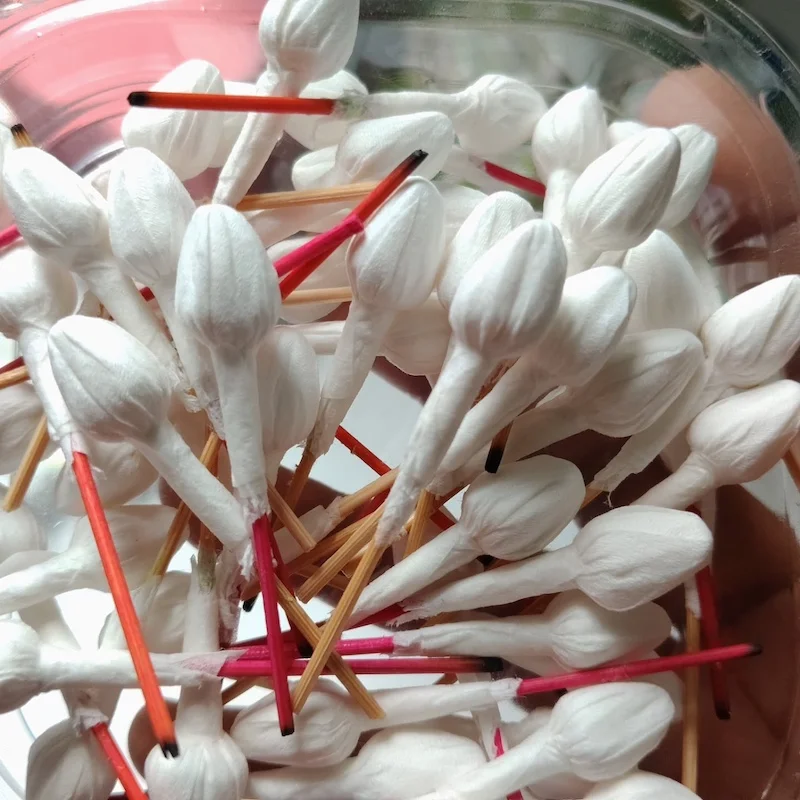
Crafting realistic paper jasmine buds (Jasminum sambac or mogra) relies on shaping compact, unopened teardrops with crisp, twisted apexes.
Rather than cutting individual petals, wrap fine white crepe paper tightly over a small cotton or paper core to achieve that smooth, swollen pre-bloom form.
To replicate traditional fresh-flower garlands and sprays, mount each bud onto a thin wooden stalk or floral wire stem.
Detail the base of the calyx with a splash of vibrant coral or crimson ink, creating a sharp color contrast that makes the pristine white paper buds pop when strung or bunched together.
20. Shape Reflexed Edges and Variegated Tones for a Full Rose
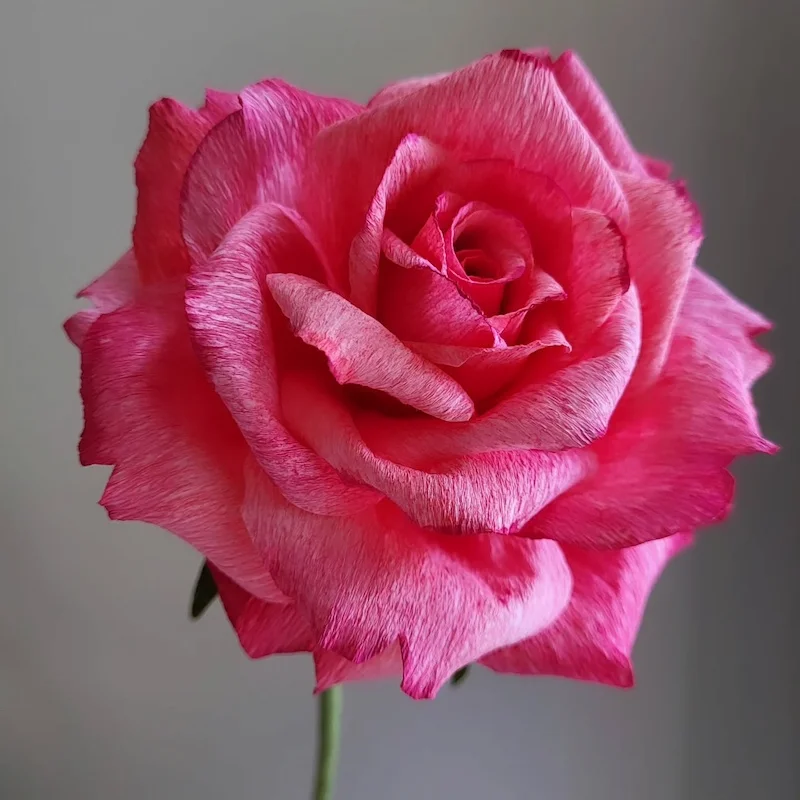
Capturing the romantic grandeur of a garden rose in full bloom depends on dramatic petal curling and gradient color depth.
Using fine-grain crepe paper with natural vertical striations—or tinting petal edges with soft pastels—replicates the subtle tone shifts from rich magenta margins to soft rose-pink centers.
To achieve realistic bloom dynamics, shape each petal using a two-step method: stretch the center to form a deep, accommodating bowl, then use a wooden dowel or skewer to roll the top edges back into crisp, reflexed rims.
Assemble the flower by wrapping the tight inner bud petals spirally around a central core, progressively loosening the spacing and angling outer petals outward to mimic natural opening.
21. Serrate Pink Edges and Gather Ruffled Discs for Vintage Carnations
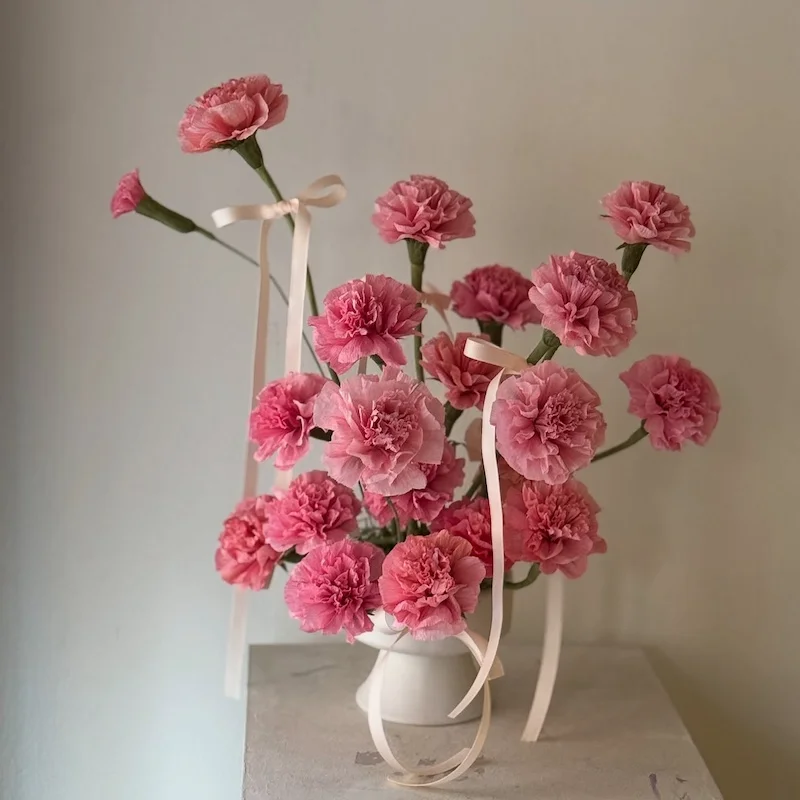
from_ylang
Recreating the classic frilly texture of crepe paper carnations depends on trimming crisp, serrated edges along circular paper layers.
Cutting fine zigzag notches around each petal disc—or using mini pinking shears—gives the layers the iconic scalloped silhouette characteristic of Dianthus blooms.
To form the dense, ruffled bloom, stack several notched paper discs, fold them into tight quarters, and pinch the lower point to gather the ruffled edges outward.
Secure these gathered clusters tightly inside a long, smooth trumpet-shaped calyx.
Accentuate tall, slender stem wires with soft blush ribbon bows to complete a soft, vintage floral arrangement.
22. Stack Star-Shaped Whorls along Tall Spires for Yellow Loosestrife
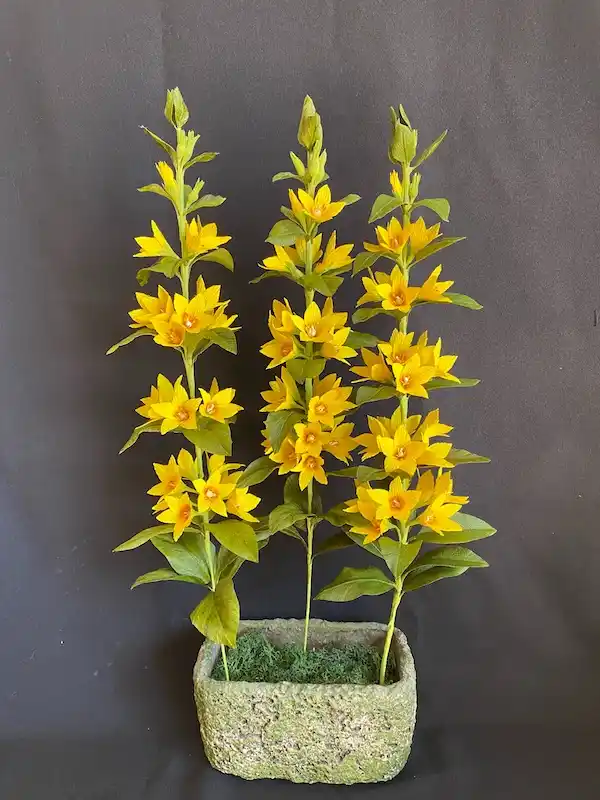
Capturing the dramatic vertical silhouette of yellow loosestrife (Lysimachia vulgaris) depends on stacking tiered whorls of star-shaped, five-petal blossoms around a central stem wire.
Cut vibrant golden-yellow crepe paper into sharp, five-pointed florets, gently stretching the center of each petal to form a subtle bowl while accentuating the core with tiny orange-tinted stamen filaments.
Build the tall spires from the apex down, starting with tight, lime-green bud clusters at the top tip.
Work downward by layering multi-flower rings nestled within pointed leaf bracts, expanding the size and density of the blooms as you descend.
Anchor several stems together in a moss-filled planter to highlight their elegant, column-like garden structure.